Once you have created a report in QuickDesigner, you can share it with other users by saving it on the server and inserting it into the Organizer. You can also export the report in a number of formats onto the client to save locally or print.
To save a QuickDesigner report, click the ![]() Save button in the toolbar. A dialog will open in a new window.
Save button in the toolbar. A dialog will open in a new window.
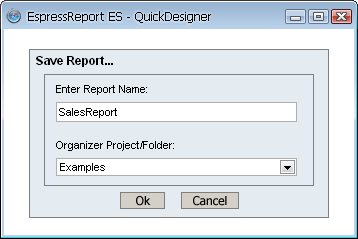
Save Dialog
The first option allows you to specify a name for the report. The report will be saved with a .qrp extension in the /ReportFiles/ directory of your ERES installation. The QuickDesigner report format (.qrp) can be also open in the Report Designer interface. However, only files with a .qrp extension can be re-opened with the QuickDesigner interface. If you make changes to a QuickDesigner report using the Report Designer interface, a new template will be saved with a .pak extension (so if you have once modified a QuickDesigner report in the Report Designer, you cannot re-open it in the QuickDesigner anymore).
The drop-down list at the bottom, contains all the Organizer projects and folders you have access to. Select the project or folder you where you would like to place the report.
Once you have finished specifying options, click the button to save the file.
Note that all saved files will include the userID and the timestamp in addition to the name you have provided. If an organizer item with the supplied name exists in the folder, you will given a choice to override the existing item or create a new entry. If you wish to save the changes in the existing report that you have opened, then do not change the report name and the Organizer folder in the Save Report dialog and the report file will be updated.

Report Overwrite Dialog
You can also export the report back out to the client in a variety of file formats. To export the report, click the ![]() button on the toolbar. A dialog will open in a new window prompting you to specify export options.
button on the toolbar. A dialog will open in a new window prompting you to specify export options.
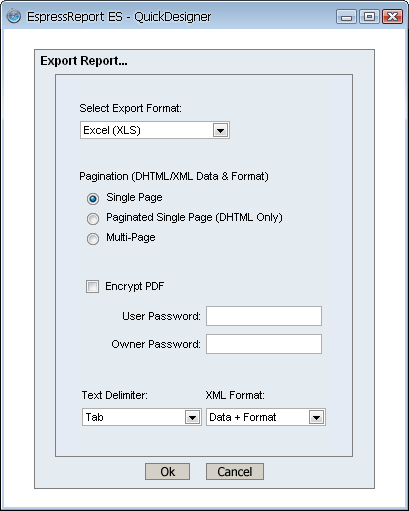
Export Report Dialog
The first option in the dialog allows you to specify in which format you would like to export the report. Available options are PDF, CSV, Excel (XLS), Excel 2007 (XLSX), DHTML, text, XML, and rich text.
Other options allow you to set single or multi-page export for DHTML and XML exports. For PDF export you can enable encryption. For text export you can select the delimiter to be used and for XML export you can select whether to export only the report data, or to export an XML description of the report and data.
For more information about the export formats and options, please see Section 3.5.2 - Exporting Reports.
Once you have finished specifying options for the exported report click . A new window will open containing the exported report. The toolbar is active on this window allowing you to save the generated file to the local system, or to print the report locally.
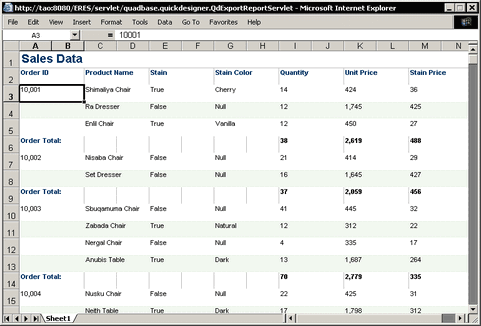
Generated Report
For paginated exports, such as PDF and rich text, you may want to change the page layout and margins. To adjust these properties, click the ![]() button on the QuickDesigner toolbar. A dialog will open in a new window.
button on the QuickDesigner toolbar. A dialog will open in a new window.
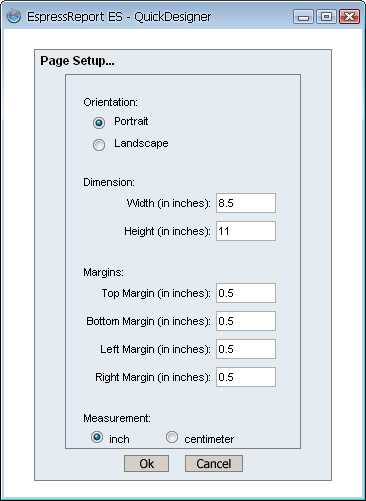
Page Setup Dialog
In this dialog you can set the page orientation (landscape or portrait), the page dimensions (height and width), and the page margins. Once you have finished, click the button and the settings will be saved.
For large reports, in other words, reports longer than a page, the option to show it as a single page or multiple pages is available. To adjust these properties, click the ![]() button on the QuickDesigner toolbar. Expanding and collapsing controls can also be selected in this dialog. The initial presentation of the report (whether collapsed completely, expanded completely or expanting to a particular group level) as well as grouping animation (fading in and out the group as it is expanded and collapsed) can also be selected. Note that the expand and collapse controls can only be selected for Single Page exports and the controls will not appear if the section header/footer is empty.
button on the QuickDesigner toolbar. Expanding and collapsing controls can also be selected in this dialog. The initial presentation of the report (whether collapsed completely, expanded completely or expanting to a particular group level) as well as grouping animation (fading in and out the group as it is expanded and collapsed) can also be selected. Note that the expand and collapse controls can only be selected for Single Page exports and the controls will not appear if the section header/footer is empty.
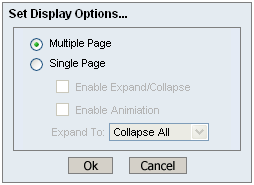
Page Display Dialog