Using Enterprise JavaBeans™ technology, developers can simplify the development of large enterprise applications. With EJB technologies, developers can rely on building business logic and allow the application server (EJB container) to manage all system level services.
When working in the Java EE™ environment, persistent data interfaces are provided by entity beans. Although the underlying storage mechanism might be a relational database, the application data model is the EJB and it may not be desirable to have a charting tool making redundant database connections. For this situation, EspressChart allows users to query data directly from an entity bean.
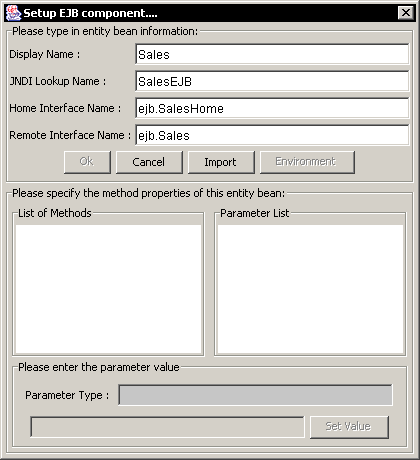
To add an EJB as a data source, the EJB must first be deployed in the application server and the client JAR file containing the appropriate stub classes must be added to your classpath (or the -classpath argument of the EspressManager.bat or EspressManager.sh file when using chart Designer). Select the EJBs node in the Data Source Manager and click the button. This will bring up a dialog allowing you to specify a display name and the connection information for the bean.

Add EJB Dialog
To connect to an EJB data source, you must provide the JNDI lookup name for the bean (this is specified when you deploy the bean). For EJB 1.1 users, specify the name for the home interface and the remote interface. For EJB 2.0 users, specify the local home interface and the local interface. Once you specify all the information, click the button, which will analyze the home interface and retrieve all of the finder methods. Any methods found will be populated in the List of Methods section in the dialog.
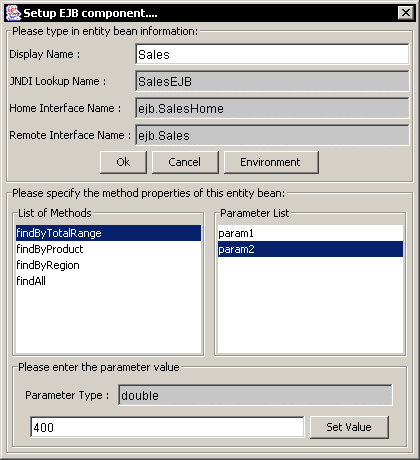
The same dialog can be used to filter the data being retrieved based on parameters that are present in the finder methods. When you select a method in the left dialog, any parameters present will appear in the Parameter List section. You can then click on a parameter to set its value.

Specifying EJB Parameter Values Dialog
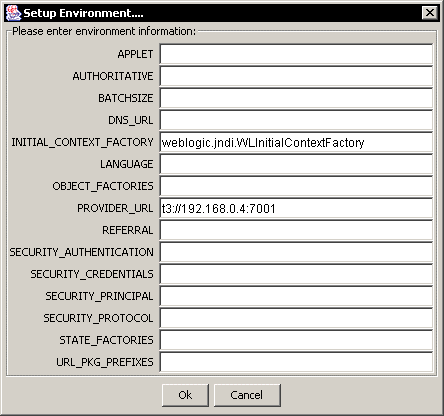
When you select a parameter, the data type of the parameter will appear in the lower portion of the window. Below that you will be able to specify a value for the parameter. Be sure to enter a correct value for the data type and then click the button. This will fix the parameter values. Once you finish setting up all parameter values, click the button. This will bring up a new dialog allowing you to specify environment properties for your application server. This information is necessary for EspressManager to connect to the EJB.

EJB Environment Setup
The fields here are the available environment properties for the JNDI context interface. You don't have to specify all values, only the information necessary for your environment (application server). Once you finish specifying the environment variables, click the button. You will be returned to the EJB setup window. Click again to finish setting up the EJB data source. A new node will appear under EJBs with your EJB.
You can modify the parameter values by selecting your EJB source, and clicking the button.
There is a sample EJB data source included in the installation in help/examples/DataSources/EJB directory. The directory contains sales.ear and salesClient.jar files, as well as the source code for the Sales entity bean. The sales.ear file is designed to be deployed in Java 2 Reference Implementation and uses the Cloudscape database as the underlying storage mechanism. You can use SalesClient.java program to populate the Cloudscape database. The salesClient.jar file contains the stub classes to connect to the deployed Sales EJB and needs to be in the EspressManager classpath.