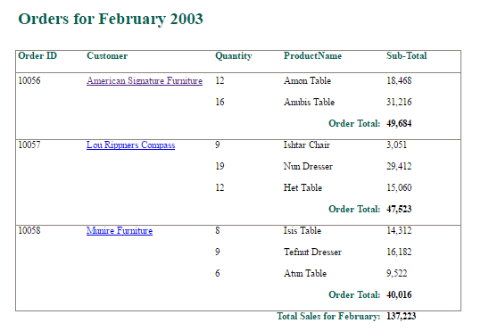
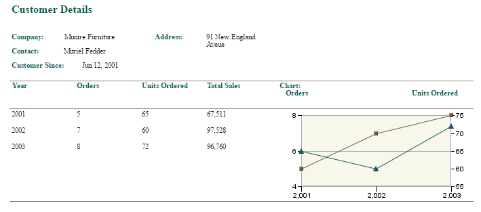
This section contains a series of short tutorials designed to illustrate some of the basic features of the Report API. For more details about any of the features described in this section, please see the Programming Guide portion of the documentation.
The code, given in this guide, has been created with the following in mind:
EspressManager is up and running;
Tomcat is being used as the servlet container and the web-server;
The MySQL Woodview database has been set up. The Woodview MySQL dump file named
"Woodview_mysql.sql"(without the double quotes) located in<EspressReport installation directory>/help/examples/DataSources/databasedirectory. Users can reload the dump flie to create a MySQL Woodview database in their environment. This is only necessary for users who wish to use the template with MySQL connection;
Any code given in this guide is also under <EspressReport installation directory>/help/quickstart/src directory and any java application class file will be under <EspressReport installation directory>/help/quickstart/classes directory. Any HTML files will be under <EspressReport installation directory>/help/quickstart/html directory. Similarly, any templates will be under help/quickstart/templates directory.
Most files doesn't have to be moved in order to run the tutorials. Instructions will be given in the few instances where the files have to be moved and/or modified.
In order to successfully use the QuickStart API Guide:
You will need to add
hsqldb.jarto the CLASSPATH in your EspressManager (Section Q.3.2.1.1 - Setup a JDBC Connection).You will need to add
ReportAPIWithChart.jar,barbecue.jar,javaws.jar,jsqlparser.jar,ReportDesigner.jar,qblicense.jarandExportLib.jarandhsqldb.jar(located in<EspressReport installation directory>/libdirectory) to your CLASSPATH. In addition, you will also needservlet.jar(located in<Tomcat installation directory>/common/libdirectory) in the CLASSPATH.The
ReportAPIWithChart.jar,ReportDesigner.jar,qblicense.jar,ExportLib.jarandhsqldb.jarmust also be added in the CLASSPATH of the Tomcat server.
Templates (referenced in this guide) that use a database as a data source, use the HSQL java database. There are alternate templates available for users who use the MySQL Woodview database. These templates can be found under <EspressReport installation directory>/help/quickstart/templates/MySQL directory. The templates will again follow the naming convention specified above along with "_mysql" (without the double quotes) before the ".rpt" (without the double quotes) extension.
Depending on the version of the Tomcat server you are using, the servlet context is defined in different ways:
In Tomcat 6.x or lower version, the servlet context
/servlet/may be commented out. Please check<Tomcat installation directory>/conf/web.xmland uncomment the following lines:<servlet-mapping> <servlet-name>invoker</servlet-name> <url-pattern>/servlet/*</url-pattern> </servlet-mapping>
and
<servlet>
	<servlet-name>invoker</servlet-name>
	<servlet-class>
		org.apache.catalina.servlets.InvokerServlet
	</servlet-class>
	<init-param>
		<param-name>debug</param-name>
		<param-value>0</param-value>
	</init-param>
	<load-on-startup>2</load-on-startup>
</servlet>
The block of statements is commented if there is <!-- at the beginning and --> at the end. So if the above blocks are commented out, please uncomment and restart your Tomcat server.
In Tomcat 7.x or higher version, the servlet, i.e., QuickStart423 in this example, needs be explicitly mapped in web.xml:
<servlet>
<servlet-name>QuickStart423</servlet-name>
<servlet-class>QuickStart423</servlet-class>
</servlet>

<servlet-mapping>
<servlet-name>QuickStart423</servlet-name>
<url-pattern>/servlet/QuickStart423</url-pattern>
</servlet-mapping>
The "classes" (without the double quotes) must also exist in your <Tomcat installation directory>/webapps/ROOT/WEB-INF directory. If the directory does not exist, please create it and restart your Tomcat server.
While running the code, you may see a message "Failed to read espressmanager.cfg. Use default host and port no. 22071." (without the double quotes). This is not an error message. This message simply states that espressmanager.cfg was not found and that it will look for and connect to EspressManager running on the same machine, as the code, and using port number 22071.
Please note that while EspressReport API can be used without EspressManager and in other application servers, the code in this guide was designed with EspressManager and Tomcat in mind. Please refer to the Programming Guide (Section 2.7.3 - Deploying without EspressManager and Section 2.5 - Servlets and Java Server Pages) to switch to other configurations.
The code has also been implemented with the idea that everything (i.e. EspressManager, Tomcat server, and the client) is on the same machine. The code is single-threaded and set to use the same machine for the client and server for demonstration purposes. You can generate multi-threaded code using EspressReport API in a multi-client server environment. To use it in a multi-machine environment, you will have to edit the code (and/or accompanying HTML files). Please refer to the Programming Guide (Section 2.7.2 - Deploying with EspressManager) for further details.
The following sections show how to run a pre-existing template (QuickStart42.rpt located in <EspressReport installation directory>/help/quickstart/templates directory) in an application, applet and servlet.
Each section shows the code to generate the report and any steps necessary to deploy.
The following code shows how to display an existing report template (in this case QuickStart42.rpt) in an application:
import java.awt.*;
import java.io.*;
import java.applet.*;
import quadbase.reportdesigner.ReportAPI.*;
import quadbase.reportdesigner.ReportElements.*;
import quadbase.reportdesigner.ReportViewer.*;
import quadbase.reportdesigner.util.*;
import quadbase.reportdesigner.lang.*;

public class QuickStart421 extends Applet {

	public static void main(java.lang.String[] args) {
		try {
			QuickStart421 doReport = new QuickStart421();
			Frame frame = new Frame();
			frame.setLayout(new BorderLayout());
			frame.add("Center", doReport.doQuickStart421(frame));
			frame.setSize(600, 600);
			frame.setVisible(true);
		} catch (Exception ex) {
			ex.printStackTrace();
		}
	}

	public void init() {
		setLayout(new BorderLayout());
		add("Center", doQuickStart421(this));
	}

	Component doQuickStart421(Object object) {
		// Connect to EspressManager
		QbReport.setEspressManagerUsed(true);
		// Create new Report object using specified report
		QbReport report = new QbReport(object,
				"help/quickstart/templates/QuickStart42.rpt");
		// Show the Report
		return (new Viewer().getComponent(report));
	}
}
The class file for the above source is located in <EspressReport installation directory>/help/quickstart/classes directory.
When the class file is run, the following report is shown using the command java QuickStart421:
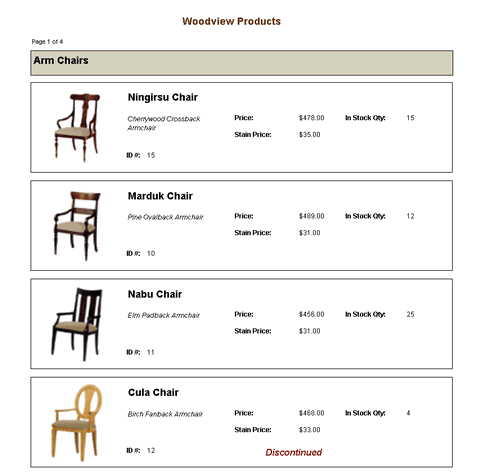
Report Generated
The main part of the code is in the doQuickStart421 component. There, a QbReport object called report is created using the QuickStart42.rpt template. The following constructor is used:
QbReport(Object parent, String reportTemplatename);
The following JNLP (QuickStart422.jnlp in <EspressReport installation directory>/help/quickstart/html directory) shows how to display an existing report template (in this case QuickStart42.rpt) with launched JNLP file:
<?xml version="1.0" encoding="utf-8"?>
<jnlp spec="1.5" codebase="http://localhost:8080/" href="QuickStart422.jnlp">
   <information>
      <title>QuickStart422</title>
      <vendor>Quadbase Systems Inc.</vendor>
      <description>QuickStart422 JNLP</description>
      <offline-allowed/>
   </information>
   <security>
      <all-permissions/>
   </security>
   <resources>
	<j2se version="1.7+" max-heap-size="780m"/>
	<jar href="ReportAPIWithChart.jar"/>
	<jar href="SwingReportAPIWithChart.jar"/>
	<jar href="QuickStart.jar" main="true"/>
   </resources>
   <applet-desc
      name="Espress Report QuickStart examples"
      main-class="QuickStart421"
      width="800"
      height="700">
	 <param name="filename" value=""/>
     </applet-desc>
</jnlp>
The same code used for the application (given in the previous section) can be used to show the report in a launched JNLP file as well. To deploy the JNLP file, copy:
QuickStart.jarfrom<EspressReport installation directory>/help/quickstart/classesdirectory to<Tomcat installation>/webapps/ROOTdirectory;ReportAPIWithChart.jar,SwingReportAPIWithChart.jarandqblicense.jarfrom<EspressReport installation directory>/libdirectory to<Tomcat installation>/webapps/ROOTdirectory;QuickStart422.jnlpfrom<EspressReport installation directory>/help/quickstart/htmldirectory to<Tomcat installation>/webapps/ROOTdirectory.
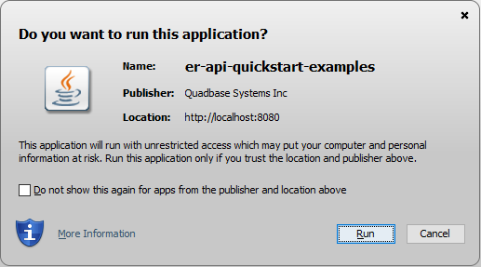
Type URL "http://localhost:8080/QuickStart422.jnlp" (without the quotes) into a browser and a window pops up asking you whether to run this application:
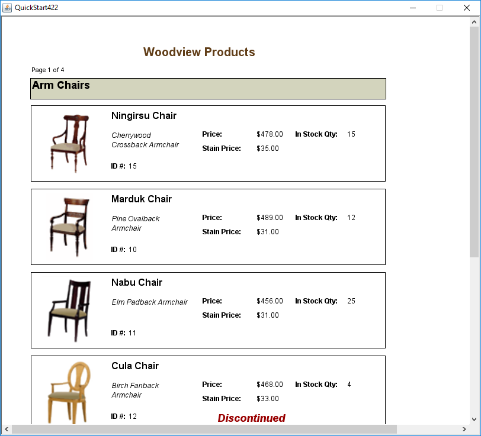
Click the button, the jnlp file will run and the following report will be displayed:
If your server is not localhost, you need to modify codebase (in the 2nd line of QuickStart422.jnlp) value with the correct server IP. For your convenience, you can also copy QuickStart422.html and QuickStart422.jsp from <EspressReport installation directory>/help/quickstart/html directory to <Tomcat installation>/webapps/ROOT directory. Then type URL "http://localhost:8080/QuickStart422.html" (without the quotes) into a browser, the jnlp will download to your machine, and you can save and open it.
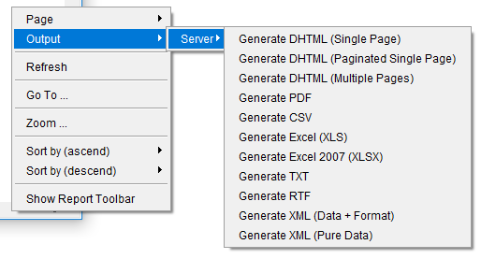
Right clicking on the report displays a Pop-Up Menu:
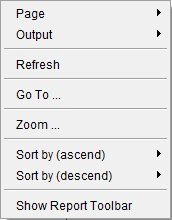
ReportViewer: Right-Click Pop-Up Menu
Mouse over to the option of "Output" and "Server":
In order to Generate Exel(XLS), poi.jar, poi-ooxml.jar, and commons-codec.jar need to be included in the resource section of the jnlp file. Correspondingly, all these jar files need to copy from <EspressReport installation directory>/lib directory to <Tomcat installation>/webapps/ROOT directory.
In order to Generate Exel 2007(XLSX), poi.jar, poi-ooxml.jar, xmlbeans.jar and poi-ooxml-schemas.jar need to be inlcuded in the jnlp file. Also need copy these jars from <EspressReport installation directory>/lib directory to <Tomcat installation>/webapps/ROOT directory.
![[Note]](../../../images/note.png) | Note |
|---|---|
The |
The following code shows how to display an existing report template (in this case QuickStart42.rpt) in a servlet:
import quadbase.reportdesigner.ReportAPI.*;
import quadbase.reportdesigner.ReportElements.*;
import quadbase.reportdesigner.ReportViewer.*;
import quadbase.reportdesigner.util.*;
import quadbase.reportdesigner.lang.*;
import java.awt.*;
import java.applet.*;
import java.io.*;
import java.util.*;
import javax.servlet.*;
import javax.servlet.http.*;

public class QuickStart423 extends HttpServlet {

	public void doGet(HttpServletRequest req, HttpServletResponse res)
			throws ServletException, IOException {
		System.out.println("Calling QuickStart423....");
		// Set the "content type" header of the response
		res.setContentType("text/html");
		// Get the response's OutputStream to return content to the client.
		OutputStream toClient = res.getOutputStream();
		try {
			// Use EspressManager
			QbReport.setEspressManagerUsed(true);
			// Open up specified Report
			QbReport report = new QbReport((Applet) null,
					"help/quickstart/templates/QuickStart42.rpt");
			// Export (Stream) the report to DHTML
			report.export(QbReport.DHTML, toClient);
		} catch (Exception e) {
			e.printStackTrace();
		}
		// Flush the outputStream
		toClient.flush();
		// Close the writer; the response is done.
		toClient.close();
	}

	public String getServletInfo() {
		return "QuickStart423 servlet for EspressReport";
	}
}
To deploy the servlet:
Move
QuickStart423.classfrom<EspressReport installation directory>/help/quickstart/classesdirectory to<Tomcat installation>/webapps/ROOT/WEB-INF/classesdirectory.For Tomcat 7.x or higher version, the servlet, i.e.
QuickStart423in this example, needs to be explicitly mapped in web.xml:<servlet> <servlet-name>QuickStart423</servlet-name> <servlet-class>QuickStart423</servlet-class> </servlet>
and
<servlet-mapping>
		<servlet-name>QuickStart423</servlet-name>
		<url-pattern>/servlet/QuickStart423</url-pattern>
</servlet-mapping>
When the servlet, using the URL "http://localhost:8080/servlet/QuickStart423" (without the quotes) is run, the following report will be displayed:
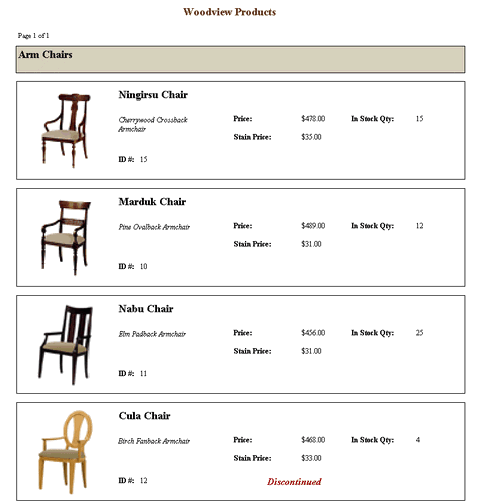
Report Generated
The main part of the code is in the QuickStart423. There, a QbReport object called report is created using the QuickStart42.rpt template. The following constructor is used:
QbReport(Object parent, String reportTemplatename);
The QbReport object, report, was then exported as a DHTML document to the servlet's response stream using the export method:
<QbReport object>.export(int exportFormat, OutputStream out);
Besides deploying the report using sevlets, it is also possible to deploy it using JSP. An example of deploying reports using JSP/Java Bean technology can be found in <EspressReport installation directory>/help/examples/jsp/deploy folder. The same folder contains a README.txt file that explains how to setup this example on your servlet container.
The following piece of code shows how to display the report in an application/applet using Page Viewer instead of Report Viewer.
import java.applet.*;
import quadbase.reportdesigner.ReportAPI.*;
import quadbase.reportdesigner.ReportElements.*;
import quadbase.reportdesigner.PageViewer.*;
import quadbase.reportdesigner.util.*;
import quadbase.reportdesigner.lang.*;

public class QuickStart424 extends Applet {

	public static void main(java.lang.String[] args) {
		try {
			QuickStart424 doReport = new QuickStart424();
			Frame frame = new Frame();
			frame.setLayout(new BorderLayout());
			frame.add("Center", doReport.doQuickStart424(frame));
			frame.setSize(600, 600);
			frame.setVisible(true);
		} catch (Exception ex) {
			ex.printStackTrace();
		}
	}

	public void init() {
		setLayout(new BorderLayout());
		add("Center", doQuickStart424(this));
	}

	Component doQuickStart424(Object parent) {
		// Connect to EspressManager
		QbReport.setEspressManagerUsed(true);

		// Location of the report
		String report = "help/quickstart/templates/QuickStart42.rpt";

		// Show the Report
		if (parent instanceof Applet)
			return (new Viewer().getComponent((Applet) parent, report, 0));
		else
			return (new Viewer().getComponent((Frame) parent, report, 0));
	}
}
The class file for the above source is located in <EspressReport installation directory>/help/quickstart/classes directory. When the class file is run using the command java QuickStart424, the following report will be displayed:
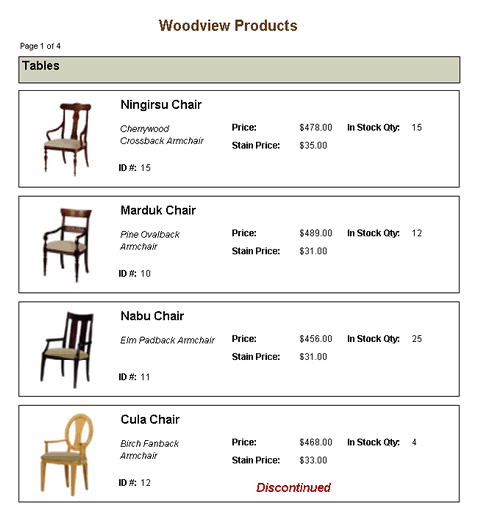
Generated Report
Notice that a QbReport object is not created. Instead, the .rpt file name is passed directly into the component:
return (new Viewer().getComponent((Applet)parent, report, 0));
In the back-end, the .rpt will be exported to VIEW and PAGE files that will be loaded into the viewer. When running without EspressManager, the report will first have to be exported in VIEW format. The resulting VIEW file can then be passed into the Page Viewer component.
The Page Viewer code can also run as a Java Web Start Application. The following jnlp (QuickStart424.jnlp in <EspressReport installation directory>/help/quickstart/html directory) shows how to display an existing report template (in this case QuickStart42.rpt) in the Page Viewer JavaWS application:
<?xml version="1.0" encoding="utf-8"?>
<jnlp spec="1.5" codebase="http://localhost:8080/" href="QuickStart424.jnlp">
   <information>
      <title>QuickStart424</title>
      <vendor>Quadbase Systems Inc.</vendor>
      <description>QuickStart424 JNLP</description>
      <offline-allowed/>
   </information>
   <security>
      <all-permissions/>
   </security>
   <resources>
	<j2se version="1.7+" max-heap-size="780m"/>
	<jar href="ReportAPIWithChart.jar"/>
	<jar href="PageViewer.jar"/>
	<jar href="QuickStart.jar" main="true"/>
   </resources>
   <applet-desc
      name="Espress Report QuickStart examples"
      main-class="QuickStart424"
      width="800"
      height="700">
	 <param name="filename" value=""/>
     </applet-desc>
</jnlp>
The same code used for the application (given in the previous section) can also be used to show the report in Java Web Start (JavaWS) Application. To deploy the JavaWS application, copy:
QuickStart.jarfrom<EspressReport installation directory>/help/quickstart/classesdirectory to<Tomcat installation>/webapps/ROOTdirectory;PageViewer.jarfrom<EspressReport installation directory>/libdirectory to<Tomcat installation>/webapps/ROOTdirectory;ReportAPIWithChart.jarfrom<EspressReport installation directory>/libdirectory to<Tomcat installation>/webapps/ROOTdirectory;QuickStart424.jnlpfrom<EspressReport installation directory>/help/quickstart/htmldirectory to<Tomcat installation>/webapps/ROOTdirectory.
If your server is not localhost, you need to modify codebase (in the 2nd line of QuickStart424.jnlp) value with the correct server IP. For your convenience, you can also copy QuickStart424.html and QuickStart424.jsp from <EspressReport installation directory>/help/quickstart/html directory to <Tomcat installation>/webapps/ROOT directory. Then type URL "http://localhost:8080/QuickStart422.html" (without the quotes) into a browser, the jnlp will download to your machine, and you can save and open it.
The following sections show how to create a report programmatically and apply a template QuickStart43.rpt (located in <EspressReport installation directory>/help/quickstart/templates directory) to the report in an application.
Each section shows the code to generate the report and any steps necessary to deploy.
The following code shows how to create a Summary Break report programmatically (using QuickStart43.txt as the data source):
import java.awt.*;
import java.io.*;
import java.applet.*;
import quadbase.reportdesigner.ReportAPI.*;
import quadbase.reportdesigner.ReportElements.*;
import quadbase.reportdesigner.ReportViewer.*;
import quadbase.reportdesigner.util.*;
import quadbase.reportdesigner.lang.*;

public class QuickStart431 extends Applet {

	// main method for application
	public static void main(java.lang.String[] args) {
		try {
			QuickStart431 doReport = new QuickStart431();
			Frame frame = new Frame();
			frame.setLayout(new BorderLayout());
			frame.add("Center", doReport.doQuickStart431(frame));
			frame.setSize(600, 600);
			frame.setVisible(true);
		} catch (Exception ex) {
			ex.printStackTrace();
		}
	}

	// init method for applet
	public void init() {
		setLayout(new BorderLayout());
		add("Center", doQuickStart431(this));
	}

	// creates report and return it
	Component doQuickStart431(Object object) {
		// Connect to EspressManager
		QbReport.setEspressManagerUsed(true);
		// Specify Column Mapping
		ColInfo colInfo[] = new ColInfo[4];
		colInfo[0] = new ColInfo(0);
		colInfo[0].setRowBreak(true);
		colInfo[1] = new ColInfo(1);
		colInfo[1].setAggregation(false, ColInfo.NONE);
		colInfo[2] = new ColInfo(2);
		colInfo[2].setAggregation(false, ColInfo.SUM);
		colInfo[3] = new ColInfo(3);
		colInfo[3].setAggregation(false, ColInfo.SUM);
		// Create the QbReport object
		QbReport report = new QbReport(object, QbReport.SUMMARY,
				"help/quickstart/templates/data/QuickStart43.txt", colInfo,
				null);
		// Show the generated report in the Viewer
		return (new Viewer().getComponent(report));
	}
}
The class file for the above source is located in <EspressReport installation directory>/help/quickstart/classes directory.
When the class file is run, the following report will be displayed using the command java QuickStart431:
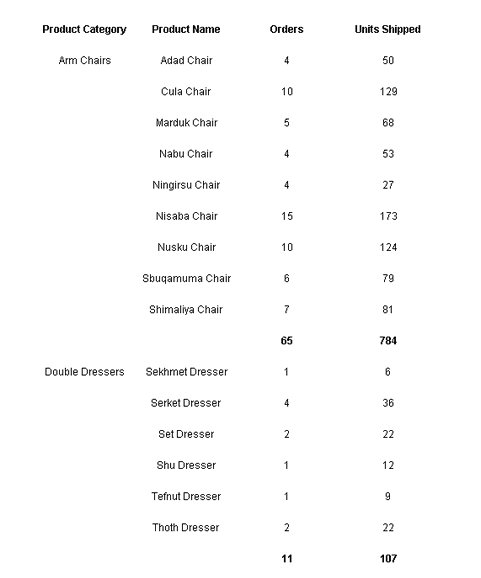
Report Generated
Please note that when the above code is run, the generated report has default look and no additional formatting.
The main part of the code is in the doQuickStart431 component. There, a QbReport object called report is created using specified Column Mapping, specified Report Type, and specified Data Source. The following constructor is used:
QbReport(Object parent, int reportType, String dataSource, ColInfo[] columnMapping, String reportTemplate);
You can apply different formatting by specifying a template during the creation of the QbReport object.
The following code shows how to create a Summary Break report programmatically (using QuickStart43.txt as the data source and QuickStart43.rpt as the template):
import java.awt.*;
import java.io.*;
import java.applet.*;
import quadbase.reportdesigner.ReportAPI.*;
import quadbase.reportdesigner.ReportElements.*;
import quadbase.reportdesigner.ReportViewer.*;
import quadbase.reportdesigner.util.*;
import quadbase.reportdesigner.lang.*;

public class QuickStart432 extends Applet {

	// main method for application
	public static void main(java.lang.String[] args) {
		try {
			QuickStart432 doReport = new QuickStart432();
			Frame frame = new Frame();
			frame.setLayout(new BorderLayout());
			frame.add("Center", doReport.doQuickStart432(frame));
			frame.setSize(600, 600);
			frame.setVisible(true);
		} catch (Exception ex) {
			ex.printStackTrace();
		}
	}

	// init method for applet
	public void init() {
		setLayout(new BorderLayout());
		add("Center", doQuickStart432(this));
	}

	// creates report and return it
	Component doQuickStart432(Object object) {
		// Connect to EspressManager
		QbReport.setEspressManagerUsed(true);
		// Specify Column Mapping
		ColInfo colInfo[] = new ColInfo[4];
		colInfo[0] = new ColInfo(0);
		colInfo[0].setRowBreak(true);
		colInfo[1] = new ColInfo(1);
		colInfo[1].setAggregation(false, ColInfo.NONE);
		colInfo[2] = new ColInfo(2);
		colInfo[2].setAggregation(false, ColInfo.SUM);
		colInfo[3] = new ColInfo(3);
		colInfo[3].setAggregation(false, ColInfo.SUM);
		// Create the QbReport object
		QbReport report = new QbReport(object, QbReport.SUMMARY,
				"help/quickstart/templates/data/QuickStart43.txt", colInfo,
				"help/quickstart/templates/QuickStart43.rpt");
		// Show the generated report in the Viewer
		return (new Viewer().getComponent(report));
	}
}
The class file for the above source is located in <EspressReport installation directory>/help/quickstart/classes directory.
When the class file is run, the following report will be displayed using the command java QuickStart432:
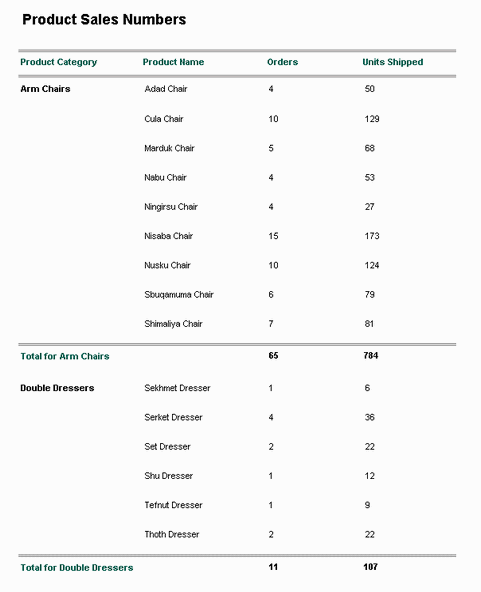
Report Generated
The main part of the code is in the doQuickStart432 component. There, a QbReport object called report is created using specified Column Mapping, specified Report Type, specified Data Source, and specified Report Template. The following constructor is used:
QbReport(Object parent, int reportType, String dataSource, ColInfo[] columnMapping, String reportTemplate);
The following code shows how to modify report's (and its accompanying sub-reports, drill-downs and independent charts) data source without having to create a new QbReport object. The QbReport object (created from QuickStart44.rpt) is opened with backup data (to avoid unnecessary load to the database). The data source is then changed to MySQL Woodview database.
import java.awt.*;
import java.io.*;
import java.applet.*;
import quadbase.reportdesigner.ReportAPI.*;
import quadbase.reportdesigner.ReportElements.*;
import quadbase.reportdesigner.ReportViewer.*;
import quadbase.reportdesigner.util.*;
import quadbase.common.util.*;
import quadbase.reportdesigner.lang.*;
import java.sql.*;

public class QuickStart44 extends Applet {

	public static void main(java.lang.String[] args) {

		try {

			QuickStart44 doReport = new QuickStart44();
			Frame frame = new Frame();
			frame.setLayout(new BorderLayout());
			frame.add("Center", doReport.doQuickStart44(frame));
			frame.setSize(600, 600);
			frame.setVisible(true);
		} catch (Exception ex) {
			ex.printStackTrace();
		}
	}

	public void init() {

		setLayout(new BorderLayout());
		add("Center", doQuickStart44(this));
	}

	Component doQuickStart44(Object object) {

		// Connect to EspressManager
		QbReport.setEspressManagerUsed(true);

		// Create the report using the two rows of back-up data
		QbReport report = new QbReport(object,
				"help/quickstart/templates/QuickStart44.rpt", false, false,
				false, true);

		// Begin Code : Specification for new Database
		String newDatabaseURL = "jdbc:mysql://localhost:3306/woodview";
		String newDatabaseDriver = "com.mysql.jdbc.Driver";
		String newDatabaseUserid = "root";
		String newDatabasePassword = "root";
		// End Code : Specification for new Database

		try {

			// Begin Code : Change the data source of the main report and all
			// ancillary templates
			report.getInputData().setAllDatabaseInfo(newDatabaseURL,
					newDatabaseDriver, newDatabaseUserid, newDatabasePassword);
			// End Code : Change the data source of the main report and all
			// ancillary templates
		} catch (Exception ex) {

			ex.printStackTrace();
		}

		return (new Viewer().getComponent(report));
	}
}
The class file for the above source is located in <EspressReport installation directory>/help/quickstart/classes directory.
When the class file is run, the following report will be displayed using the command java QuickStart44:
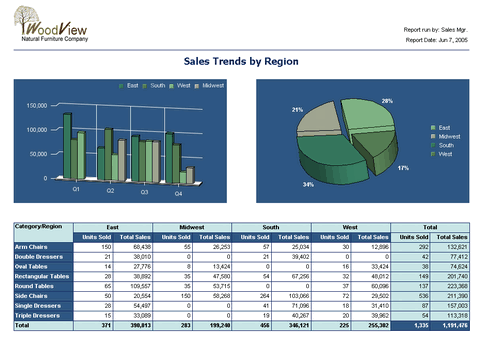
Report Generated
The main part of the code is in the doQuickStart44 component. There, a QbReport object called report is created. The data source for the report, sub-report, drill-down, and chart (with independent data source) is changed using the following method in quadbase.reportdesigner.util.IInputData interface:
setAllDatabaseInfo(String url, String driver, String userid, String password);
The following code shows how to modify a report's (and its accompanying sub-reports) data source without having to create a new QbReport object. The data source is then changed from MySQL Woodview database to HSQLDB Woodview database. The QbReport object (created from QuickStart441_mysql.pak) will be opened with backup data, if the HSQLDB database is not hit.
import java.awt.*;
import java.io.*;
import java.applet.*;
import quadbase.reportdesigner.ReportAPI.*;
import quadbase.reportdesigner.ReportElements.*;
import quadbase.reportdesigner.ReportViewer.*;
import quadbase.reportdesigner.util.*;
import quadbase.common.util.*;
import quadbase.reportdesigner.lang.*;
import java.sql.*;

public class QuickStart441 extends Applet {

	public static void main(java.lang.String[] args) {

		try {

			QuickStart441 doReport = new QuickStart441();
			Frame frame = new Frame();
			frame.setLayout(new BorderLayout());
			frame.add("Center", doReport.doQuickStart441(frame));
			frame.setSize(600, 600);
			frame.setVisible(true);
		} catch (Exception ex) {
			ex.printStackTrace();
		}
	}

	public void init() {

		setLayout(new BorderLayout());
		add("Center", doQuickStart441(this));
	}

	Component doQuickStart441(Object object) {

		// Connect to EspressManager
		QbReport.setEspressManagerUsed(true);

		// Create the report using the two rows of back-up data
		QbReport report = new QbReport(object,
				"help/quickstart/templates/MySQL/QuickStart441_mysql.pak",
				false, false, false, true);

		// Begin Code : Specification for new Database
		String newDatabaseURL = "jdbc:hsqldb:help/examples/DataSources/database/woodview";
		String newDatabaseDriver = "org.hsqldb.jdbcDriver";
		String newDatabaseUserid = "sa";
		String newDatabasePassword = "";

		String newDatabaseReportQuery = "select year(o.orderdate) as \"Year\", month(o.orderdate) as \"Month\", count(o.orderid) as \"Orders\", sum(od.quantity) as \"Units Sold\", sum((p.unitprice + od.staincost) * od.quantity) as \"Total Sales\" from orders o, order_details od, products p where o.orderid = od.orderid and p.productid = od.productid group by year(o.orderdate), month(o.orderdate) order by year(o.orderdate), month(o.orderdate);";

		String newDatabaseSubReportQuery = "select c.region as \"Region\", year(o.orderdate) as \"Year\", sum((p.unitprice + od.staincost) * od.quantity) as \"Total Sales\" from customers c, orders o, products p, order_details od where c.customerid = o.customerid and o.orderid = od.orderid and od.productid = p.productid group by c.region, year(o.orderdate);";
		try {
			// Begin Code : Get a handle to the Sub-Report and change its data
			// source
			SubReportObject subReportObject = report.getSubReports()[0];
			QbReport subReport = (QbReport) subReportObject.getSubReport(false,
					false, true, report);

			// Get the query and pass in new database info
			DBInfo newSubReportDatabaseInfo = new DBInfo(newDatabaseURL,
					newDatabaseDriver, newDatabaseUserid, newDatabasePassword,
					newDatabaseSubReportQuery);

			subReport.getInputData().setDatabaseInfo(newSubReportDatabaseInfo);
			// End Code : Get a handle to the Sub-Report and change its data
			// source

			// Begin Code : Change the data source of the main report
			// Get the query and pass in new database info
			DBInfo newReportDatabaseInfo = new DBInfo(newDatabaseURL,
					newDatabaseDriver, newDatabaseUserid, newDatabasePassword,
					newDatabaseReportQuery);

			report.getInputData().setDatabaseInfo(newReportDatabaseInfo);
			// End Code : Change the data source of the main report
		} catch (Exception ex) {

			ex.printStackTrace();
		}

		return (new Viewer().getComponent(report));
	}
}
The class file for the above source is located in <EspressReport installation directory>/help/quickstart/classes directory.
When the class file is run, the following report will be displayed using the command java QuickStart441:
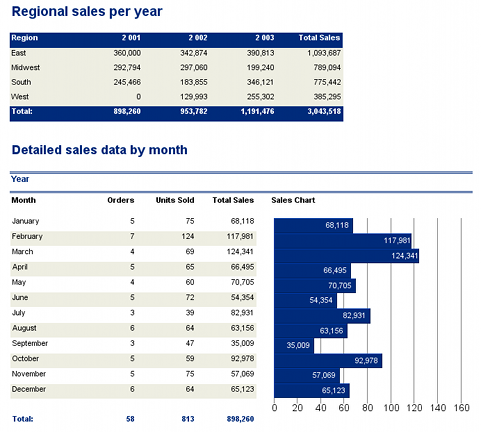
Report Generated
The main part of the code is in the doQuickStart441 component. There, a QbReport object called report is created. The data source for the report and the sub-report is changed using the following method in quadbase.reportdesigner.util.IInputData interface:
setDatabaseInfo(IDatabaseInfo db);
The sub-report is obtained by getting a handle to the cell containing the sub-report and then calling the sub-report. The sub-report is also opened using its backup data. This is done by:
SubReportObject subReportObject = report.getSubReports()[index of particular SubReport];
(QbReport)subreport = (QbReport)subReportObject.getSubReport(boolean isEnterpriseServer, boolean optimizeMemory, boolean useBackupData, IReport report);
Please note that if you wish to change the data source from HSQLDB Woodview database to MySQL Woodview database, you will need to change the following lines of code from:
QbReport report = new QbReport(object, "help/quickstart/templates/MySQL/QuickStart441_.pak", false, false, false, true);

// Begin Code : Specification for new Database
String newDatabaseURL = "jdbc:hsqldb:help/examples/DataSources/database/woodview";
String newDatabaseDriver = "org.hsqldb.jdbcDriver";
String newDatabaseUserid = "sa";
String newDatabasePassword = "";

String newDatabaseReportQuery = "select year(o.orderdate) as \"Year\", month(o.orderdate) as \"Month\", count(o.orderid) as \"Orders\", sum(od.quantity) as \"Units Sold\", sum((p.unitprice + od.staincost) * od.quantity) as \"Total Sales\" from orders o, order_details od, products p where o.orderid = od.orderid and p.productid = od.productid group by year(o.orderdate), month(o.orderdate) order by year(o.orderdate), month(o.orderdate);";

String newDatabaseSubReportQuery = "select c.region as \"Region\", year(o.orderdate) as \"Year\", sum((p.unitprice + od.staincost) * od.quantity) as \"Total Sales\" from customers c, orders o, products p, order_details od where c.customerid = o.customerid and o.orderid = od.orderid and od.productid = p.productid group by c.region, year(o.orderdate);";
to
QbReport report = new QbReport(object, "help/quickstart/templates/QuickStart441.pak", false, false, false, true);

// Begin Code : Specification for new Database
String newDatabaseURL = "jdbc:mysql://localhost:3306/woodview";
String newDatabaseDriver = "com.mysql.jdbc.Driver";
String newDatabaseUserid = "root";
String newDatabasePassword = "root";

String newDatabaseReportQuery = "select year(o.orderdate) as \"Year\", month(o.orderdate) as \"Month\", count(o.orderid) as \"Orders\", sum(od.quantity) as \"Units Sold\", sum((p.unitprice + od.staincost) * od.quantity) as \"Total Sales\" from orders o, \"order_details\" od, products p where o.orderid = od.orderid and p.productid = od.productid group by year(o.orderdate), month(o.orderdate) order by year(o.orderdate), month(o.orderdate);";

String newDatabaseSubReportQuery = "select c.region as \"Region\", year(o.orderdate) as \"Year\", sum((p.unitprice + od.staincost) * od.quantity) as \"Total Sales\" from customers c, orders o, products p, \"order_details\" od where c.customerid = o.customerid and o.orderid = od.orderid and od.productid = p.productid group by c.region, year(o.orderdate);";
The following code shows how to modify a report's and its accompanying sub-reports parameterized data sources without having to create a new QbReport object. The QbReport object (created from QuickStart442_Acc.rpt) is opened with backup data (to avoid unnecessary load to the database). The datasource is then changed from Access Woodview database to HSQLDB Woodview database.
import java.awt.*;
import java.util.*;
import java.io.*;
import java.applet.*;
import java.sql.*;
import quadbase.reportdesigner.ReportAPI.*;
import quadbase.reportdesigner.ReportElements.*;
import quadbase.reportdesigner.ReportViewer.*;
import quadbase.reportdesigner.util.*;
import quadbase.reportdesigner.lang.*;

public class QuickStart442 extends Applet {

	public static void main(java.lang.String[] args) {

		try {
			QuickStart442 doReport = new QuickStart442();
			Frame frame = new Frame();
			frame.setLayout(new BorderLayout());
			frame.add("Center", doReport.doQuickStart442(frame));
			frame.setSize(600, 600);
			frame.setVisible(true);

		} catch (Exception ex) {
			ex.printStackTrace();

		}

	}

	public void init() {

		setLayout(new BorderLayout());
		add("Center", doQuickStart442(this));

	}

	Component doQuickStart442(Object parent) {

		// Connect to EspressManager
		QbReport.setEspressManagerUsed(true);

		// Open the report using the two rows of backup data
		QbReport report = new QbReport(parent,
				"help/quickstart/templates/MySQL/QuickStart442_mysql.rpt",
				false, false, false, true);

		// Begin Code : Specification for new Database
		String URL = "jdbc:hsqldb:help/examples/DataSources/database/woodview";
		String driver = "org.hsqldb.jdbcDriver";
		String userid = "sa";
		String passwd = "";

		String newDatabaseSubReportQuery = "select c.categoryname as \"Category\", p.productname as \"Product\", cu.region as \"Region\", sum((od.staincost + p.unitprice) * od.quantity) as \"Sales\" from categories c, products p, customers cu, orders o, order_details od where c.categoryid = p.categoryid and p.productid = od.productid and cu.customerid = o.customerid and o.orderid = od.orderid and c.categoryname IN (:category) group by c.categoryname, p.productname, cu.region";

		try {

			// Begin Code : Get a handle to the SubReport and change its
			// datasource
			SubReportObject subReportObject = report.getSubReports()[0];
			QbReport subReport = (QbReport) subReportObject.getSubReport(false,
					false, true, report);

			// Begin Code : Get the parameter information of the subreport and
			// pass in the new database information along with the parameter
			// information
			IQueryInParam[] subReportParameters = ((IQueryFileInfo) subReport
					.getInputData().getDatabaseInfo()).getInParam();
			SimpleQueryFileInfo subReportInfo = new SimpleQueryFileInfo(URL,
					driver, userid, passwd, newDatabaseSubReportQuery);
			subReportInfo.setInParam(subReportParameters);

			subReport.getInputData().setDatabaseInfo(subReportInfo);
			// End Code : Get the parameter information of the subreport and
			// pass in the new database information along with the parameter
			// information
			// End Code : Get a handle to the SubReport and change its
			// datasource

			// Begin Code : Get the parameter information of the main report and
			// pass in the new database information along with the parameter
			// information
			// Begin Code : Pass in the parameter values for the main report
			// (which is then picked up by the subreport)
			Vector<String> paramValues = new Vector<String>();
			paramValues.addElement(new String("Arm Chairs"));
			paramValues.addElement(new String("Double Dressers"));
			paramValues.addElement(new String("Round Tables"));
			// End Code : Pass in the parameter values for the main report
			// (which is then picked up by the subreport)

			// Begin Code : Get the parameter properties information and pass in
			// the value of the parameter
			IQueryInParam[] reportParameters = (IQueryInParam[]) ((IQueryFileInfo) report
					.getInputData().getDatabaseInfo()).getInParam();
			((IQueryMultiValueInParam) reportParameters[0])
					.setValues(paramValues);
			// End Code : Get the parameter properties information and pass in
			// the value of the parameter

			// Get the query for the main report from the report template itself
			// instead of passing in a new query
			SimpleQueryFileInfo reportInfo = new SimpleQueryFileInfo(URL,
					driver, userid, passwd, report.getInputData()
							.getDatabaseInfo().getQuery());
			reportInfo.setInParam(reportParameters);

			report.getInputData().setDatabaseInfo(reportInfo);
			// End Code : Get the parameter information of the main report and
			// pass in the new database information along with the parameter
			// information

		} catch (Exception ex) {
			ex.printStackTrace();

		}

		return (new Viewer().getComponent(report));

	}

}
The class file for the above source is located in <EspressReport installation directory>/help/quickstart/classes directory.
When the class file is run, the following report will be displayed using the command java QuickStart442:
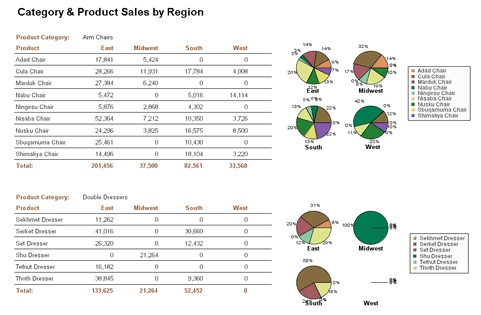
Report Generated
The main part of the code is in the doQuickStart442 component. There, a QbReport object called report is created. The data source for the report and the sub-report is changed using the following method in quadbase.reportdesigner.util.IInputData interface:
setDatabaseInfo(IDatabaseInfo db);
However, because both reports use a parameterized report, a separate class file (QueryFileInfo) was created, which used the interface quadbase.reportdesigner.util.IQueryFileInfo to pass in the database connection information and the parameter properties information as well. An object of the class QueryFileInfo (with the required information) is then passed as the argument for setDatabaseInfo() method.
The parameter information is obtained by getting the database connection information (by calling the getDatabaseInfo() method), casting it to IQueryFileInfo and using the following method in IQueryFileInfo:
public IQueryInParam[] getInParam();
The above method call returns complete parameter properties information for all parameters defined in the report.
The code also passes in values for the parameters directly into the report, rather than have the user be prompted to specify the values. The values are entered by going to each parameter and specifying them before passing them to the report object. The following method, in IQueryInParam, is used to specify the value:
public void setValue(Object value);
The sub-report is obtained by getting a handle to the cell containing the sub-report and then calling the sub-report. The sub-report is also opened using its backup data. This is done by:
SubReportObject subReportObject = report.getSubReports()[index of particular SubReport];

(QbReport)subreport = (QbReport)subReportObject.getSubReport(boolean isEnterpriseServer, boolean optimizeMemory, boolean useBackupData, IReport report);
Please note that if you wish to change the data source from HSQLDB Woodview database to MySQL Woodview database, you will need to change the following lines of code from:
QbReport report = new QbReport(object, "help/quickstart/templates/MySQL/QuickStart442_mysql.rpt", false, false, false, true);

// Begin Code : Specification for new Database
String newDatabaseURL = "jdbc:hsqldb:help/examples/DataSources/database/woodview";
String newDatabaseDriver = "org.hsqldb.jdbcDriver";
String newDatabaseUserid = "sa";
String newDatabasePassword = "";

String newDatabaseSubReportQuery = "select c.categoryname as \"Category\", p.productname as \"Product\", cu.region as \"Region\", sum((od.staincost + p.unitprice) * od.quantity) as \"Sales\" from categories c, products p, customers cu, orders o, order_details od where c.categoryid = p.categoryid and p.productid = od.productid and cu.customerid = o.customerid and o.orderid = od.orderid and c.categoryname IN (:category) group by c.categoryname, p.productname, cu.region;";
to
QbReport report = new QbReport(object, "help/quickstart/templates/QuickStart442.rpt", false, false, false, true);

// Begin Code : Specification for new Database
String newDatabaseURL = "jdbc:mysql://localhost:3306/woodview";
String newDatabaseDriver = "com.mysql.jdbc.Driver";
String newDatabaseUserid = "root";
String newDatabasePassword = "root";

String newDatabaseSubReportQuery = "select c.categoryname as \"Category\", p.productname as \"Product\", cu.region as \"Region\", sum((od.staincost + p.unitprice) * od.quantity) as \"Sales\" from categories c, products p, customers cu, orders o, order_details od where c.categoryid = p.categoryid and p.productid = od.productid and cu.customerid = o.customerid and o.orderid = od.orderid and c.categoryname IN (:category) group by c.categoryname, p.productname, cu.region;";
You can also pass in a java.sql.Connection object instead of passing in the URL, driver, userid and password of the database. For example, if you wish to pass in a Connection object, conn, you would need to change the following lines of code:
SimpleQueryFileInfo subReportInfo = new SimpleQueryFileInfo(URL, driver, userid, passwd, newDatabaseSubReportQuery);
SimpleQueryFileInfo reportInfo = new SimpleQueryFileInfo(URL, driver, userid, passwd, report.getInputData().getDatabaseInfo().getQuery());
to
SimpleQueryFileInfo subReportInfo = new SimpleQueryFileInfo(conn, newDatabaseSubReportQuery);
SimpleQueryFileInfo reportInfo = new SimpleQueryFileInfo(conn, report.getInputData().getDatabaseInfo().getQuery());
The following code shows how to modify certain elements of the report programmatically. The QbReport object is created from QuickStart45.rpt. When the code is run, the original report is first shown and when the button (located at the bottom) is clicked, some of the report elements will change.
import java.awt.*;
import java.io.*;
import java.applet.*;
import java.util.*;
import quadbase.reportdesigner.ReportAPI.*;
import quadbase.reportdesigner.ReportElements.*;
import quadbase.reportdesigner.ReportViewer.*;
import quadbase.reportdesigner.util.*;
import quadbase.reportdesigner.lang.*;
import quadbase.reportdesigner.report.Formula;

// Set up Frame
public class QuickStart45 extends Frame {
	QbReport report;
	Viewer viewer;
	Component reportComponent;
	Button b = new Button("Change");

	// Start Frame
	public QuickStart45() {
		start();
	}

	// Create Empty Report and set up initial data and wipe out empty report
	// data
	public void start() {

		// Connect to EspressManager
		QbReport.setEspressManagerUsed(true);
		setLayout(new BorderLayout());
		// Create QbReport object
		report = new QbReport((Applet) null,
				"help/quickstart/templates/QuickStart45.rpt");
		viewer = new Viewer();
		reportComponent = viewer.getComponent(report);
		add("Center", reportComponent);
		add("South", b);
	}

	// What to do with the button
	public boolean action(Event e, Object o) {
		// Begin Code : Dual color
		int numberOfColumns = report.getTable().getColumnCount();
		for (int i = 0; i < numberOfColumns; i++) {
			ReportColumn column = report.getTable().getColumn(i);
			column.setAlternateRow(1);
			column.setBgColor2(new Color(245, 245, 238));
			column.setFontColor2(new Color(0, 0, 0));
			column.setFont2(new Font("Dialog", Font.PLAIN, 8));
		}
		// End Code : Dual color

		// Begin Code : Add title to Report Header
		ReportCell title = new ReportCell();
		title.setText("Top 10 Customers");
		title.setBgColor(new Color(255, 255, 255));
		title.setFontColor(new Color(0, 54, 100));
		title.setFont(new Font("Dialog", Font.BOLD, 14));
		title.setAlign(IAlignConstants.ALIGN_LEFT);
		title.setWidth(2.1);
		title.setHeight(0.4);
		title.setX(0);
		title.setY(0);
		report.getReportHeader().addData(title);
		// End Code : Add title to Report Header

		// Begin Code :Add a formula
		ReportCell formulaCell = new ReportCell();
		Formula formula = new Formula("totalSales", "sum({Total Sales})");
		report.addFormula(formula);
		formulaCell.setFormulaObj(formula);
		formulaCell.setBgColor(new Color(255, 255, 255));
		formulaCell.setFontColor(new Color(0, 0, 0));
		formulaCell.setFont(new Font("Dialog", Font.BOLD, 8));
		formulaCell.setAlign(IAlignConstants.ALIGN_LEFT);
		formulaCell.setWidth(1.0);
		formulaCell.setHeight(0.25);
		formulaCell.setX(4.1);
		formulaCell.setY(0);
		report.getReportFooter().addData(formulaCell);
		// End Code :Add a formula

		// Begin Code : Add a label
		ReportCell label = new ReportCell();
		label.setText("Total sales for top 10 customers:");
		label.setBgColor(new Color(255, 255, 255));
		label.setFontColor(new Color(0, 54, 100));
		label.setFont(new Font("Dialog", Font.BOLD, 8));
		label.setAlign(IAlignConstants.ALIGN_RIGHT);
		label.setWidth(2.1);
		label.setHeight(0.4);
		label.setX(1.9);
		label.setY(0);
		report.getReportFooter().addData(label);
		// End Code : Add a label
		remove(reportComponent);
		viewer = new Viewer();
		reportComponent = viewer.getComponent(report);
		add("Center", reportComponent);
		pack();
		return true;
	}

	public Dimension getPreferredSize() {
		return new Dimension(600, 600);
	}

	// Start
	public static void main(String[] args) {
		QuickStart45 t = new QuickStart45();
		t.setSize(600, 600);
		t.setVisible(true);
	}
}
The class file for the above source is located in <EspressReport installation directory>/help/quickstart/classes directory.
When the class file is run, the following report will be displayed using the command java QuickStart45:
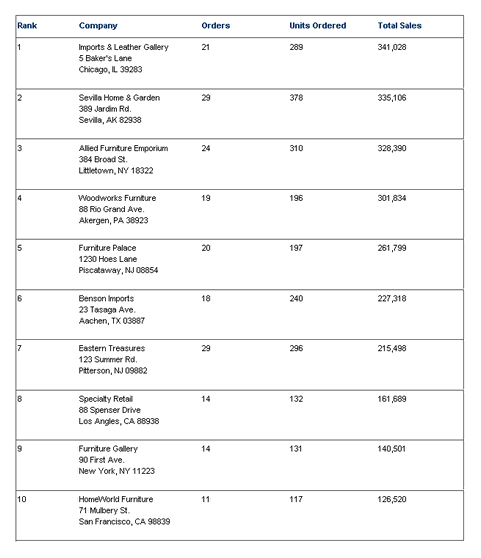
Report Generated
When the button is clicked, the following report will be displayed:
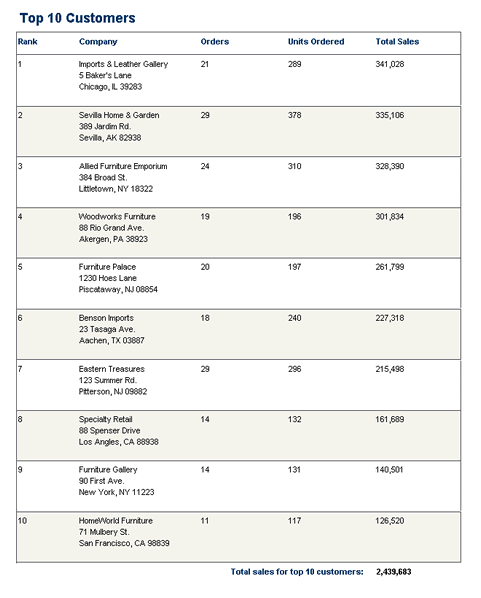
Report Generated After Change Button is Clicked
The main part of the code is in the action class. Report properties such as Dual Color are turned on and formula, label and title are added to the QbReport object.
Dual colors are set using the following code. The dual color property is set for each table column and alternate background color, font color, and font are specified.
<Desired Report Column>.setAlternateRow(int numberOfRowsBeforeAlternateColor);
<Desired Report Column>.setBgColor2(Color alternateBackgroundColor);
<Desired Report Column>.setFontColor2(Color alternateFontCOlor);
<Desired Report Column>.setFont2(Font alternateFont);
Adding a title to the Report Header is done using the following code. The ReportCell object is first created, the title text then set and the ReportCell properties such as height, width, x-position, and y-position are specified before adding them to the Report Header section.
ReportCell title = new ReportCell();
title.setText(String text);
title.setBgColor(Color backgroundColor);
title.setFontColor(Color fontColor);
title.setFont(Font font);
title.setAlign(int alignment);
title.setWidth(double width);
title.setHeight(double height);
title.setX(double xPosition);
title.setY(double yPosition);
<Handle to desired Report Section>.addData(title);
A formula and a label are specified in the same way. A ReportCell object is first created, the formula or label set, and the ReportCell properties specified before adding the newly created formula or label ReportCell object to the appropriate section.
ReportCell formulaCell = new ReportCell();
Formula formula = new Formula(String formulaname, String formulaText);
report.addFormula(formula);
formulaCell.setFormulaObj(formula);
formulaCell.setBgColor(Color backgroundColor);
formulaCell.setFontColor(Color fontColor);
formulaCell.setFont(Font font);
formulaCell.setAlign(int alignment);
formulaCell.setWidth(double width);
formulaCell.setHeight(double height);
formulaCell.setX(double xPosition);
formulaCell.setY(double yPosition);
<Handle to desired Report Section>.addData(formulaCell);

ReportCell label = new ReportCell();
label.setText(String text);
label.setBgColor(Color backgroundColor);
label.setFontColor(Color fontColor);
label.setFont(Font font);
label.setAlign(int alignment);
label.setWidth(double width);
label.setHeight(double height);
label.setX(double xPosition);
label.setY(double yPosition);
<Handle to desired Report Section>.addData(label);
The following sections show how to run a pre-existing template (QuickStart46.rpt located in <EspressReport installation directory>/help/quickstart/templates directory) which uses a parameterized query as the data source.
Each section shows the code to generate the report and any steps necessary to deploy.
The following code shows how to display an existing report template (in this case QuickStart46.rpt), which uses a parameterized query, in an application. The parameter values are passed when creating the report.
import java.io.*;
import java.applet.*;
import java.awt.*;
import java.sql.*;
import java.util.Vector;
import quadbase.reportdesigner.ReportAPI.*;
import quadbase.reportdesigner.ReportElements.*;
import quadbase.reportdesigner.ReportViewer.swing.*;
import quadbase.reportdesigner.util.*;
import quadbase.reportdesigner.lang.*;

public class QuickStart461 extends Applet {

	public QuickStart461() {
	};

	public static void main(java.lang.String[] args) {
		try {
			QuickStart461 doReport = new QuickStart461();
			Frame frame = new Frame();
			frame.setLayout(new BorderLayout());
			frame.add("Center", doReport.createReport(doReport));
			frame.setSize(600, 600);
			frame.setVisible(true);
		} catch (Exception ex) {
			ex.printStackTrace();
		}
	}

	Component createReport(Object parent) {
		// Connect to EspressManager
		QbReport.setEspressManagerUsed(true);
		// Begin Code : Set query parameters
		Vector vec = new Vector();
		vec.addElement("CA");
		vec.addElement("NH");
		Object queryParams[] = new Object[3];
		queryParams[0] = vec;
		queryParams[1] = new Date(99, 0, 4);
		queryParams[2] = new Date(101, 01, 12);
		// End Code : Set query parameters
		// Begin Code : Set formula parameter
		Object formulaParams[] = new Object[1];
		formulaParams[0] = "Ivan";
		// End Code : Set formula parameter
		// Create new Report object using specified report and parameter values
		QbReport report = new QbReport(parent,
				"help/quickstart/templates/QuickStart46.rpt", queryParams,
				formulaParams);

		// Show the Report
		Viewer viewer = new Viewer();
		Component comp = viewer.getComponent(report);
		return comp;

	}

}
The class file for the above source is located in <EspressReport installation directory>/help/quickstart/classes directory.
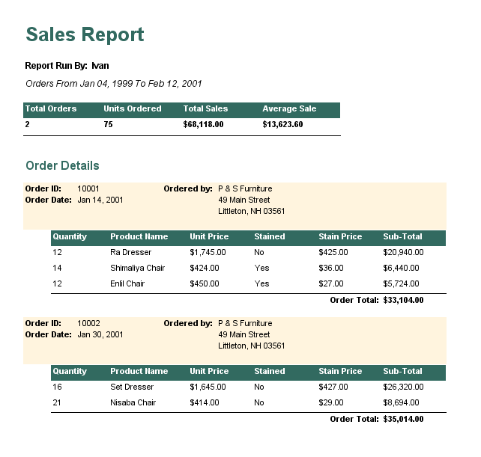
When the class file is run, the following report will be displayed using the command java QuickStart461:
The main part of the code is in the createReport component. There, a QbReport object called report is created using the QuickStart46.rpt template. The parameter values are passed using the following constructor:
QbReport(Object parent, String reportTemplatename, Object[] queryParameterValues, Qbject[] formulaParamterValues);
Both query parameter and formula parameter values are placed in the same order as the parameters were defined. Query parameters, which take in multiple values, are declared as Vector object which then contains different multiple values.
Please note that if you are using Access templates, you will need to change the following lines of code from:
queryParams[1] = new Date(99, 0, 4);
queryParams[2] = new Date(101, 01, 12);
to
queryParams[1] = new Timestamp(99, 0, 4, 0, 0, 0, 0);
queryParams[2] = new Timestamp(101, 01, 12, 0, 0, 0, 0);
In addition to the above, you can also pass in parameter values using getAllParameters method in QbReport. The following code shows how to display an existing report template (in this case QuickStart46.rpt), which uses a parameterized query, in an application. The report is opened with backup data (to avoid unnecessary load to the database) and the parameter values are set. The report is then refreshed with the data.
import java.io.*;
import java.applet.*;
import java.awt.*;
import java.sql.*;
import java.util.Vector;
import quadbase.reportdesigner.ReportAPI.*;
import quadbase.reportdesigner.ReportElements.*;
import quadbase.reportdesigner.ReportViewer.swing.*;
import quadbase.reportdesigner.util.*;
import quadbase.reportdesigner.lang.*;

public class QuickStart462 extends Applet {

	public QuickStart462() {
	};

	public static void main(java.lang.String[] args) {
		try {
			QuickStart462 doReport = new QuickStart462();
			Frame frame = new Frame();
			frame.setLayout(new BorderLayout());
			frame.add("Center", doReport.createReport(doReport));
			frame.setSize(600, 600);
			frame.setVisible(true);
		} catch (Exception ex) {
			ex.printStackTrace();
		}
	}

	Component createReport(Object parent) {
		// Connect to EspressManager
		QbReport.setEspressManagerUsed(true);
		// Begin Code : Set query parameters
		Vector vec = new Vector();
		vec.addElement("CA");
		vec.addElement("NH");
		Object queryParams[] = new Object[3];
		queryParams[0] = vec;
		queryParams[1] = new Date(99, 0, 4);
		queryParams[2] = new Date(101, 01, 12);
		// End Code : Set query parameters
		// Begin Code : Set formula parameter
		Object formulaParams[] = new Object[1];
		formulaParams[0] = "Ivan";
		// End Code : Set formula parameter
		// Create new Report object using backup data
		QbReport report = new QbReport(parent,
				"help/quickstart/templates/QuickStart46.rpt", false, false,
				false, true);

		try {

			report.getAllParameters().get(0).setValues((Vector) queryParams[0]);
			report.getAllParameters().get(1).setValue(queryParams[1]);
			report.getAllParameters().get(2).setValue(queryParams[2]);
			report.getAllParameters().get(3).setValue(formulaParams[0]);

			report.refreshWithOriginalData();

		} catch (Exception ex) {
			ex.printStackTrace();
		}

		// Show the Report
		Viewer viewer = new Viewer();
		Component comp = viewer.getComponent(report);
		return comp;
	}
}
The class file for the above source is located in <EspressReport installation directory>/help/quickstart/classes directory.
When the class file is run, the following report will be displayed using the command java QuickStart462:
The main part of the code is in the createReport component. There, a QbReport object called report is created using the QuickStart46.rpt template. The parameter values are passed using the following interface in QbReport:
getAllParameters();
Both query parameter and formula parameter values are placed in the same order as the parameters were defined. Query parameters which take in multiple values are declared as Vector object which then contains different multiple values.
Please note that if you are using Access templates, you will need to change the following lines of code from:
queryParams[1] = new Date(99, 0, 4);
queryParams[2] = new Date(101, 01, 12);
to
queryParams[1] = new Timestamp(99, 0, 4, 0, 0, 0, 0);
queryParams[2] = new Timestamp(101, 01, 12, 0, 0, 0, 0);
The following code shows how to display an existing report template (in this case QuickStart46.rpt), which uses a parameterized query, in a servlet. The servlet creates the QbReport object by opening the template using backup data. A HTML page is then streamed asking for the parameter values. These values are passed to another servlet (the ParamReportGeneratorServlet servlet) and the QbReport object is created from the given template with the specified parameter values.
import quadbase.reportdesigner.ReportAPI.QbReport;
import quadbase.common.param.*;
import java.applet.*;
import java.io.*;
import javax.servlet.*;
import javax.servlet.http.*;
import java.awt.Font;

public class QuickStart463 extends HttpServlet {

	public void doGet(HttpServletRequest req, HttpServletResponse res)
			throws ServletException, IOException {

		System.out.println("QuickStart463 Servlet: Do Get....");
		System.out
				.println("QuickStart463 Servlet: Generate paramter html page...");
		res.setContentType("text/html");

		OutputStream toClient = res.getOutputStream();
		try {
			// Connect to EspressManager
			QbReport.setEspressManagerUsed(true);
			String reportLocation = "help/quickstart/templates/QuickStart46.rpt";
			// Create the ObReport object using back-up data
			QbReport report = new QbReport((Applet) null, reportLocation,
					false, false, false, true, false);

			// Specify the parameters for connecting to
			// ParamReportGeneratorServlet
			report.setDynamicExport(true, "127.0.0.1", 8080);

			// Specify report template location and export format desired
			ParameterPage paramPage = report.getParameterPage(reportLocation,
					null, QbReport.DHTML, null);
			Writer writer = new PrintWriter(toClient);
			HtmlParameterPageWriter paramPageWriter = new HtmlParameterPageWriter(
					paramPage, writer);
			paramPageWriter.writePage();
			writer.flush();
			writer.close();
		} catch (Exception e) {
			e.printStackTrace();
		}
		toClient.flush();
		toClient.close();

	}

	public String getServletInfo() {
		return "QuickStart463 servlet for EspressReport";
	}
}
To deploy the servlet:
Move
QuickStart463.classfrom<EspressReport installation directory>/help/quickstart/classesdirectory to<Tomcat installation>/webapps/ROOT/WEB-INF/classesdirectory;Compile
ParamReportGeneratorServlet<EspressReport installation directory>/ParamReportGeneratorMove
ParamReportGeneratorServlet.classto<Tomcat installation>/webapps/ROOT/WEB-INF/classesdirectory.
When the servlet is run using the URL http://localhost:8080/servlet/QuickStart463, the following HTML page will be displayed:
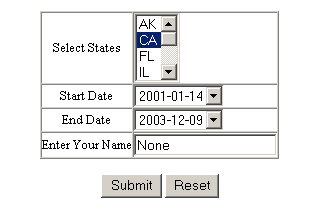
HTML Prompt Page Generated
Depending on what parameter values you pass in, a report similar to the following will be displayed:
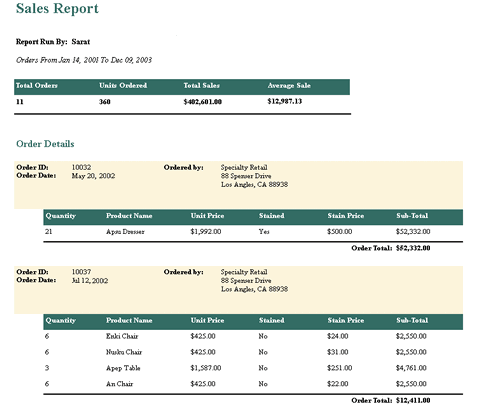
Report Generated After Passing in Parameter Values
The main part of the code is in the QuickStart463. There, a QbReport object called report is created using the QuickStart46.rpt template. The dynamic export is then called to use the ParamReportGeneratorServlet (provided with EspressReport) using the following lines:
<QbReport object>.setDynamicExport(boolean isDynamicExport, String servername, int servletRunnerPort);
String htmlParamPage = <QbReport object>.getHTMLParamPage(String reportLocation, int exportFormat);
The HTML file asking for the parameter values is then generated and passed to the OutputStream.
For more information about the parameter page writer classes, see Section 2.3.5.7.10.3 - Generating HTML Parameter Page. For an example of generating parameter page using CssHtmlParameterPageWriter which utilize CSS, go to <EspressReport>/help/examples/servlet/CssParamReport and follow the javadoc instructions.
The following code shows how to display an existing report template (in this case QuickStart47.rpt), which is a drill-down report, in a servlet. The servlet creates the QbReport object by opening the template. A DHTML page, showing the contents of the first level, is then streamed. The next level report is obtained by clicking on the links. These links point to the DrillDownReportServlet. The values of the link (clicked on) are passed to the DrillDownReportServlet and the next level report (based on those values) is then generated and then streamed to the client.
import quadbase.reportdesigner.ReportAPI.QbReport;
import java.applet.*;
import java.io.*;
import javax.servlet.*;
import javax.servlet.http.*;
import java.awt.Font;

public class QuickStart47 extends HttpServlet {

	public void doGet(HttpServletRequest req, HttpServletResponse res)
			throws ServletException, IOException {

		System.out.println("QuickStart47 Servlet: Do Get....");
		res.setContentType("text/html");

		OutputStream toClient = res.getOutputStream();
		try {
			// Connect to EspressManager
			QbReport.setEspressManagerUsed(true);
			String reportLocation = "help/quickstart/templates/QuickStart47.rpt";
			// Create the ObReport object using back-up data
			QbReport report = new QbReport((Applet) null, reportLocation);
			// Specify the parameters for connecting to DrillDownReportServlet
			report.setDynamicExport(true, "127.0.0.1", 8080);
			// Export the report to DHTML
			report.export(QbReport.DHTML, toClient);
		} catch (Exception e) {
			e.printStackTrace();
		}

		toClient.flush();
		toClient.close();

	}

	public String getServletInfo() {
		return "QuickStart47 servlet for EspressReport";
	}
}
To deploy the servlet:
Move
QuickStart47.classfrom<EspressReport installation directory>/help/quickstart/classesdirectory to<Tomcat installation>/webapps/ROOT/WEB-INF/classesdirectory;Compile
DrillDownReportServlet<EspressReport installation directory>/DrillDownLinkGenerator;Move
DrillDownReportServlet.classto the<Tomcat installation>/webapps/ROOT/WEB-INF/classesdirectory;Compile
RPTImageGenerator<EspressReport installation directory>/ImageGenerator;Move
RPTImageGenerator.classto<Tomcat installation>/webapps/ROOT/WEB-INF/classesdirectory.For Tomcat 7.x or higher version, the servlet, i.e.
QuickStart482in this example needs to be explicitly mapped in web.xml:<servlet> <servlet-name>QuickStart47</servlet-name> <servlet-class>QuickStart47</servlet-class> </servlet>
and
<servlet-mapping>
		<servlet-name>QuickStart47</servlet-name>
		<url-pattern>/servlet/QuickStart47</url-pattern>
</servlet-mapping>
When the servlet is run using the URL http://localhost:8080/servlet/QuickStart47, the following HTML page will be displayed:
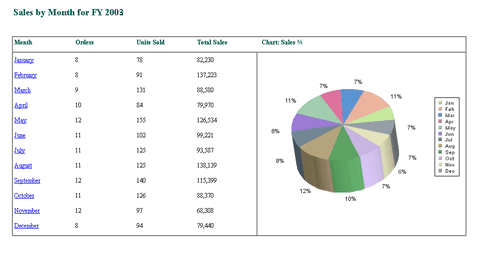
Report Generated
Depending on what link you click, a report similar to the following will be displayed:
Again, depending on what link you click, a report similar to the following will be displayed:
The main part of the code is in the QuickStart47. There, a QbReport object called report is created using the QuickStart47.rpt template. The dynamic export is then called to use the DrillDownReportServlet (provided with EspressReport) using the following lines:
<QbReport object>.setDynamicExport(boolean isDynamicExport, String servername, int servletRunnerPort);
The DHTML file for the top level report is then generated and passed to the OutputStream.
<QbReport object>.export(int exportFormat, OutputStream out);
The following sections show how to run a pre-existing template (QuickStart48.rpt located in <EspressReport installation directory>/help/quickstart/templates directory) in a servlet and have the generated report saved to a file or streamed to the client browser.
Each section shows the code to generate the report and any steps necessary to deploy.
The following code shows how to display an existing report template (in this case QuickStart48.rpt) in an servlet. The servlet then exports the report to a PDF file.
import quadbase.reportdesigner.ReportAPI.*;
import quadbase.reportdesigner.ReportElements.*;
import quadbase.reportdesigner.ReportViewer.*;
import quadbase.reportdesigner.util.*;
import quadbase.reportdesigner.lang.*;
import java.awt.*;
import java.applet.*;
import java.io.*;
import java.util.*;
import javax.servlet.*;
import javax.servlet.http.*;

public class QuickStart481 extends HttpServlet {

	public void doGet(HttpServletRequest req, HttpServletResponse res)
			throws ServletException, IOException {
		System.out.println("Calling QuickStart481....");
		// Set the "content type" header of the response
		res.setContentType("text/html");
		// Get the response's PrintWriter to return content to the client.
		PrintWriter toClient = res.getWriter();
		try {
			// Use EspressManager
			QbReport.setEspressManagerUsed(true);
			// Open up specified Report
			QbReport report = new QbReport((Applet) null,
					"help/quickstart/templates/QuickStart48.rpt");
			// Export the report to PDF file
			report.export(QbReport.PDF, "generatedReport");
			// Begin Code : Send message to client saying file has been exported
			toClient.println("<html>");
			toClient.println("<head>");
			toClient.println("</head>");
			toClient.println("<body>");
			toClient.println("The report has been exported to generatedReport.pdf in your EspressReport installation root directory.");
			toClient.println("</body>");
			toClient.println("</html>");
			// End Code : Send message to client saying file has been exported
		} catch (Exception e) {
			e.printStackTrace();
		}
		// Flush the outputStream
		toClient.flush();
		// Close the writer; the response is done.
		toClient.close();
	}

	public String getServletInfo() {
		return "QuickStart481 servlet for EspressReport";
	}
}
To deploy the servlet:
Move
QuickStart481.classfrom<EspressReport installation directory>/help/quickstart/classesdirectory to<Tomcat installation>/webapps/ROOT/WEB-INF/classesdirectory.
When the servlet is run using the URL http://localhost:8080/servlet/QuickStart481, the report is generated to your <EspressReport installation directory>/generatedReport.pdf and the following message will be displayed:
Message Shown After Report is Generated
The main part of the code is in the QuickStart481. There, a QbReport object called report is created using the QuickStart48.rpt template. The following constructor is used. The QbReport object report was then exported as PDF using the export method:
<QbReport object>.export(int exportFormat, String exportFilename);
The following code shows how to display an existing report template (in this case QuickStart48.rpt) in a servlet. The servlet then streams the report (along with the chart) as a DTHML document to the client.
import quadbase.reportdesigner.ReportAPI.QbReport;
import java.applet.*;
import java.io.*;
import javax.servlet.*;
import javax.servlet.http.*;
import java.awt.Font;

public class QuickStart482 extends HttpServlet {

	public void doGet(HttpServletRequest req, HttpServletResponse res)
			throws ServletException, IOException {
		System.out.println("QuickStart482 Servlet: Do Get....");
		res.setContentType("text/html");
		OutputStream toClient = res.getOutputStream();
		try {
			// Connect to EspressManager
			QbReport.setEspressManagerUsed(true);
			String reportLocation = "help/quickstart/templates/QuickStart48.rpt";
			// Create the ObReport object
			QbReport report = new QbReport((Applet) null, reportLocation);

			// Specify the parameters for connecting to RPTImageGenerator
			report.setDynamicExport(true, "127.0.0.1", 8080);

			// Stream report to client
			report.export(QbReport.DHTML, toClient);
		} catch (Exception e) {
			e.printStackTrace();
		}
		toClient.flush();
		toClient.close();

	}

	public String getServletInfo() {
		return "QuickStart482 Servlet for EspressReport";
	}
}
To deploy the servlet:
Move
QuickStart482.classto<Tomcat installation>/webapps/ROOT/WEB-INF/classesdirectory;Compile
RPTImageGenerator<EspressReport installation directory>/ImageGenerator;Move
RPTImageGenerator.classto<Tomcat installation>/webapps/ROOT/WEB-INF/classesdirectory.For Tomcat 7.x or higher version, the servlet, i.e.
QuickStart482in this example, needs to be explicitly mapped in web.xml:<servlet> <servlet-name>QuickStart482</servlet-name> <servlet-class>QuickStart482</servlet-class> </servlet>
and
<servlet-mapping>
		<servlet-name>QuickStart482</servlet-name>
		<url-pattern>/servlet/QuickStart482</url-pattern>
</servlet-mapping>
When the servlet is run using the URL http://localhost:8080/servlet/QuickStart482, the following HTML page will be displayed:
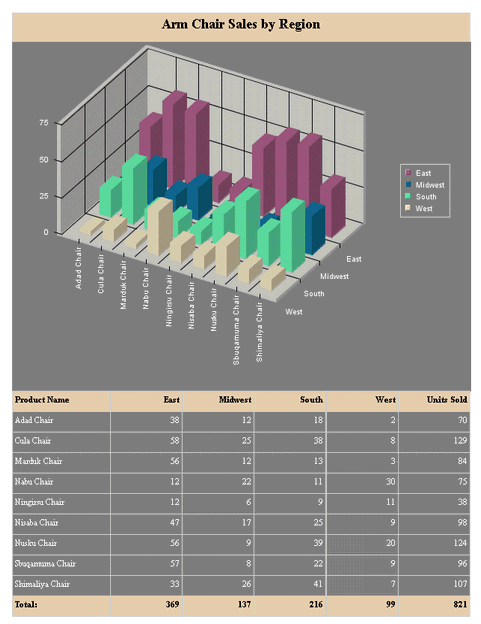
Report generated
The main part of the code is in the QuickStart482. There, a QbReport object called report is created using the QuickStart48.rpt template. Dynamic export is then called to use the RPTImageGenerator (provided with EspressReport) using the following lines:
<QbReport object>.setDynamicExport(boolean isDynamicExport, String servername, int servletRunnerPort);
The DHTML file for the top level report is then generated and passed to the OutputStream.
<QbReport object>.export(int exportFormat, OutputStream out);
The following code shows how to launch the Report Designer (in default mode) via the Report API:
import java.awt.*;
import javax.swing.*;
import java.io.*;
import quadbase.reportdesigner.designer.*;

public class QuickStart49 {

	public static void main(java.lang.String[] args) {

		try {
			QuickStart49 doReport = new QuickStart49();
		} catch (Exception ex) {
			ex.printStackTrace();
		}
	}

	public QuickStart49() {

		// Begin Code : Start Designer in default mode and show the Designer
		QbReportDesigner.setUseSysResourceImages(true);
		QbReportDesigner designer = new QbReportDesigner(null);
		designer.setVisible(true);
		// End Code : Start Designer in default mode and show the Designer
	}
}
The class file for the above source is located in <EspressReport installation directory>/help/quickstart/classes directory.
To run the class file, move QuickStart49.class to <EspressReport Installation directory> and use the command java QuickStart49.
The main part of the code is in the QuickStart49. There, a QbReportDesigner object called designer is created and shown:
QbReportDesigner(Object parent);
<QbReportDesigner object>.setVisible(boolean b);
