Included with EspressReport is a simple interface that allows you to schedule reports, as well as virtually any other event on the server-side. The Scheduler runs in conjunction with EspressManager, and through the interface you can set schedules, as well as manage scheduled tasks.
The Scheduler can be run as an application on the server or remotely through a web browser. To run the Scheduler, take the following steps:
- Application:
If you are running the Scheduler locally, be sure to start EspressManager first by executing the espressmanager batch file. Then start the Scheduler by executing the scheduler batch file. This will launch the application.
- Browser:
If you are running the Scheduler remotely, make sure EspressManager is running on the server machine then type the URL for the Scheduler in your browser i.e.
http://machinename/espressreport/scheduler.html. This will bring up the Scheduler as an Java Web Start window.
The main Scheduler interface is a window that contains a list of scheduled jobs.
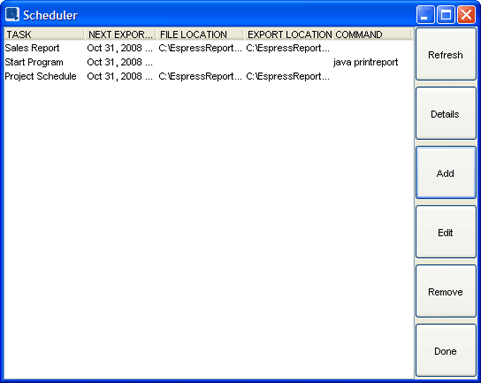
Main Scheduler Interface
For each job the window displays the job name, the next scheduled export time, the location of the report file (if applicable), the location of the exported file (if applicable), and the scheduled command line (if applicable). The buttons on the right-hand side of the window perform the following functions:
- Refresh:
This will refresh the list of scheduled tasks showing the latest. This is useful if there are other users who may be adding schedules as well.
- Details:
This will open a new window displaying detailed information about the currently selected scheduled task.
- Add:
This allows you to set up a new schedule.
- Edit:
This allows you to edit the currently selected scheduled task.
- Remove:
This will delete the currently selected scheduled task.
- Done:
This will exit the scheduler. (This button only appears when you are running the Scheduler as an application).
To create a new schedule, click the button in the main Scheduler window. This will open a dialog asking you if you would like to schedule a report or a command.
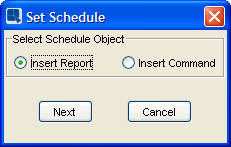
First Schedule Dialog
- Report:
This option allows you to select a report template (either
.pak, .rptor.xmlformat) to schedule. You will be able to specify the periodicity of the schedule as well as delivery options. For more information, see Section 1.13.2.1 - Scheduling a Report.- Command:
The command option allows you to schedule something other than a report file. This feature allows you to write a command that will be executed in the same directory as EspressManager. Hence, you could use this feature to run a Java process that includes the Report API. For more information, see Section 1.13.2.6 - Scheduling a Command
To schedule a report, add a new schedule in the Scheduler and select the Insert Report option. The first dialog of the scheduling process will open.
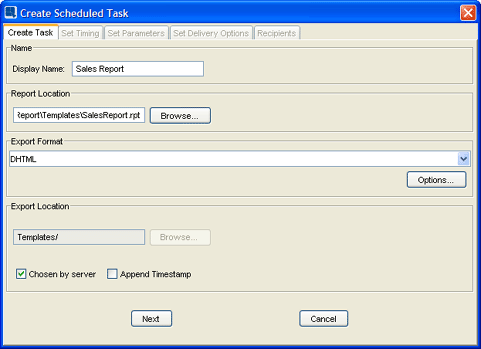
Schedule Dialog
From this screen, you are first prompted to specify a display name for the scheduled event. The second section allows you to specify the template to use for the schedule and the third section allows you to specify the export format for the report. Available formats include DHTML, PDF, CSV, Excel (XLS), Excel 2007 (XLSX), text, rich text, or XML. The button allows you to set format-specific options for the exported file. For DHTML you can set single or multi-page exporting and you can also specify which CSS options to use. For PDF you can set encryption and for text you can specify the delimiter. For more information about report exporting options, please see Section 1.7.2 - Exporting Reports.
The last section allows you to specify the report's export location. You can either specify a path and filename for the exported file (without extensions), or allow the server to assign a location and filename. If you enter a location and filename, the server will overwrite that file with the latest version each time the schedule is run. If you allow the server to assign location and filename, the file will be placed in the ScheduledReports directory for exported reports under the server root.
The Append Timestamp option allows you to control how the files are saved. Normally, when a schedule job executes, it will overwrite the last version that was generated. However, you can specify to append a timestamp with the export time to the file name each time the schedule executes. This will generate a unique file for each scheduled execution instead of overwriting the last file.
After you finish specifying image and name options, click . If the report contain security levels, a dialog will pop up asking for the security level to use for this report.
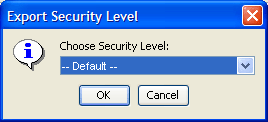
Set Security level
From this dialog you can select one of the security levels defined in the template, or you can use the default setting which will apply none of the security settings to the template. The schedule will then run using the security level that you have defined. Once you have selected the security level to use, click . You will then be prompted to specify the periodicity of the schedule.
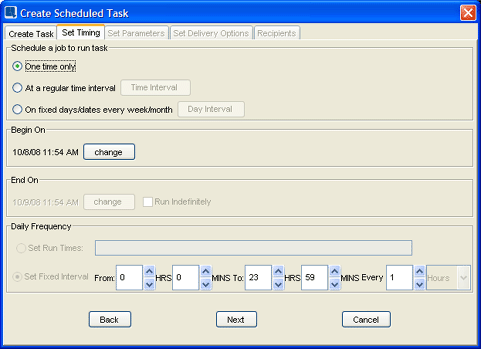
Set Start & End Date Dialog
The next screen allows you to select a start and finish date for the scheduled event. The Begin On and End On sections allow you to select the start and end date for the schedule. You can also check Run Indefinitely instead of specifying an end date.
The top of the window allows you to select one of three options to run the chart or report: One time only, At a regular time interval, and On fixed dates/days every week/month.
The first option will only run the event once on the start date specified. If you select this option there is no need to specify an end date. If you select the second option, be sure to specify a start and end date, and click the button to specify the interval for the schedule. A dialog will appear allowing you to select the time interval, either in hours/minutes, days, or months. The export will begin at the start time and run at the specified intervals there after.

Select Time Interval Dialog
If you select the third option, be sure to specify a start and end date, and click the button to specify the interval for the schdule. A dialog will appear allowing you to enter dates of the month (dates are comma separated i.e. 5,15), or days of the week for the event to run.
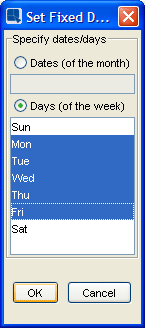
Select Fixed Days/Dates Dialog
Selecting the third option also means that you are required to specify the daily frequency. The Daily Frequency section allows you to fine tune when schedules are run during the specified days. The Set Run Time option allow you to specify the exact time(s) to run the export during the day. For example, using the 'Set Run Times' option, you can specify a schedule to run at irregular intervals such as 9:00AM, 5:30PM, and 12:00AM. The Set Fixed Interval option allows you to specify the run times based off of regular intervals. For example, you can set up a schedule that runs every 30 minutes between 9:00AM and 5:00PM using this option.
Once you have finished specifying the periodicity, click to continue with the Schedule Wizard.
If you have selected to schedule a report that contains parameters, the next tab will appear allowing you to set the parameter values you would like use.

Set Schedule Parameters Dialog
To add a set of parameters, select the button. This will bring up the parameter prompt dialog allowing you to select the set of parameter values you would like to use. Once you have selected a parameter set, your choices will appear in the dialog. You can add as many different combinations of parameter sets as you would like. A separate file will be generated for each set of parameters you specify.
You can also specify a name for each parameter set by double clicking on the first column. The name specified here will be used in later dialogs to help you organize your recipients.
Once you have specified all the parameters you would like, click the button to continue.
After you have finished setting up the schedule, you will see a two tabbed dialog allowing you to deliver the report to users via email.

Email Delivery Options Dialog
If you choose to deliver the report by email, check the Send Email box at the bottom. The first tab contains information for the email sent when the report successfully exports. The General Email Information portion of this tab allows you to specify the from addresses for the email as well as the subject. The body text portion allows you to specify a message for the body of the email.
There are three ways in which a scheduled report can be sent via email. You can send the generated report as an email attachment, you can send a link to the generated report, or you can send the report as the email (this option is available for DHTML export only). If you select to send a link to the generated report, you will need to specify an http path to the directory in which the report is generated. Otherwise, the link will not form correctly. For example, if you have EspressReport installed under Tomcat's web root, and you elected to let the server choose the location/name of the generated files, then the actual directory location would be something like:
C:\Tomcat5.5\webapps\ROOT\EspressReport\ScheduledReports
And the corresponding URL Mapping would be:
http://hostname:8080/EspressReport/ScheduledReports
If you do not wish to include email delivery/notification with a particular job, simply un-select the option marked Send Email. Once you have finished specifying email options, click and the schedule will be completed.
![[Note]](../../../images/note.png) | Note |
|---|---|
In order for email delivery to work correctly, you will need to have correctly configured the smtp information in the EspressManager config file. For more information about this, see Section 1.2.3 - Configuration. |
![[Note]](../../../images/note.png) | Note |
|---|---|
In order to send email correctly the smtp host needs to be setup in the config file in the userdb directory. To setup the smtp host, open the config.txt file. Under the heading [smtp host] quadbase.com [smtp secured] true [smtp ssl] true [smtp port] 587 [smtp username] guest [smtp password] password |
The Failed Email tab allows you to send a different email (subject and body) to your recipients should there be an error running the report.

Specifying Failed Email
This tab also allows you to send the error logs to a specific user. Typically, this would be the admin or a technical user who is able to diagnose and troubleshoot the problem.
If you selected to email the scheduled file, the next tab allows you to specify the recipient list. The recipient list is set up differently depending on the type of report or chart you are scheduling. If the report or chart contains parameters, you will see the following dialog. This allows you to send different parameter sets to different users or groups.
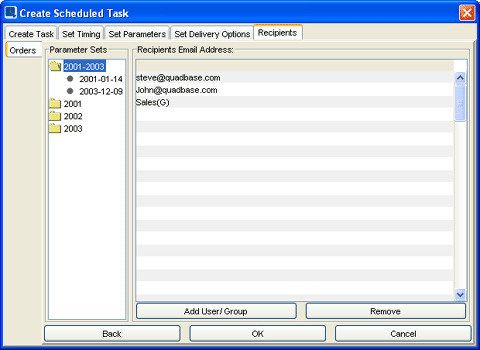
Recipients List for Parameterized Report
Entering recipients into the list is simple, add regular email addresses by double clicking any row in the recipients list and typing it in. To send different parameter sets to the same user, there are copy and paste options available when you right click on the recipients list. You may also click on to view the previously listed recpients.
If you are scheduling a grouped report (such as a summary break report) and the report is using a database as a datasource, then you will see the option for report bursting as well. Screenshot and detailed information for report bursting can be found in the Section 1.13.2.5 - Report Bursting.
For all other cases, you will see the following dialog containing only the recipients list.

Recipients List
If the report being scheduled contains grouped data (like a summary break report), you can select to burst the schedule delivery. When a report is burst, the schedule job will generate a separate report for each group of data. You can then deliver each group's report to a specific email address, allowing end users to receive scheduled reports containing data relevant to them. By running large reports once, and then breaking up the exports into smaller reports, this feature can offer significant performance and security improvements over running multiple smaller schedule jobs. Note that the report bursting option is only available if the datasource for the report is a database.
On the recipients tab, you will be presented with a dialog that allows you to select email delivery options for the schedule. If the report contains grouped data, the dialog will contain a bursting option at the top.
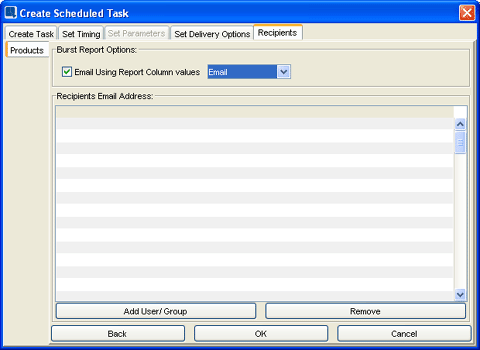
Recipients List for Report Bursting
To utilize the burst report feature, the report must have a column that contains email addresses that correctly correspond to the group by (row break) column. For example, if the report is an account statement grouped by a customer ID column, the report must also contain a column that contains the email address for each customer. Note that the email column does not need to be visible in order to use the bursting feature.
If the report meets the aforementioned requirements, you can enable report bursting by selecting the option Email Using Report Column Values at the top of the dialog. This will run a single query for the report, break the report up by groups, export each group, and deliver the exports to the email address listed for each group.
In additional scheduling reports, you can also schedule a command execution. The schedule command option allows you to write a command that will be run in the same directory as EspressManager. This is a very flexible option and any command can be used. For example, you could run a java program that contains custom code modifying and exporting a report (e.g. java runreport). To create a scheduled command, create a new schedule from the Scheduler interface and select the Insert Command option.

Command Options Dialog
From this screen you are first prompted to enter a display name for the scheduled event. The next option allows you to enter the command that you would like the Scheduler to execute.
The main Scheduler window shows a list of all scheduled tasks. For more information about a particular task, you can select it, and click the button. This will bring up a new window displaying schedule details.
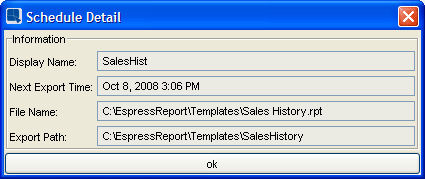
Schedule Detail Dialog
To edit a schedule you can select a scheduled task in the main window and click the Button. This will re-open the schedule dialogs, allowing you to specify different details.
In order for the schedule to run, EspressManager must be running. Schedules cannot run without EspressManager. If you shut down EspressManager, the schedule will resume when you re-start it.