This chapter covers security concepts in ERES and the administration of user privileges. Other security features for data registries and deployment (menu page, URLs, and the API) are discussed in later sections.
There are two security concepts in ERES:
- User privileges
This is the default security concept. User privileges are derived from relations between users and groups (will be described later). Relations between users/groups can be modified.
- File permissions
You can disable the “User Privileges” mode for certain files/folders and set custom permissions for those files/folders.
In EspressReport ES, privileges are based on the concept of ownership by default. This means that the privileges or access to a particular folder, report or chart, stem from who is the owner or creater of that folder, report or chart. Each user (or group) has a set of privileges that apply to other users or groups when accessing reports or charts created by that user.
In this ownership approach, users belonging to the same group or subgroups of the same group have full access privilege to items (folders, reports, charts) created by each other. For example, group A (group structure A) has users a,b,c and sub-group B. Group B (as a sub-group of A) has users d,e ,and f. The default behavior is such that users a,b,c,d,e,f will have full access privilege to items created by each other. At the same time, users outside of the group structure A have no access to the items created by users in this group structure.
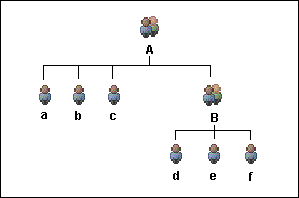
Users from group A and B will have access to each other's files.
With the “user privileges” setting functionality, you (as the administrator) can modify the default privilege granting scheme. For example, you can grant users from group C and D read or read/write access to group B users' items whereas group A's users have no permission to access group B users' items. Meanwhile, group B users still have same access right to other group A users' items if group A is still using default privileges.
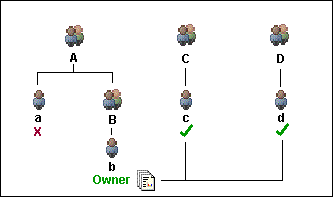
After setting group permission, groups C and D have access to group B's files, but group A does not.
In addition to the “user privileges” ownership model, the privileges for individual items can be modified to further enhance the security settings. This function is called the “File permissions”. In this scenario, individual items can be made accessible to groups and users independent of the ownership assigned scheme.
For example, an item created by user a is automatically fully accessible to users b,c,d,e, and f. But you can specifically modify the permission setting such that user c has no access right to that particular item while the rest of the users in the group structure maintain their access rights.
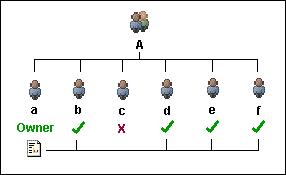
After setting file permission, user c does not have access to this particular report.
Privileges are set by the administrator in the Organizer interface (with the exception of the basic designer/viewer role for users set in the Admin Console). To set user privileges in Organizer, select → or click the ![]() button on the toolbar. This will bring up a dialog, allowing you to set owner permissions for users and groups.
button on the toolbar. This will bring up a dialog, allowing you to set owner permissions for users and groups.

Permission Setting Dialog
The dialog contains two tabs one listing all of the groups currently defined for ERES and the other listing all the users. From either of these tabs you can select a user or group for which you would like to set owner permissions by selecting it and clicking the button.
![[Note]](../../../images/note.png) | Note |
|---|---|
When you select a user or group, you are setting privileges for folders, reports, and charts that this user, or users in this group create (or become owners of). You are not setting access levels for that particular user or group, rather you are setting privileges for other groups or users who access reports created by this user or group. |
Group/User Permissions
Every group or user will automatically have read and write permissions for their own report and charts. You can give other groups and users access, by clicking the button. This will bring up a list of users and groups allowing you to select which users and/or groups you would like to add. For each additional user or group, you can set their access to read-only, or read-write.
Read-only access allows the user or group to view the file using various ERES tools. For example, when the user opens the file from the ERES Organizer, the program will launch the corresponding viewer (Chart Viewer for charts, Page Viewer for reports, Dashboard Viewer for dashboards) rather than opening the Designer. The user can also create schedules and archives for this file and access the file through the ERES menu page. With read-only permission, the user will not be able to edit the file using the Designers, nor will they be able to generate URL for the file. In addition, the user cannot see the file and URL path in the Organizer.
Read-write access grants full privilege to the user. They can edit the file using the corresponding designer as well as generate URL and see the file and URL path in the organizer.
If the Use Default checkbox is checked then the user or group will inherit permissions from the group to which he/it belongs. If the user or group does not belong to any other groups then they will have read and write permissions for their reports but no other users will have access. This option is used by default in EspressReport ES. There users will automatically inherit group permissions unless settings for that user are specifically modified.
Generally, a user is the owner of any folder, chart, or report he/she creates. However, the administrator can change the owner of any folder or file in the Organizer. To change the owner of a folder or file, right click on it, and select Change Ownership from the pop-up menu. This will bring up a dialog showing the current owner of the file or folder.
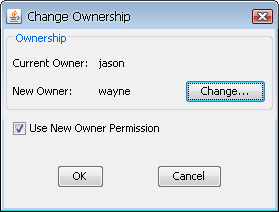
Change Ownership Dialog
To change ownership, click the button. This will bring up a list of all the defined users. Select the user to which you would like to assign ownership and click . The new owner will then be reflected in the dialog. Click again to apply the changes. Note that changing the owner of the file will generally effect which users can access and edit the file.
By default, user privileges for files and folders in the Organizer are derived from the owner of that file or folder. However, in certain circumstances you may want to set privileges for specific files or folders to be different from those associated with the owner. To apply a different set of permissions to a file or folder, right click on it and select Change Folder/File Permissions from the pop-up menu.
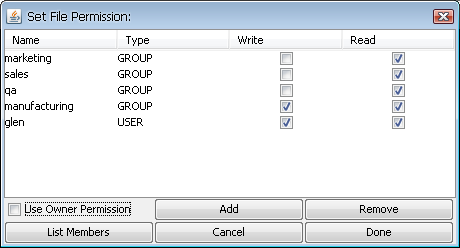
File/Folder Permissions Dialog
The Use Owner Permission checkbox indicates, if checked, that the folder or file is currently using owner permissions. To add different levels of access for that particular object, first un-check this option, and click the button. This will bring up a list of users and groups, allowing you to select which users and/or groups you would like to add. For each additional user or group, you can set their access to read-only, or read-write. Once you have finished adjusting access for the object, click and the changes will be applied.
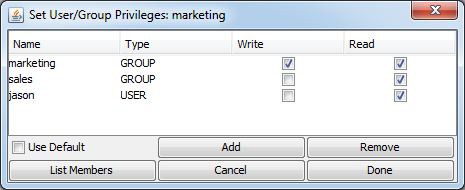
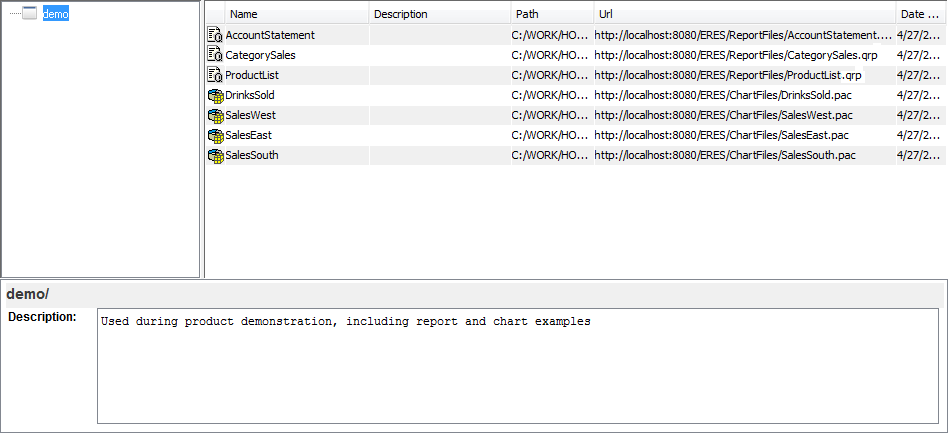
Here is a practical example that illustrates how the file/folder permissions function. Suppose John, a member of the marketing group, can only see the demo project, which is used during project demostrations. All other existing projects that John does not have access to are automatically hidden from view.
John's Organizer
Suppose the administrator would like for John to edit and incorporate a dashboard into his presentations. To do so, the administrator gives John read and write permissions for one dashboard in the Dashboard/DashDemo/ project. It is not necessary for administrator to set folder privileges since the change will be propagated through the parent folders.
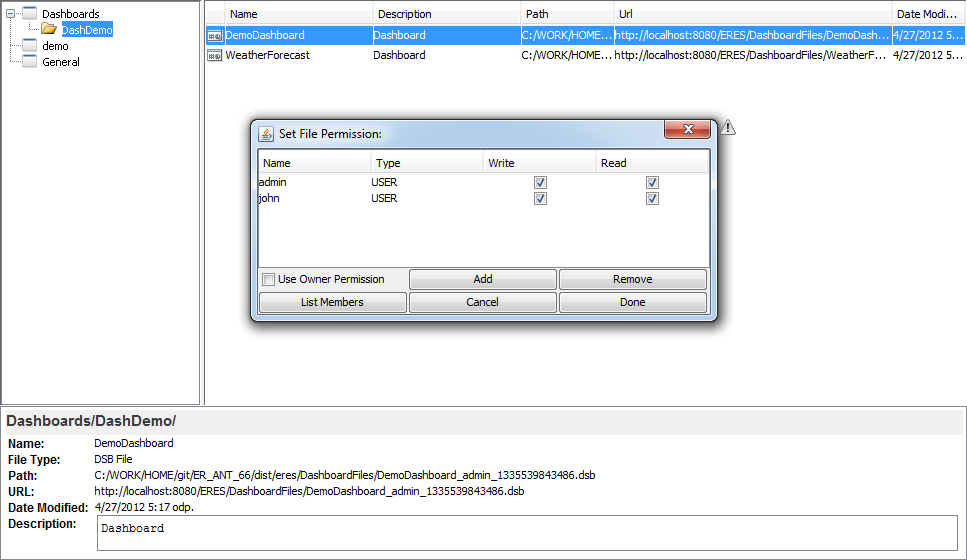
Setting File Permission
The next time John launches the Organizer, he will see the dashboard file that he has been given permission to view and edit. However, John will not be able to see any other files in this folder nor any files in the Dashboard folder (the parent folder).
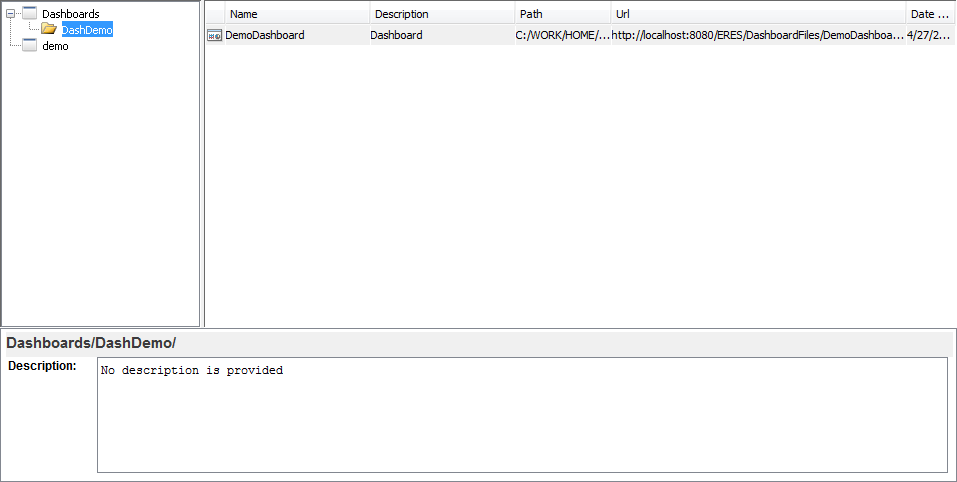
Dashboard File is Accessible
In addition to setting permissions and access for different reports, the administrator can also apply security settings within reports, such that users and groups can get different views of the same report when accessing it. This security feature is administered through security levels.
Security levels are settings which can be applied to reports. For different security levels, elements (cells, and columns) in a report can be modified, and filters can be automatically applied to the report. For more information about how to apply security settings for reports in the Report Designer, please see Section 3.10 - Template Security.
Security levels are created by the administrator in Organizer and applied to reports in the Report Designer. To create or modify security levels, select Set Security Levels from the Edit menu. This will bring up a dialog listing all the security levels that have been defined.
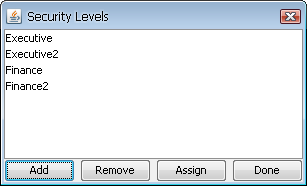
Security Levels Dialog
To add a new security level, click the button. This will bring up a dialog prompting you to specify a name for the new security level. There is no limit to the number of different security levels that can be defined. Defined security levels are then imported into the Report Designer allowing you to set/modify report behavior for different levels.
In ERES, users and groups can be associated with defined security levels to provide end-to-end security. When a user accesses a report, the security level to which they are associated will be applied, and the view defined by that security level will be presented to the user. To associate users and groups with security levels, select a security level in the list and click the Button in the Security Level Dialog.
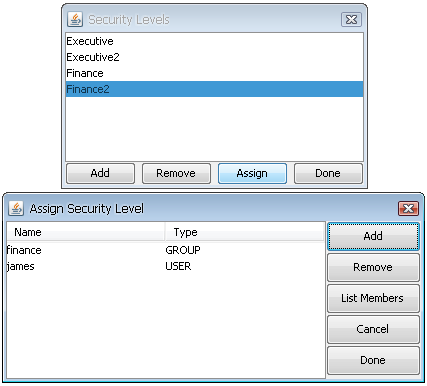
Assign Security Level Dialog
In the dialog that opens, click the button to associate a user or group with the selected security level. This will bring up a dialog that contains a list of all the defined users and groups. From this dialog you can select groups and users to associate with the security level. When you have finished, click to return to the security levels dialog.
You can assign more than one user or group to a security level, but users cannot be assigned to more than one security level at a time. Security level associates, like permissions are applied at the lowest level. This means that if an individual user is associated with a security level, it will take precedence over settings for their group.