One of the most common needs with a reporting tool is to keep the number of different report templates at a minimum. In ERES, the administrator can grant access to specific reports for users and groups in the system. However simply granting or denying access may not be enough to facilitate template re-use. To help with this, ERES provides a template security features that allow the administrator to configure different levels of access to the same report template for different users/groups in the system.
For example, say you have a group in ERES called Sales. The group all has access to a report that shows total sales grouped by sales region. Sales executives viewing the report need to see the totals as well as the contributions by each region, while individual account managers would only need to see the data for their region. Rather than creating a different report for each sub-group within the Sales group, the same template can have security settings applied. The base template for this scenario would look like this:
| Sales Report | ||||
|---|---|---|---|---|
| Total Units Sold: 29 Total Sales: $24,449.69 | ||||
| Eastern Region | ||||
| Order # | Quantity | Product | Unit Price | Total Sales |
| 1001 | 2 | Chair | $325.16 | $650.32 |
| 1 | Table | $1,114.18 | $1,114.18 | |
| Order Total: | $1,764.50 | |||
| 1004 | 3 | Table | $1,114.18 | $3,342.54 |
| 2 | Dresser | $1,518.60 | $3,037.20 | |
| Order Total: | $6,379.74 | |||
| Total for Eastern Region: | $8,144.24 | |||
| Midwestern Region | ||||
| Order # | Quantity | Product | Unit Price | Total Sales |
| 1003 | 4 | Chair | $325.16 | $1,300.25 |
| 2 | Table | $1,114.18 | $2,228.36 | |
| 1 | Dresser | $1,518.60 | $1,518.60 | |
| Order Total: | $5,047.21 | |||
| Total for Midwestern Region: | $5,047.21 | |||
| Southern Region | ||||
| Order # | Quantity | Product | Unit Price | Total Sales |
| 1005 | 2 | Table | $1,114.18 | $2,228.35 |
| 1 | Dresser | $1,518.60 | $1,518.60 | |
| Order Total: | $3,746.95 | |||
| 1007 | 3 | Chair | $325.16 | $975.48 |
| 1 | Table | $1,114.18 | $1,114.18 | |
| Order Total: | $2,089.66 | |||
| Total for Southern Region: | $5,836.61 | |||
| Western Region | ||||
| Order # | Quantity | Product | Unit Price | Total Sales |
| 1006 | 2 | Dresser | $1,518.60 | $3,037.20 |
| 4 | Chair | $325.16 | $1,300.25 | |
| 1 | Table | $1,114.18 | $1,114.18 | |
| Order Total: | $5,451.63 | |||
| Total for Western Region: | $5,451.63 | |||
Using the security features, this one template could be used to meet the requirements of all the members of the Sales group. In this example, assume that the report has a query parameter that filters based on region.
For executives, the view above is what they would want to see when viewing the report, so a security level called Management could be created that retrieves data for all regions. This is accomplished by mapping all the available values for the region parameter to the Management level. In this example the values for the Eastern, Midwestern, Southern, and Western regions would be assigned to the security level. Note that in ReportDesigner, in order to supply more than one value to a query parameter, you need to define a multi-value parameter. For more on this, please see Section 2.4.3.2.2.1 - Multi-Value Parameters
For the account managers, different security levels could be created for each region. The above example has four regions, so security levels East, Midwest, South, and West would be added. Since account managers should not see the aggregate data, cells containing the summaries in the header would be hidden for the region levels using the cell-level security features discussed in Section 3.10.2 - Cell-Level Security. To make sure that each level returns data for the appropriate regions the parameter value for the Eastern region would be mapped to the "East" security level, the parameter value for the Midwestern region would be mapped to the Midwest security level, the parameter value for the Southern region would be mapped to the South security level, and the parameter value for the Western regions would be mapped to the West security level. For more about setting security levels to apply parameter values, see Section 3.10.2.1 - Security Parameters.
In the Organizer the members of the Sales group can be associated with the defined security levels. Then when the report is run the security level for the user who has requested the report is applied and the parameter values associated with that level are automatically supplied to the query without prompting the user. For example, here is the same report run by an account manager in the eastern region:
| Sales Report | ||||
|---|---|---|---|---|
| Eastern Region | ||||
| Order # | Quantity | Product | Unit Price | Total Sales |
| 1001 | 2 | Chair | $325.16 | $650.32 |
| 1 | Table | $1,114.18 | $1,114.18 | |
| Order Total: | $1,764.50 | |||
| 1004 | 3 | Table | $1,114.18 | $3,342.54 |
| 2 | Dresser | $1,518.60 | $3,037.20 | |
| Order Total: | $6,379.74 | |||
| Total for Eastern Region: | $8,114.24 | |||
Security levels are unique groups of settings that can control cell and parameter behavior in reports. Levels are created by the administrator in the Organizer interface. For more information about setting security levels, see Section 2.3.3 - Security Levels. The administrator can also associate users and groups with specific security levels. For more about this feature, please see Section 2.3.3.1 - Associating Security Levels with Users and Groups.
Within a report different cell behaviors and filtering can be associated with a specific security level. At run-time, based on the user login, the security level assigned to that user is applied to the report.
For any cell/visible column in the report, you can set different behaviors for different security levels. To apply security settings to a cell, either select the cell and select Security from the Data menu, or right click on the cell and select Security from the pop-up menu. This will bring up a dialog allowing you to specify the security settings for that cell.
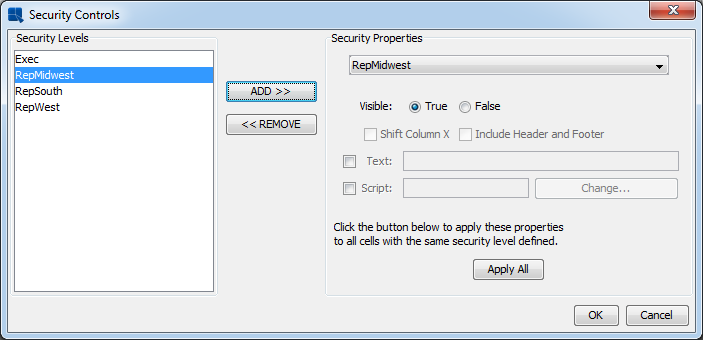
Cell Security Settings Dialog
The dialog contains a list of all the defined security levels in the Organizer.
Security levels can be added/removed/modified in the Organizer. See the Section 2.3.3 - Security Levels chapter for more details.
To add security settings for a report cell, select the level for which you would like changes to take effect and click the button. The security level will then appear in the drop-down list on the left-hand side of the cell security dialog. Now you can modify the cell for that security level. There are three basic controls that are available for cells. You can render the cell invisible for a security level. If the cell is visible, you can either provide custom text for the cell or you can apply a cell script. For more on cell scripts, please see Section 3.7 - Scripting. If you select to make a column (cell in Table Data section) invisible, make sure to select the column header along with the data cell so they both contain the same security setting, then you can check the Shift Column X option to make the other columns shift to the left when the security level is applied.
![[Note]](../../../images/note.png) | Note |
|---|---|
When you specify to change the text of a cell, it will not work for default column headers. This is because column headers are unique elements that retrieve their value from the data source. If you wish to modify the text of a column header,first, you will need to convert it to a static label first. For more information on this, please see Section 3.3.7.2 - Editing Elements. |
You can propagate this behavior to any cell that has controls for this security level by clicking the button on the right-hand side. You can specify controls for as many different levels as you would like for the cell.
Once you have finished specifying security settings for the cell, click the button. You will go back to the Design window, where a red s will appear in the upper left-hand corner to indicate that security settings have been applied to the cell.
Report Cells with Security Settings
In addition to controlling the specific behavior of cells in a report, you can also assign parameter values to a security level. For example, using the scenario described earlier where a sales report is grouped by region, you could add a query parameter that filters by sales region, and then assign the appropriate region value to a security level for that region. When an employee logs in, the report is run with the appropriate security level, and the user will only see data for their sales region as the appropriate parameter value has been supplied to the report by the security level. To use security parameters, the report must use either a parameterized database query or a parameterized class as the data source.
To add security settings for parameters, select Secured Query Parameters from the Data menu. This will bring up a dialog allowing you to select query parameter values.
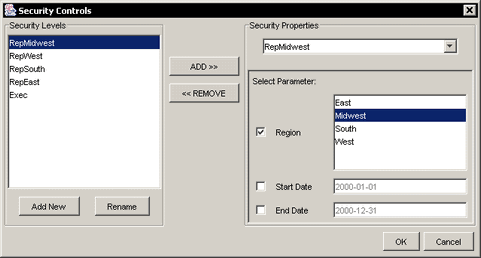
Security Parameters Dialog
Like the cell security dialog, the parameter security dialog contains a list of all the security levels defined in the Organizer in the left-hand side.
To add security settings to report parameters, select the level that you would like to assign parameter values to, and click the button. The security level will then appear in the drop-down list on the right-hand side of the dialog. For each selected security level, you can select which parameters you would like to secure using the check box next to the parameter. For each secured parameter you can select the value(s) that you would like to be associated with this security level. Once you have finished assigning parameter values, click to return to the design window.
Template security settings can automatically be applied to sub-reports as well as drill-down layers. In both cases, you need to edit the sub-report or drill-down layer (by clicking the sub-report tab, or navigating to the drill-down layer) to add security . In the sub-report or drill-down layer you can add security settings just as you would for the main report. If you would like to apply security to both the main report and the sub-report/drill-down layer, you will need to assign the security levels the same name(s) as in your main report. When a report is run with a security level, the security level will automatically be applied to the sub-report(s) and/or drill-down layer(s).
For more information about drill down and sub-reports, please see Section 3.8 - Drill Down and Section 3.9 - Sub-Reports.
You can preview the effects of your security settings in the Preview window of the Report Designer. To do this, select Set Preview Security Level from the Data menu. This will bring up a dialog prompting you to select the security level that you would like to use to view the report.
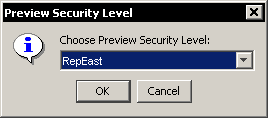
Preview Security Level Dialog
Select the level that you would like and then preview the report. You will see the report with security settings applied for the level you selected. This level will remain selected, until you change the settings. Selecting the blank entry at the top of the list in this dialog will set the report to run without applying any security settings.
Only the administrator has access to the report security features. When other users access the Report Designer, it will run in secure mode. When the Report Designer is running in secure mode, users will only be able to preview reports at the level assigned to them. In addition they will be unable to modify report cells with defined security settings or cell scripts that have been applied as security settings.
You can also call Report Designer in secure mode when launching it through the API. For more information about launching Report Designer through the API, see Section 7.1.5.8 - Calling Report Designer from Report API.