EspressDashboard deploys as servlet and JSP collection in an application server. As detailed in Section 1.3.1 - Installing EDAB, EDAB comes bundled with the Tomcat servlet container. Users have an option to install Tomcat (with EDAB automatically deployed) when running the installer. This option is recommended for new users and evaluators because EDAB will work “out-of-the-box” in this configuration.
However, EDAB can also be deployed on most popular application servers. This chapter provides step-by-step setup instructions for Tomcat, Resin, WebLogic, WebSphere, JBoss, Oracle, and Sun servers.
Throughout this chapter, the following naming conventions will be used.
<EDAB_INSTALL_DIR>:This is the location where EDAB is installed.
<EDAB_DEPLOY_DIR>:This is the final deployment directory of EDAB. It might not be same as your installation directory (
<EDAB_INSTALL_DIR>).<EDAB_CONTEXT>:This is the context path used to access EDAB web application components.
<EDAB_SERVLET_CONTEXT>:This is the servlet context of EDAB. EDAB uses servlets for many of the back-end functions. There is a
web.xmlfile under the<EDAB_INSTALL_DIR>/WEB-INFdirectory that maps all servlet classes packaged with EDAB. By default, every servlet is mapped to/servlet/<servlet name>. After deploying EDAB, you may need to change the servlet context.<server>:This is your application/web server name. It can be the name of the server machine or IP address.
<port>:The port number on which your application/web server is listening.
- EDAB Start Page :
This is the main/home page for EDAB. It should be accessed by the following URL:
http://<server>:<port>/<EDAB_CONTEXT>/index.jsp.
In addition, instructions in this chapter refer to starting and stopping the EDAB server, as well as features/options in the Admin console. If you are using AUTOSTART feature, you need to set correct port in Server Options - Auto-Start in Admin Console page. For details about these actions, please see Section 1.3.2.2 - Starting the Server and Section 1.4 - Administration.
As the result of moving to a different application server, the <EDAB_INSTALL_DIR> location may move or the name of the EDAB context may be changed. When this happens, you will need to modify the URL mapping in Organizer in order to create/modify/run reports and charts. For more information about setting URL mapping, see Section 2.1.5 - URL Mapping.
![[Note]](../../../images/note.png) | Note |
|---|---|
These instructions assume you are running EDAB with the default (HSQL) database. If you are using a different database, you need to add the JDBC driver classes for your database to your servlet container's classpath. All JAR files are under |
You can also deploy EDAB as a war file. To make an EDAB war file, you must:
Go to
<EDAB_INSTALL_DIR>/WEB-INFdirectory and editweb.xml. Remove the two instances of the<!-- WAR DeploymentandWAR Deployment -->references and then save the file.Open command prompt and cd to
<EDAB_INSTALL_DIR>directory. Then run following command (make sure jdk/bin is in your PATH):jar -cvf0 EDAB.war *The
EDAB.warfile is now available under the<EDAB_INSTALL_DIR>and can be deployed to an application server.
Please note that when deploying the war file, the <EDAB_INSTALL_DIR> is still being used to store all templates and user files, so it must be valid and accessible. Also, the instructions, given above, must be carried out again when an update is performed on the <EDAB_INSTALL_DIR> directory and the newly created war file should be deployed again. Note that certain application servers requires additional files (such as JBoss needing a jboss-web.xml file) before the war file can be successfully deployed.
The following instructions show how to deploy EspressDashboard under Tomcat 4.1/5.x/6.0.x/7.0.x. The instructions assume that Tomcat has been installed on the system. The location of the Tomcat installation is referenced as <TOMCAT_INSTALL_DIR>.
For reference, please note that Tomcat's default port is 8080, the default working directory is <TOMCAT_INSTALL_DIR>/bin and the default Web root is <TOMCAT_INSTALL_DIR>/webapps/ROOT.
Modify the
<TOMCAT_INSTALL_DIR>/config/server.xmlfile and add the following entry:<Context path="/EDAB" docBase="<EDAB_INSTALL_DIR>" debug="0"/>. Path is the context path of EDAB web application and docBase is the absolute path or relative path of the EDAB installation. Please substitute<EDAB_INSTALL_DIR>with your actual path.![[Note]](../../../images/note.png)
Note Please use double quotes.
Now start Tomcat from
<TOMCAT_INSTALL_DIR>/bin/startup.bat/.sh.With Tomcat running, go to EDAB Start page
http://<server>:<port>/<EDAB_CONTEXT>/index.jspWith the above configuration,EDAB_CONTEXTisEDAB. Start the EDAB Server.From the EDAB Start page, login as administrator and launch the Admin Console.
From Admin Console page, go to Setting Info tab and change the EDAB Servlet Context entry to
/EDAB/servlet. This change requires you to restart the EDAB Server. You can also change the webroot entry to<TOMCAT_INSTALL_DIR>/webapps/ROOT, but it is not necessary.Stop and restart the EDAB Server.
Deploying EspressDashboard to Resin 3.x/4.x can be accomplished using the instructions provided below. The location of the Resin installation is referenced as <RESIN_INSTALL_DIR>.
For reference, please note that Resin's default port is 8080, the default working directory is <RESIN_INSTALL_DIR> and the default Web root is <RESIN_INSTALL_DIR>/docs.
You may need to move tools.jar file from your Java development kit to the
<RESIN_INSTALL_DIR>/libdirectory (for JSP compilation) or add a library path entry for the file.Modify
<RESIN_INSTALL_DIR>/conf/resin.conf. Add the following entry for context path /EDAB<web-app id="/EDAB" document-directory="<EDAB_INSTALL_DIR>"/>between<host-default>and</host-default>tags. Theidin the entry is the context path of EDAB, anddocument-directoryis the absolute path of the EDAB installation. Please substitute<EDAB_INSTALL_DIR>with your actual EDAB installation directory.In Resin 3.X, start your Resin server by running
<resin-installation-dir>/bin/httpd. In Resin 4.X, first navigate to the<RESIN_INSTALL_DIR>directory and then start the server by running the following command:java -jar lib/resin.jar start.Now from your web browser, browse to the EDAB Start page to start the server (
http://<server>:<port>/<EDAB_CONTEXT>/index.jsp). For the above configuration, the context path isEDAB.From the EDAB Start page, login as the administrator and launch the Admin Console.
From Admin Console page, go to the Setting Info tab. Change the EDAB Servlet Context entry to
/EDAB/servlet. You can also change the webroot to<RESIN_INSTALL_DIR>/doc, but it is not necessary.Stop the EDAB Server.
Stop and re-start Resin if necessary.
Go to the EDAB Start page and start the EDAB server.
The following instructions show how to deploy EspressDashboard under Resin 2.1.12. The instructions assume that Resin has been installed on the system. The location of the Resin installation is referenced as <RESIN_INSTALL_DIR>.
For reference, please note that Resin's default port is 8080, the default working directory is <RESIN_INSTALL_DIR> and the default Web root is <RESIN_INSTALL_DIR>/docs.
You may need to move
tools.jarfile from your Java development kit to the<RESIN_INSTALL_DIR>/libdirectory (for JSP compilation), or add a library path entry for the file.Modify
<RESIN_INSTALL_DIR>/conf/resin.conf. Add the following entry for context path /EDAB<web-app id="/EDAB" app-dir="<EDAB_INSTALL_DIR>"/>Whereidis the context path of EDAB, andapp-diris the absolute path of the EDAB installation. Please substitute<EDAB_INSTALL_DIR>with your actual EDAB installation directory.Start your Resin server by running
<resin-installation-dir>/bin/httpd.Now from your web browser, browse to the EDAB Start page to start the server (
http://<server>:<port>/<EDAB_CONTEXT>/index.jsp). For the above configuration, the context path isEDAB.From the EDAB Start page, login as administrator and launch the Admin Console.
From Admin Console page, go to Setting Info tab and change the EDAB Servlet Context entry to
/EDAB/servlet. You can also change the webroot to<RESIN_INSTALL_DIR>/doc, but it is not necessary.Stop the EDAB Server.
Stop and restart Resin if necessary.
Go to the EDAB Start page and start the EDAB server.
The following instructions show how to deploy EspressDashboard under WebLogic Server 9.2/10.3. The instructions assume that you have WebLogic 9.2/10.3 Server installed on the system and will be deploying EDAB under the wl_server that comes with WebLogic. The location of the WebLogic installation will be referenced as <WL_INSTALL_DIR>.
For reference, the wl_server port number is 7001 and the working directory is <WL_INSTALL_DIR>/samples/domains/wl_server/bin.
Start WebLogic 9.2/10.0 example server by executing
<WL_INSTALL_DIR>/samples/domains/wl_server/bin/startWebLogic.cmd(Windows) orstartWeblogic.sh(Unix).When Weblogic Server web is loaded, press the button on the home page.
Login to the administration console page and select Deployments node from the Domain Structure panel on the left side. This will bring up the Deployments panel on the right.
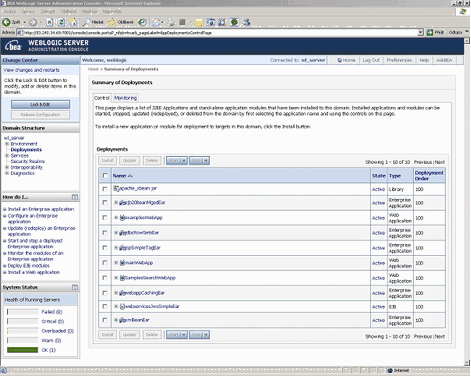
To install a new application, press the button from the Deployments panel. This will direct you to the Install Application Assistant.
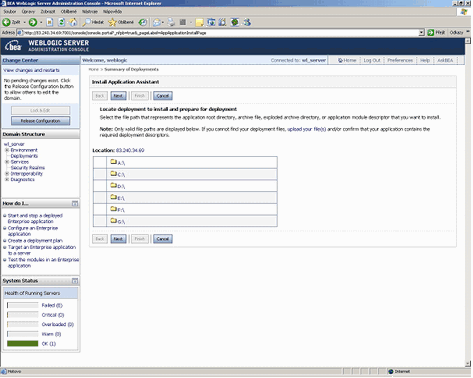
From the Application Assistant, browse to the expanded application directory of EDAB, which in this case will be the installation directory of EDAB
<EDAB_INSTALL_DIR>, and then select the radio button to the left of the EDAB directory and press the button. This will show up the following panel. From this panel, select the Install this deployment as an application radio button and press the button.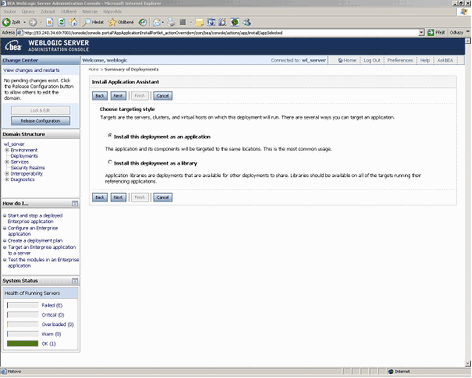
This will show up the following panel that will allow you to specify optional settings of the configuration procedure. From this panel, enter the information for EDAB and then press the button.
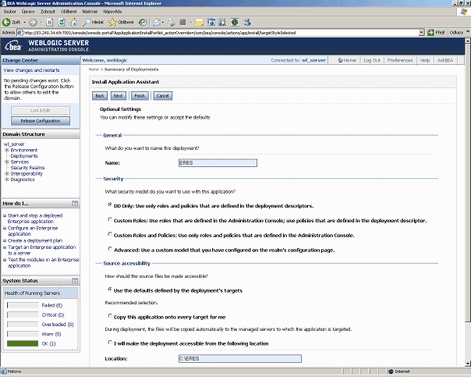
If the deployment has been installed and added to the list of pending changes successfully, press the button from the Change Center dialog to activate the pending changes.
Activate the EDAB application by checking the checkbox to the left of the EDAB link and press the "Start" button.
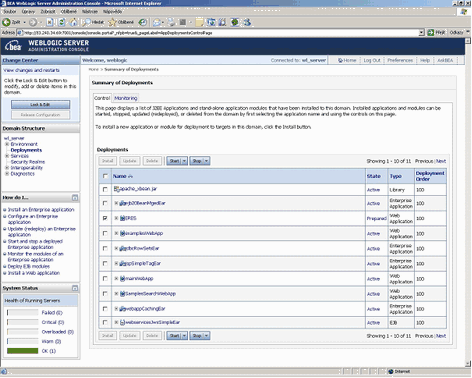
Now go to the EDAB Start page
http://<server>:<port>/<EDAB_CONTEXT>/index.jsp. From the start page, start the EDAB server.From the EDAB Start page, login as administrator and launch the Admin Console.
From Admin Console page, go to Setting Info tab and change EDAB Servlet Context entry to
/<EDAB_CONTEXT>/servlet. Please substitute<EDAB_CONTEXT>with your actual context for EDAB.Stop and restart the EDAB Server.
Deploying EspressDashboard to WebLogic Server 8.1 can be accomplished using the same steps as listed in the next two sections for WebLogic Server 7.0. Note that there are a few small file structure and user interface differences between WebLogic Server 7.0 and 8.1. First, the exampleServer for WebLogic Server 8.1 is under the path <WL_INSTALL_DIR>/samples/domains/examples. Also, the sequence of links in step 3 is changed to → → instead of → → , and the link in step 4 is called Deploy a new Web Application Module for WebLogic Server 8.1 instead of Configure a new web application.
Use the following instructions in place of steps 5 and 6:
5. From the right panel, browse to the expanded application directory of EDAB, which in this case will be the installation directory of EDAB
<EDAB_INSTALL_DIR>, and then click the radio button to the left of the EDAB directory and press the button. This will show up the Review your choices and deploy panel. From this panel, enter the information for EDAB.6. Then press the button to deploy EDAB.
The following instructions show how to deploy EspressDashboard under WebLogic Server 7.0. The instructions assume that you have WebLogic Server 7.0 installed on the system and will be deploying EDAB under the exampleServer that comes with WebLogic. The location of the WebLogic Server installation will be referenced as <WL_INSTALL_DIR>
This section uses administration console to deploy EDAB. For quick deployment without using the administration console, please refer to Section 9.3.3.1.3 - WebLogic Server 7.0 - Quick Deployment.
For reference, the Example Server port number is 7001 and the working directory is <WL_INSTALL_DIR>/samples/server/config/examples
Start WebLogic example server by executing
<WL_INSTALL_DIR>/samples/server/config/examples/startExamplesServer.cmdWhen Example Server web page is loaded, click the Administration console link in the home page.
Login to the administration console page and click → → from the left panel. This will bring up the Web Applications panel on the right.
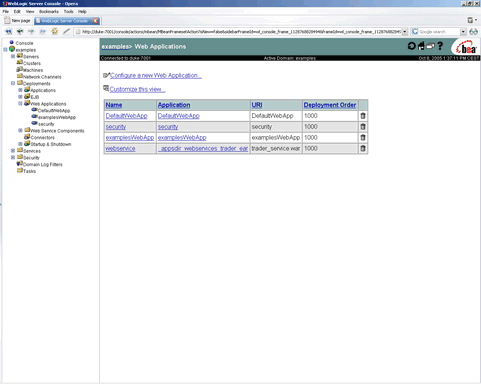
Click the Configure a new web application link from the above page. This will direct you to install and configure the EDAB web application.
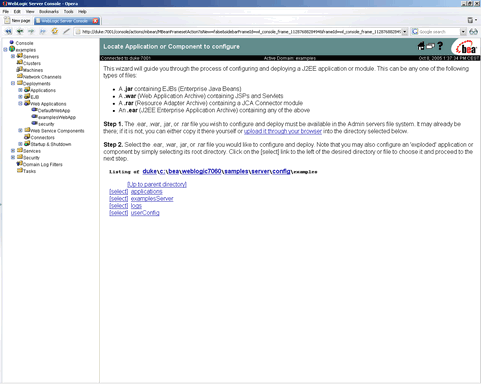
From the right panel, browse to the expanded application directory of EDAB, which in this case will be the installation directory of EDAB
<EDAB_INSTALL_DIR>, and then click the Select link to the left of the EDAB directory. This will bring you to the following panel to continue with Steps 3, 4 and 5 of the configuration procedure. From this panel, enter the information for EDAB and choose the targeted server which in this case will be the exampleServer.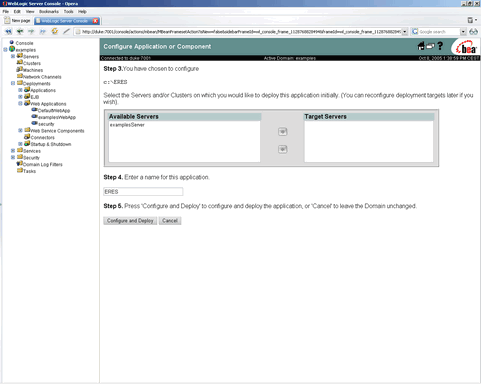
Then press the button to deploy EDAB.
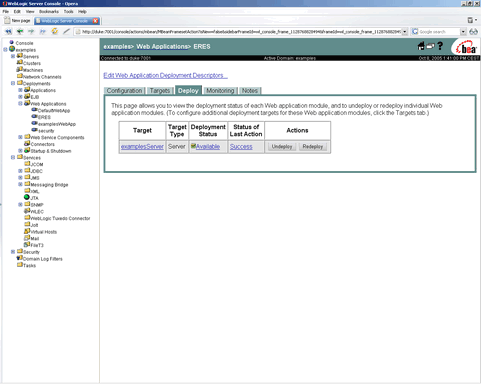
If hot deployment is not enabled in your WebLogic application server, stop and restart the exampleServer.
Now go to the EDAB Start page
http://<server>:<port>/<EDAB_CONTEXT>/index.jsp. From the start page, start the EDAB server.From the EDAB Start page, login as administrator and launch the Admin Console.
From Admin Console page, go to Setting Info tab and change EDAB Servlet Context entry to
/<EDAB_CONTEXT>/servlet. Please substitute<EDAB_CONTEXT>with your actual context for EDAB.Stop and restart the EDAB Server.
These instructions will accomplish the same effect - deploying EspressDashboard under the WebLogic exampleServer - as the previous section. This section explains how to deploy EDAB without using the WebLogic administration console. Users who are not very familiar with WebLogic should use the instructions in the previous section.
Modify the
<WL_INSTALL_DIR>/samples/domains/examples/config.xmlfile to add the following entry:<Application Deployed="true" Name="EDAB" Path="<PARENT of EDAB_INSTALL_DIR>" TwoPhase="true"> <WebAppComponent Name="EDAB" Targets="examplesServer" URI="EDAB"/> </Application>Path is the parent directory of
<EDAB_INSTALL_DIR>. Application name is the EDAB installation directory name. For example, if you install EDAB underC:/EDAB, this should be “EDAB”.WebAppComponent Nameis the name of this component. These instructions show how to deploy EDAB with exampleServer. This is declared by theTargetattribute in theconfig.xmlfile. URI is how to access this web component. This is the context path that will be used to access this web application. “EDAB” is used as the default context path.Start the WebLogic 7.0 exampleServer by executing the following command:
<WL_INSTALL_DIR>/samples/server/config/examples/startExamplesServer.cmdNow go to the EDAB Start page
http://<server>:<port>/<EDAB_CONTEXT>/index.jsp. From the start page, start the EDAB server.From the EDAB Start page, login as administrator and launch the Admin Console.
From Admin Console page, go to Setting Info tab and change the EDAB Servlet Context entry to
/<EDAB_CONTEXT>/servlet. Please substitute<EDAB_CONTEXT>with your actual context for EDAB.Stop the EDAB Server.
Stop and restart Weblogic if necessary.
Restart the EDAB Server.
While EspressDashboard can be deployed in WebSphere 7.1 using several ways, the following instructions show how to do so with minimal changes to WebSphere and EDAB. The instructions assume WebSphere has been installed, started, and running on the same machine as EDAB.
Reinstall EDAB under the following directory
EDAB/EDABApp_war.ear/EDABApp.war(for example,C:\EDAB\EDABApp_war.ear\EDABApp.war), then enter the host name/IP of the WebSphere machine and the port it is running on when prompted in the EDAB installer. Leave the default EDAB as the servlet context.In order to deploy EDAB under WebSphere, you will need to convert the EDAB web application into a WAR file, called
EDABApp.war, using the Java's JAR tool. To do this, make sure that the java/bin directory is in your path and navigate to<EDAB_INSTALL_DIR>in a command window. Then execute the following command:jar -cvf EDABApp.war *Start the administration console for WebSphere. From the left panel of the administration console, select the Applications node and then click the Install New Applications link.
Select New Enterprise Application and then browse to the created war file (which should be
EDAB/EDABApp_war.ear/EDABApp.war/EDABApp.war). After selectingEDABApp.war, click on .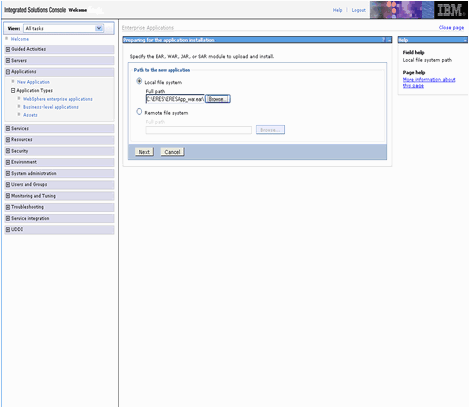
When you get asked about how to install the application, select Fast Path and click the button.
Under Directory to install application, enter the path to
/EDAB. For example, if you installed EDAB underc:\EDAB\EDABApp_war.ear\EDABApp.war, enterc:\EDAB. Click .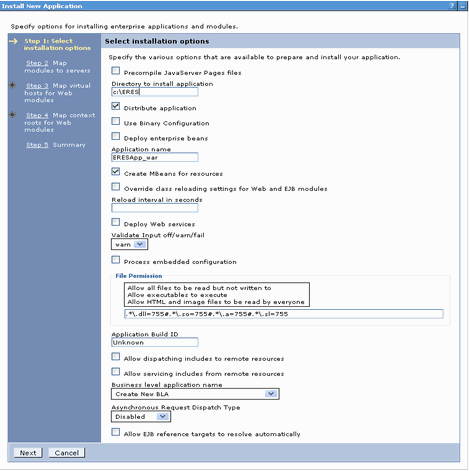
Under Map modules to application servers, select Module and click on .
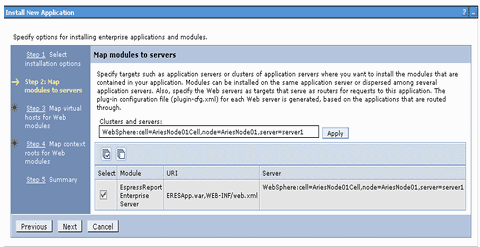
Under Map virtual hosts for Web modules, select Web module and click on .
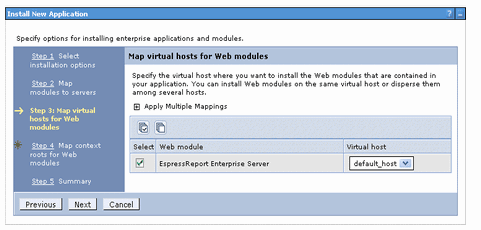
For Map context root for Web modules, enter
/EDABunder Context Root and click on .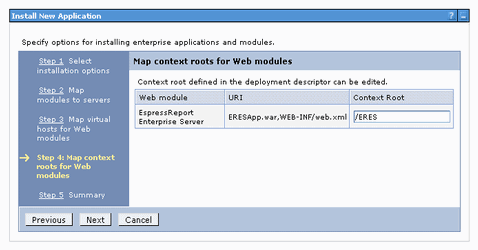
A summary of the installation options is then shown. Click on Finish and the WebSphere will now deploy the EDAB web application.
If the deployment was successful, finish it by clicking the save link on this page.
Expand Applications on the right side and select WebSphere enterprise applications. Then select
EDABApp_warand click on .Now go to the EDAB Start page
http://<server>:<port>/EDAB/index.jsp. Note that port is9080by default. From the start page, start the EDAB server.
EspressDashboard can be deployed in WebSphere in a number of ways. The following instructions show how to deploy EDAB under WebSphere Application Server 5.0 or 6.0/6.1 with minimal configuration changes. The instructions assume that WebSphere Application Server has been installed on the system. The location of the WebSphere installation is referenced as <WS_INSTALL_DIR>. WebSphere is also assumed to be started and running.
Reinstall EDAB under the following directory
EDAB/EDABApp_war.ear/EDABApp.war(for example,c:\EDAB\EDABApp_war.ear\EDABApp.war), then enter the host name/IP of the WebSphere machine and the port it is running on when prompted in the EDAB installer. Leave the default EDAB as the servlet context.In order to deploy EDAB under WebSphere, you will need to convert the EDAB web application into a WAR file, called
EDABApp.war, using the Java's JAR tool. To do this, make sure that thejava/bindirectory is in your path and navigate to<EDAB_INSTALL_DIR>in a command window. Next, execute the following command:jar -cvf EDABApp.war *Start the administration console for WebSphere. From the left panel of the administration console, select the Applications node and then click the Install New Applications link.
You will be redirected to the following window for preparing the application installation. From the right panel, provide the war file path (which should be
EDAB/EDABApp_war.ear/EDABApp.war/EDABApp.war), enterEDABfor the context path and then click the button. Please note that if you are deploying EDAB under WebSphere 6.1, you can skip steps 5 and 6 and continue with step 7.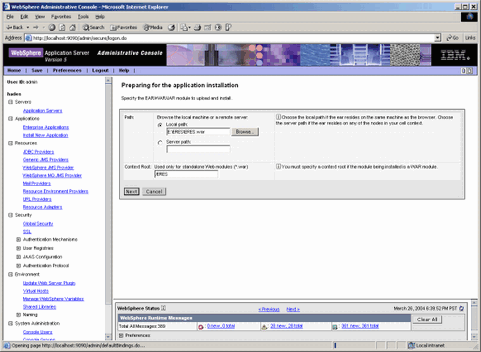
In case you do not have any binding specified, select Generate Default Bindings in the next page.
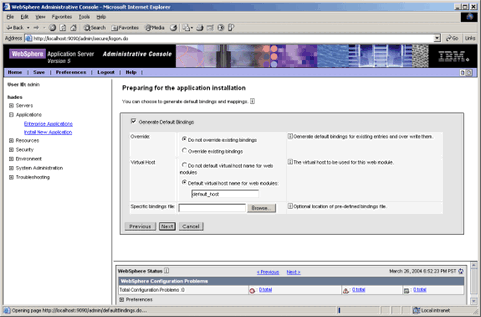
Click the button.
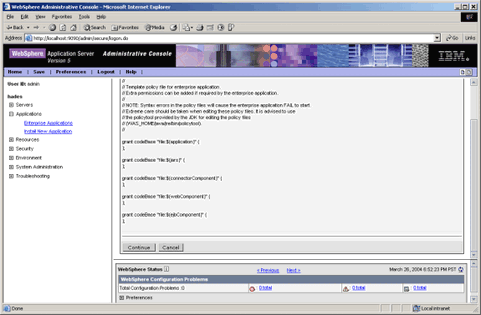
Click the button. Now you are redirected to the step 1 of the installation: Provide options to perform the installation. Under Directory to install application, enter the path to
/EDAB. For example, if you installed EDAB underc:\EDAB\EDABApp_war.ear\EDABApp.war, enterc:\EDAB.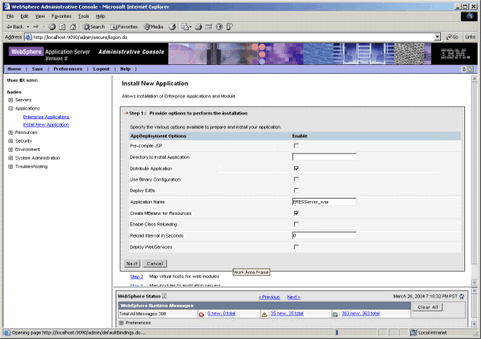
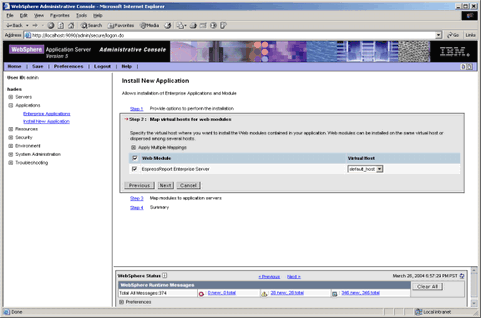
Click the button to go to step 2: Map virtual hosts for web modules. Select Web Modules.
Click the button to go to step 3: Map modules to application servers. Select Module.
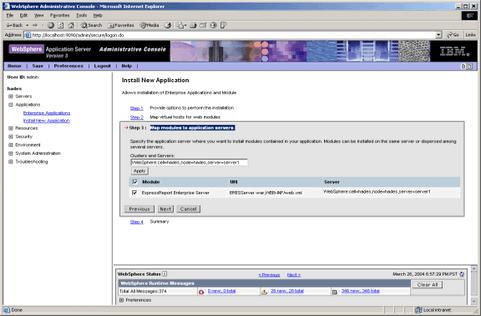
Click the button to go to step 4: Summary of this web application. Please make sure that all information is correct. If it's not, go back to the previous pages to edit the information.
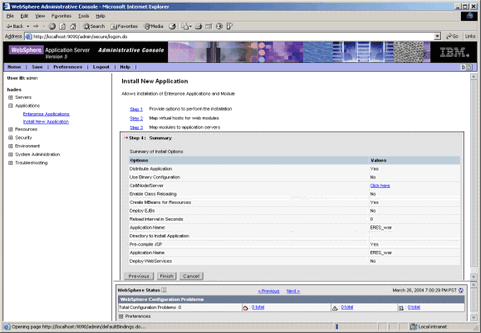
After verifying all informations, click the button. WebSphere will now try to deploy the EDAB Web application.
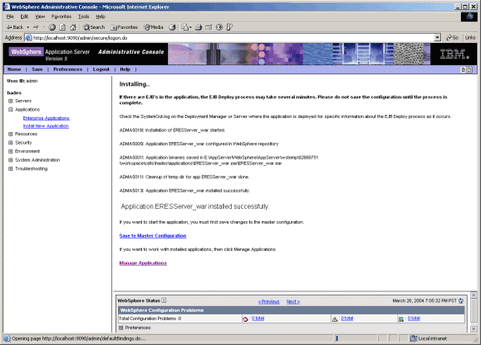
If the deployment was successful as shown above, save the changes either by clicking the save link in this page, or clicking on the save link on top of the administration console. Note that you may have to go under Applications in the right frame, expand Enterprise Applications and start
EDABApp_war.Now go to the EDAB Start page
http://<server>:<port>/EDAB/index.jsp. Note that port is9080by default. From the start page, start the EDAB server.
Deploying EspressDashboard to WebSphere for z/OS has a few additional steps:
Download
EDAB.warand deploy it on WebSphere (see above section for general WebSphere deployment). You will need to use viascii to configure text files that are mentioned in the instructions. Also, since the required jar files are in theWEB-INF/lib directoryinside the war file, you can skip the steps for adding them as classpath to your servlet container.EDAB requires Java graphics support to run. If you are using JDK 1.5 or higher, the solution is to set it to run in headless mode by specifying the
-Djava.awt.headless=trueflag for the java command that starts your WebSphere. For JDK 1.3 or lower, you can use PJA graphics emulation.Stop and restart WebSphere if necessary. EDAB is now set up and accessible using URL:
http://host:port/EDAB/index.jsp.
The following instructions show how to deploy EspressDashboard under JBoss 3.2.3 with Tomcat 5.0 / JBoss 4.0.5 /6.0.0. The instructions assume you have JBoss installed on the system. The location of the JBoss installation is referenced as <JBOSS_INSTALL_DIR>.
For reference, the default port is 8080 and the default working directory is <JBOSS_INSTALL_DIR>/bin.
You need a
jboss-web.xmldeployment descriptor to deploy EDAB. This file should be added to the<EDAB_INSTALL_DIR>/WEB-INFdirectory. This is the same location asweb.xmlfile. This deployment descriptor is to specify the EDAB context. The content should look like this:<?xml version="1.0" encoding="UTF-8"?> <!DOCTYPE jboss-web PUBLIC "-//JBoss//DTD Web Application 2.3//EN" "http://www.jboss.org/j2ee/dtds/jboss-web_3_0.dtd"> <jboss-web> <context-root>/EDAB</context-root> </jboss-web>Rename the EDAB installation directory
<EDAB_INSTALL_DIR>toEDAB.war, then move the entireEDAB.wardirectory to<JBOSS_INSTALL_DIR>/server/default/deploy. This new directory is referenced as<EDAB_DEPLOY_DIR>. Next time when JBoss starts, server will automatically deploy the EDAB web application.Open
<EDAB_DEPLOY_DIR>/WEB-INF/classes/QB.propertiesfile and change theAutoStartServerInstallDirentry to point to<EDAB_DEPLOY_DIR>. Example:Original entry
AutoStartServerInstallDir=<EDAB_INSTALL_DIR>New entry
AutoStartServerInstallDir=<EDAB_DEPLOY_DIR>Now you have to change Database URL. If the
DatabaseUrlentry already exists in yourQB.propertiesfile, just change it to point to the hsql database under<EDAB_DEPLOY_DIR>. Example:Original entry
DatabaseUrl=jdbc\:hsqldb\:<EDAB_INSTALL_DIR>/data/quadbasedbNew entry
DatabaseUrl=jdbc\:hsqldb\:<EDAB_DEPLOY_DIR>/data/quadbasedbIf the entry does not exist in your file, save the changes and open
<EDAB_DEPLOY_DIR>/WEB-INF/orguserdb/config.txtfile. In the file, modify[database url]entry to point to the hsql database under<EDAB_DEPLOY_DIR>. Example:Original entry
[database url] jdbc:hsqldb:<EDAB_INSTALL_DIR>/data/quadbasedbNew entry
[database url] jdbc:hsqldb:<EDAB_DEPLOY_DIR>/data/quadbasedbExecute
run.bat/.shin the<JBOSS_INSTALL_DIR>/bindirectory to start the JBoss Server. The EDAB application will be automatically deployed. The deployment information should be printed out on the JBoss console.Go to the EDAB Start page
http://<server>:<port>/<EDAB_CONTEXT>/index.jspto start the EDAB server.EDAB_CONTEXTis defined in yourjboss-web.xmlfile. In this case. it will beEDAB.From the EDAB Start page, login as administrator and launch the Admin Console.
From Admin Console page, go to Setting Info tab and change EDAB Servlet Context entry to
/<EDAB_CONTEXT>/servlet. Please substitute<EDAB_CONTEXT>with your actual context for EDAB.Stop and restart the EDAB server.
The following instructions show how to deploy EspressDashboard under OC4J 10g (9.0.4.0/10.1.3.5). The instructions assume that you have OC4J installed on the system. The location of the OC4J installation is referenced as <OC4J_INSTALL_DIR>
For reference, the default port is 8888 and the default working directory is <OC4J_INSTALL_DIR>/j2ee/home.
The easiest way to deploy EDAB is to put EDAB under default-web-app. Copy the entire EDAB directory
<EDAB_INSTALL_DIR>to<OC4J_INSTALL_DIR>/j2ee/home/default-web-app. This new directory is referenced as<EDAB_DEPLOY_DIR>.You will need to copy the
tools.jarfile from your Java development kit to the<OC4J_INSTALL_DIR>/j2ee/home/applibdirectory (for JSP compilation), or add a library path entry for the file. Check your<OC4J_INSTALL_DIR>/j2ee/home/config/application.xmlfile. The following entry should exist in the file:<library path="../applib"/>Open
<EDAB_DEPLOY_DIR>/WEB-INF/classes/QB.propertiesfile and change theAutoStartServerInstallDirentry to point to<EDAB_DEPLOY_DIR>. Example:Original entry
AutoStartServerInstallDir=<EDAB_INSTALL_DIR>New entry
AutoStartServerInstallDir=<EDAB_DEPLOY_DIR>Now you have to change Database URL. If the
DatabaseUrlentry already exists in yourQB.propertiesfile, just change it to point to the hsql database under<EDAB_DEPLOY_DIR>. Example:Original entry
DatabaseUrl=jdbc\:hsqldb\:<EDAB_INSTALL_DIR>/data/quadbasedbNew entry
DatabaseUrl=jdbc\:hsqldb\:<EDAB_DEPLOY_DIR>/data/quadbasedbIf the entry does not exist in your file, save the changes and open
<EDAB_DEPLOY_DIR>/WEB-INF/orguserdb/config.txtfile. In the file, modify[database url]entry to point to the hsql database under<EDAB_DEPLOY_DIR>. Example:Original entry
[database url] jdbc:hsqldb:<EDAB_INSTALL_DIR>/data/quadbasedbNew entry
[database url] jdbc:hsqldb:<EDAB_DEPLOY_DIR>/data/quadbasedbBackup the
web.xmlfile under<OC4J_INSTALL_DIR>/j2ee/home/default-web-app/WEB-INF, then move all directories and files (except for the/orguserdb/directory) under the<EDAB_DEPLOY_DIR>/WEB-INFto the<OC4J_INSTALL_DIR>/j2ee/home/default-web-app/WEB-INFdirectory. This will make all the class files and servlets accessible from OC4J. If necessary, merge the oldweb.xmlfile with theweb.xmlfile for EDAB to create a newweb.xmlfile.Start the Oracle server by executing the command
java -jar oc4j.jarin the<OC4J_INSTALL_DIR>/j2ee/homedirectory.Go to the EDAB Start page
http://<server>:<port>/<EDAB_CONTEXT>/index.jspto start the EDAB server. TheEDAB_CONTEXTwill be the directory name of<EDAB_DEPLOY_DIR>.From the EDAB Start page, login as administrator and launch the Admin Console.
From Admin Console page, go to Setting Info tab and change the EDAB Servlet Context entry to
/servlet/.Stop and restart the EDAB server.
The following instructions show how to deploy EspressDashboard under Oracle Application Server 10g R3. The instructions assume that you have Oracle AS installed on the system with standard installation. The location of the Oracle AS installation is referenced as <O10g_INSTALL_DIR>
Install EDAB to the
<O10g_INSTALL_DIR>/j2ee/home/default-web-app/orCopy the EDAB directory to
<O10g_INSTALL_DIR>/j2ee/home/default-web-app/.The new location for the EDAB directory is referenced as
<EDAB_HOME>.If the database is set up with direct path, open
<EDAB_HOME>/WEB-INF/classes/QB.propertiesand modify the database info as shown below.DatabaseUrl=jdbc:hsqldb:<EDAB_HOME>/data/quadbasedbMove all directories and files (except for the
/orguserdb/directory) from<EDAB_HOME>/WEB-INF to <O10g_INSTALL_DIR>/j2ee/home/default-web-app/WEB-INF/directory.Add
<EDAB_HOME>/lib/EDABServer.jarto the CLASSPATH user variable.Go to
http://<machine>:80/j2ee/EDABand start EDAB server.In the admin console, change the servlet context to
/j2ee/servlet.Restart EDAB Server
The following instructions show how to deploy EspressDashboard under GlassFish Server 3.0.1. The instructions assume that the application server and EDAB are installed on the same machine and that GlassFish is up and running.
Log in to the GlassFish Admin Console. Click on Aplications or (in Glasfish v2) expand Applications on the left and then click on Enterprise Applications.
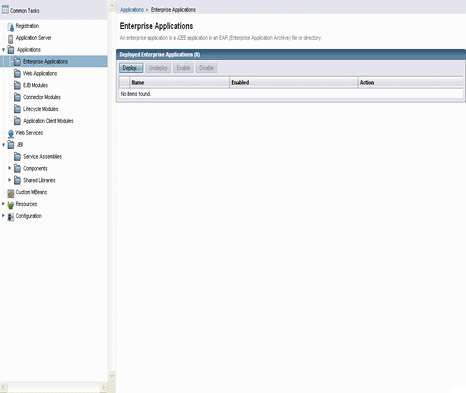
Click on Deploy to deploy a new enterprise application.
Select Browse Folders and select
<EDAB_INSTALL_DIR>.Enter
EDABunder Application Name and select the server under Virtual Server.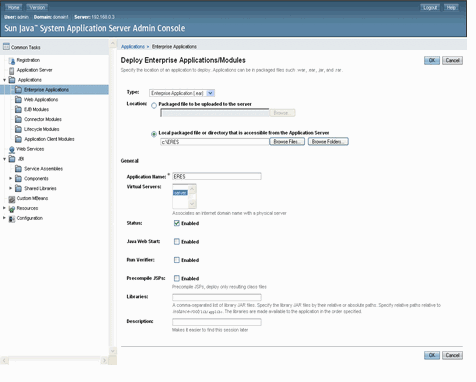
Click on the button to finish deployment.
In the Enterprise Application window, select the EDAB application you have created and then select Launch. This will enable the enterprise application (i.e. start it) and launch it in a separate browser window. You can now start using EDAB.