After you finish editing the report, you can save it as a template or export it to DHTML, PDF, CSV, Excel (XLS), Excel 2007 (XLSX), Text, XML, or Rich Text format.
You can save the current report by selecting Save or Save As from the File menu, or by clicking the ![]() button on the toolbar. All reports are saved as templates either in
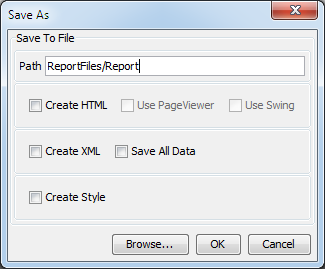
button on the toolbar. All reports are saved as templates either in .pak (binary) or XML format. Selecting the save option will simply overwrite the existing file, unless you are working on a new report that has yet to be saved. Selecting option will bring up a dialog box prompting you to create a file name. The dialog also has several checkboxes.
Save As Dialog
- Create HTML:
This option will create a HTML page with the Report Viewer or Page Viewer applet embedded. The file will have the same name as your
.pakfile and it will be placed in HTML directory. By default, the Report Viewer applet is used. For more information about the Report Viewer, please see Section 2.1 - Introduction to Report Viewer.- Use Page Viewer:
Checking this option indicates that you would like to generate the applet page using the Page Viewer applet instead of the Report Viewer. For more information about the Page Viewer, please see Section 2.2 - Introduction to Page Viewer.
- Use Swing:
This checkbox specifies whether or not to use the swing version of the Report Viewer or the Page Viewer depending on which viewer is selected for the applet page.
- Create XML:
This checkbox specifies whether or not to save the report in XML format. By default, reports are saved in binary (
.pak) format. When this checkbox is checked, EspressReport will generate the template in XML format. The XML file can be saved and re-opened by the Designer. It can also be applied as a template for other reports.- Create Style:
This checkbox specifies whether or not to save the report as a custom style. Reports saved in this format can be applied as a default look and feel to new reports. However, they cannot be used as a report anymore. For more information about this featue, see Section 1.4.6.1 - Custom Styles.
- Save All Data:
This option will save all of the report data in the template. By default, only two records are saved. This feature is useful if you want to preserve the structure of a crosstab when changing data sources or editing the report without the datasource. It also allows users to share a complete report when the data source is not available. Reports are always opened with backup data in the Report Designer. Users can get the latest data by selecting the "Live Data" option when previewing the report.
By default, all reports are saved/opened from /templates/ directory. You can change the default directory by modifying reportdesigner.bat/.sh file or the HTML source of the applet page that is used to launch Report Designer.
To change the default save location, add the following argument to reportdesigner.bat or .sh file: -templatesDirectory:<Path> where the path is a directory relative to the root directory of the installation. For example:
-templatesDirectory:templates/mytemplates
will set the default directory to <EspressReportInstallDir>/templates/mytemplates.
If you are running Report Designer using an applet, you will need to add the following parameter to the applet HTML page:
<PARAM NAME=templates_directory VALUE="templates/mytemplates">
Both data registry files and report templates in EspressReport can be saved in XML format. By default, both types of files use the Western European encoding. In order to save data registries (including queries) and report templates correctly in XML, you will need to set the XML encoding to use a different character set. For more information about using this feature, please see Section 4.1.2.4 - XML Encoding.
You can export the current report to multiple formats directly from the Report Designer. To export a file, select Export from the File menu or click the ![]() button on the toolbar. This will bring up a second menu allowing you to select the type of file you want to export to: DHTML, PDF, CSV, Excel (XLS), Excel 2007 (XLSX), text, XML, or rich text. You can also export it by clicking the button on the toolbar.
button on the toolbar. This will bring up a second menu allowing you to select the type of file you want to export to: DHTML, PDF, CSV, Excel (XLS), Excel 2007 (XLSX), text, XML, or rich text. You can also export it by clicking the button on the toolbar.
- DHTML:
If you select DHTML as the desired export format, you will be prompted to enter the file name and location of the new DHTML file. Because DHTML is a text only format, charts will be saved as separate image files in the same directory as the DHTML file. If your report includes a chart, be sure to set the chart export format before exporting to DHTML, to specify the desired image format and attributes. If your report has images, the image files will be referenced in the DHTML document. DHTML will produce a much more accurate output than HTML; however, not all of the report features will translate accurately in older browsers. Internet Explorer 11, Chrome, Firefox, or Edge are recommended for viewing.
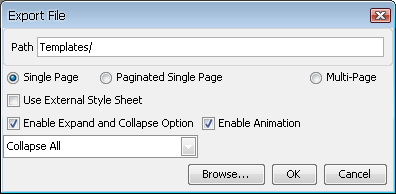
You can specify to export the report to one page, multiple pages, or as a paginated single page. If you specify one page, the entire report will be exported into one DHTML file. If you specify multiple pages, each page of the report will be generated in a new DHTML file. The output pages are linked by a navigation bar on top of each page. If you specify to export as a paginated single page, only one DHTML file will be generated. However, the page size, spacing, and margins will be retained, allowing the report to be printed out of the browser and appearing the same as if printed from a PDF or Report Designer.
You can also specify to use internal or external style sheet (CSS) definitions to apply formatting to the exported DHTML instead of generating style definitions for each report element. For more information about this option, see Section 1.7.2.1.1 - PDF Font Mapping Import/Export.
Export to DHTML Dialog
For reports with grouped data (except for Side-By-Side Master & Details reports), you can select to add expand and collapse controls for the grouping. This allows for a more compact presentation of the report. Each grouping can be expanded and/or collapsed depending on the viewing requirement. When selecting this option, you can also choose the initial presentation, i.e. show the report completely collapsed, completely expanded or expanded to a particular group level. You can also choose to enable animation wherein the grouping that is being expanded or collapsed fades in or out of view. Note that the expand and collapse controls can only be selected for single page exports and the controls will not appear if the Section Header or Footer is empty.
You can specify a title for the exported DHTML file. The title will appear as
<title>meta elements in the export. To add a title, select Html Page Title from the Option menu. This will bring up a dialog allowing you to enter the title.- PDF:
If you select PDF as the desired export format, you will be prompted to enter the file name and location of the new PDF file. Because PDF format supports images, there will be no separate files created by the export.
You can also set encryption for PDF files. When you check the Encrypt PDF Export box in the export dialog, two new options will appear, allowing you to specify a user and an owner password for the generated document. More encryption options are available when exporting files through the API.
For more information about exporting to PDF, please see Section 2.3.5.7.2 - PDF Exporting Options.
- CSV:
CSV export creates a text file of the data used in the current report with a comma field delimiter. If you select CSV as the desired export format, you will be prompted to enter the file name and location of the new CSV file, the Delimiter for the file (either Tab, Space, Double Space, Comma, or Semi-Colon), and the Newline Delimiter (either Windows(\r\n), Mac(\r), Others(\n), System).
![[Note]](../../../images/note.png)
Note CSV export will only export the data associated with the report and none of the objects and attributes of the report itself.
- Excel (XLS):
If you select an Excel spreadsheet as the desired export format, you will be prompted to enter the file name and the location of the new spreadsheet. EspressReport generates a formatted Excel output where spacing, fonts, colors, lines, and grids will be applied. Excel exports also include charts and images. Note that charts will be exported as images and thus are not editable in Excel. Any gif, jpeg, and/or png image will be shown in the Excel export. You can use the CSV export to get a plain data dump to Excel.
- Excel 2007 (XLSX):
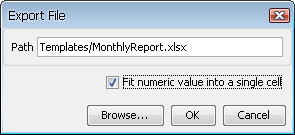
Excel 2007 (XLSX) export creates an XLSX file used in Microsoft Excel 2007 or newer. If you select an Excel 2007 as the desired export format, you will be prompted to enter the file name and the location of the new spreadsheet. EspressReport generates a formatted Excel 2007 output where spacing, fonts, colors, lines, and grids get applied. Excel 2007 exports also include charts and images. Again, the charts will be exported as images and thus are not editable in Excel.
If you plan to use Excel functions in the report, you will want to select the option Fit numeric value into a single cell. This option guarantees that each numeric data is exported to its own cell allowing you to use these values in Excel functions. Note that this option will sometimes affect the cell alignment of the exported report.
Export to Excel Dialog
For reports with grouped data, you can select to print each group on a different sheet in the exported file. This option is set in the Section menu for the Group Header section. For more information, please see Section 1.5.3 - Section Options.
Note Since Excel spreadsheets are a fixed field format, not all report elements may translate correctly.
- TXT:
Unlike CSV, which creates a comma delimited data file, the text export feature generates the entire report as a text file. Because the report is exported as pure text, no formatting information is retained. If you select text as the desired export format, you will be prompted to enter the file name and the location of the new text file, the Delimiter for the file (either Tab, Space, Double Space, Comma, or Semi-Colon), and the Newline Delimiter (either Windows(\r\n), Mac(\r), Others(\n), System).
- XML:
There are two XML export versions. One is a data file and the other exports report data with formatting information.
- Pure Data:
This XML export option exports the data used by the report in XML format. The format of the XML file is the same as the formatting requirements for XML input data.
- Data + Format:
This XML export creates an XML version of the whole report. All of the report data as well as formatting information are included. This file is similar to the XML version of the DHTML export and can be used in conjunction with style sheets to display HTML content. This export allows you to export the entire report as one XML file or as a separate file for each page.
- Rich Text:
If you select rich text as the desired format, you will be prompted to enter the file name and the location for the new rich text file. EspressReport uses the full capability of the RTF 1.5 specifications to generate a rich text output very similar to the actual report. The rich text export may not work in all viewers. By default, EspressReport will export all the colors in the RTF export directly into the output. However, older versions of Microsoft Word only support 16 colors. To support these viewers, you can export the RTF using 16 colors. This option will convert the colors used in the report into the basic color palette for Microsoft Word 97.
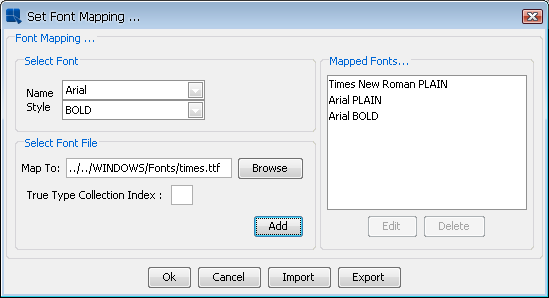
EspressReport allows you to use any font on the system for reports. For most formatted exports (DHTML/Rich Text/Excel/Excel 2007) system fonts will translate automatically in the generated output (For Rich Text and Excel/Excel 2007, if the fonts cannot be found, they will default to Arial). However, for PDF you will have to manually specify a .ttf (true type font), .ttc (true type collection), .pfb, or .afm file for any system font that you would like to use in the report.
To set font mapping for the PDF export, select Font Mapping from the Option menu. This will bring up a dialog allowing you to specify font files.
Font Mapping Dialog
You can select a specific .ttf, .ttc, .pfb, or .afm file for each font and style combination. You can either type the full path or browse to the font file. If you are using a .ttc file, you will need to specify the font index in the box provided (.ttc files contain more than one font). Once you specify the correct file, click the button to save the mapping to the list. You can edit or delete existing mappings by selecting them in the list and clicking the appropriate button.
You can pass the font mapping from one report to another using the Import/Export feature. You can export the font mapping by clicking the button on the font mapping dialog. This will bring up a dialog box prompting you to specify a file name. The font mapping will then be saved as XML file. You can load a font mapping XML file by selecting the Import option from the dialog. This will bring up a dialog box prompting you to specify the XML file that you want to import. Click the button and the mapping stored in the XML file will be applied to the current report.
When exporting a report to DHTML, the style definitions are created for each element in the report by default. This makes the export faster. However, it can result in a very large file size for large reports. To limit the size of the generated DHTML file, users can select to generate an internal list of global style definitions. This option is slightly slower, but it produces a significantly smaller file. In addition, EspressReport provides an option that allows users to apply their own style definitions to report elements by selecting a .css file when exporting the report.
If you are going to use external style sheet definitions, you will need to first select the class name from the external style definitions that should be associated with elements in the report. To set the class for a report element, right click on the cell and select Set Style Class Name from the pop-up menu. This will bring up a dialog allowing you to specify a style name for that report element.
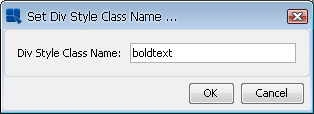
Set Style Class Dialog
Elements for which you do not select a style class will generate their own style based on the settings in the report when the report is exported to DHTML.
Users can also export a .css file for the formatting defined in the report. These style definitions are the same as generated by the internal style sheet option. This feature can be used to apply formatting created in the Report Designer to other reports or other web pages. To export a .css file from a report, select Export Style Sheet from the Option menu. A dialog will open, prompting you for the name and location for the generated file.
CSS options can be set in the export dialog for the DHTML export.
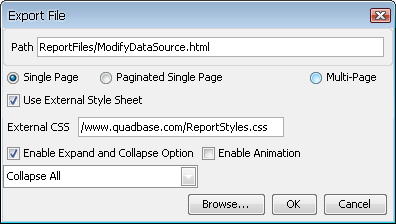
DHTML Export Dialog
The Use External Style Sheet option allows you to specify the location (either relative path or full HTTP path) of a .css file which contains the definitions for the style classes that you have assigned to report elements.
| Note |
|---|---|
The formatting from an external style sheet file will only be applied to the DHTML export. Other export formats will use the formatting defined in the report template. |