Scalability is an important concern for enterprise reporting. One of the best ways to easily scale an application, while eliminating server down-time is to deploy the application in a clustered environment. To provide for maximum scalability, EDAB can be deployed in a clustered environment.
When running EDAB in a cluster, one server acts as the load balancing machine, receiving incoming requests and routing them to the other servers in the cluster where they are processed. This following diagram illustrates EDAB running in a clustered environment.
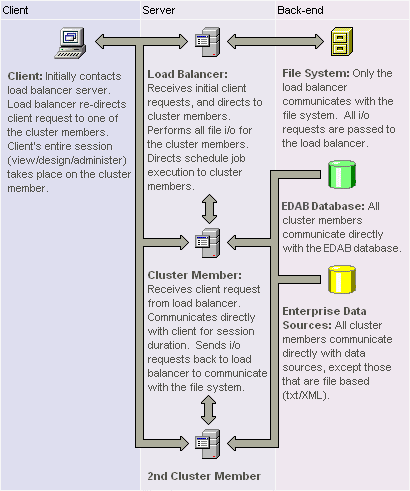
EDAB Clustering Diagram
All incoming requests are handled by the load balancing server, which will re-direct the requests to one of the cluster members. The client's entire session will then take place on the cluster member. Users have the option of making the load balancer one of the cluster members, or using it soley as the balancer. Each of the cluster members will directly access data sources and read/write information from the EDAB Server, but only the load balancer will access the file system. All i/o requests from the cluster members are routed through the load balancer. This ensures that users are working with the same set of deployed dashboards, regardless of which cluster member they are currently using.
The following chapter details how to deploy an EDAB cluster in different application server environments.
In this section, you will be modifying the following:
<TomcatInstallDir>/conf/server.xmlAdmin Console
<TomatInstallDir>/webapps/balancer/WEB-INF/web.xml<TomcatInstallDir>/webapps/balancer/WEB-INF/config/rules.xml<EDABInstallDir>/index.html<EDABInstallDir>/WEB-INF/web.xml
The first step in setting up an EDAB cluster is to deploy EDAB to all the servers in the cluster. You will need to install EDAB on all the machines and deploy it in the Tomcat instance. You can follow the instructions in Section 8.3.1 - Tomcat 4.1/5.x/6.0.x/7.0.x.
Next, modify the server.xml under <TomcatInstallDir>/conf on the load balancing machine. Add the following configuration to this file to enable clustering.
<Cluster className="org.apache.catalina.cluster.tcp.SimpleTcpCluster"

      managerClassName="org.apache.catalina.cluster.session.SimpleTcpReplicationManager"
      expireSessionsOnShutdown="false"
      useDirtyFlag="true">

      <Membership
            className="org.apache.catalina.cluster.mcast.McastService"
            mcastAddr="228.0.0.4"
            mcastPort="45564"
            mcastFrequency="500"
            mcastDropTime="3000"/>

      <Receiver
            className="org.apache.catalina.cluster.tcp.ReplicationListener"
            tcpListenAddress="auto"
            tcpListenPort="4000"
            tcpSelectorTimeout="100"
            tcpThreadCount="6"/>

      <Sender
            className="org.apache.catalina.cluster.tcp.ReplicationTransmitter"
            replicationMode="pooled"/>

      <Valve className="org.apache.catalina.cluster.tcp.ReplicationValve"
            filter=".*\.gif;.*\.js;.*\.jpg;.*\.htm;.*\.html;.*\.txt;"/>

</Cluster>
There is a default clustering implementation in the server.xml file, but it is commented out. For the load balancer server, you will need to use this slightly different implementation instead.
For all the other servers in the cluster, you can use the default cluster configuration in the server.xml file You just need to un-comment the default configuration. In the default configuration, the default tcpListenPort is 4001.
If any of the cluster members has more than one IP address, it may be necessary to add the mcastBindAddress parameter to the <Membership> tag. This argument allows you to specifically set an IP for the cluster service.
If you are using HSQL as the EDAB database you will need to change the configuration of this database on the load balancer machine. HSQL usually runs as an application process and cannot be accessed from other machines. In order to make it available to the other servers in the cluster, it needs to be configured to run in client-server mode. For setup instructions, please see Section 1.3.2.1.2 - Running HSQL in Client-Server Mode.
Next, you will need to log in as Admin and enter the Admin Console . Go to → and add the entries for Server Host, Server Port Number and Cluster Member List.
Server Host: 192.168.0.8

Server Port Number: 8080

Cluster Member List: 192.168.0.8:8080
                     192.168.0.10:8080
                     192.168.0.16:8080
The Server Host and Server Port Number entries should be the address and port number for the load balancing server. The first entry under the Cluster Member List heading should also be the load balancer server. It needs to be listed under this argument even if the load balancer is not acting as a cluster member. The order of the other servers should be the same in the Admin Console for each EDAB instance.
Next, you will need to deploy the balancer web application to the load balancer server. This is a stand-alone Web application for Tomcat that is included in the EDAB installation under <EDABInstallDir>/Clustering/Tomcat/balancer. To deploy the Web application copy the contents of the /balancer/ directory to the load balancer server, and place it under <TomcatInstallDir>/webapps/. The web.xml file for the balancer application, now under <TomcatInstallDir>/webapps/balancer/WEB-INF maps LoadBalancer to a BalancerFilter and gives the definition of the BalancerFilter with its class file and rules.xml file.
<web-app>

      <!-- BalancerFilter definition -->

<filter>

      <filter-name>BalancerFilter</filter-name>
      <filter-class>org.apache.webapp.balancer.BalancerFilter</filter-class>
      <init-param>
            <param-name>configUrl</param-name>
            <param-value>/WEB-INF/config/rules.xml</param-value> </init-param>

</filter>

<!-- BalancerFilter mapping -->

<filter-mapping>

      <filter-name>BalancerFilter</filter-name>
            <url-pattern>/LoadBalancer</url-pattern> </filter-mapping>

</web-app>
Rules.xml defines how the BalancerFilter should redirect requests to server instance. The following is an example of ruler.xml file and it is based on RoundRobinRule. RoundRobinRule.class and several other rule classes are included in the balancer package.
<rules>

      <!-- Redirect to server instance based on RoundRobinRule -->
      <rule className="org.apache.webapp.balancer.rules.RoundRobinRule"
            serverInstance="1"
            maxServerInstances="3"
            tcpListenAddress="127.0.0.1"
            tcpListenPort="4000"
            redirectUrl="http://192.168.0.8:8080/EDAB/index.jsp" />

      <rule className="org.apache.webapp.balancer.rules.RoundRobinRule"
            serverInstance="2"
            maxServerInstances="3"
            tcpListenAddress="127.0.0.1"
            tcpListenPort="4001"
            redirectUrl="http://192.168.0.10:8080/EDAB/index.jsp" />

      <rule className="org.apache.webapp.balancer.rules.RoundRobinRule"
            serverInstance="3"
            maxServerInstances="3"
            tcpListenAddress="127.0.0.1"
            tcpListenPort="4001"
            redirectUrl="http://192.168.0.16:8080/EDAB/index.jsp" />

</rules>
Each defined server instance in the rules.xml file should point to one of the EDAB cluster members. If you want the load balancer server to also function as a cluster member, include it as a server instance here. You need to make sure that the tcpListenPort in the rules.xml file matches the port specified in the server.xml file for that server. The RoundRobinRule as depicted above, routes each incoming request to the next cluster member in sequence, using the default tcpListenPort. Also included in the balancer application is a RandomRedirectRule option. This will pick a cluster member at random for each incoming request.
![[Note]](../../../images/note.png) | Note |
|---|---|
The balancer application uses Apache's Log4J logging services code. If the Log4J classes aren't deployed in your load balancer server, you will need to add the |
Finally, you need to create a new index.html (instead of the current index.jsp) page in the <EDABInstallDir> directory on the load balancer server. The page can be blank. It only needs to have the following meta tag to the top of the page:
<meta http-equiv="refresh" content="0; URL=http://servername:8080/balancer/LoadBalancer" />
This will re-direct all incoming requests to the balancer application, where it will be routed to one of the cluster members following the logic defined in the rules.xml file. Replace servername with the domain or IP address of your load balancer server in the URL. In order to make the new index.html page the default start page for the load balancer machine, you can edit the web.xml file under <EDABInstallDir>/WEB-INF and change the following entry
<welcome-file-list>

      <welcome-file>index.jsp</welcome-file>

</welcome-file-list>
to
<welcome-file-list>

      <welcome-file>index.html</welcome-file>

</welcome-file-list>
Once you have completed the deployment, start Tomcat on your load balancer server and then start Tomcat on all the other servers in the cluster. To get to the EDAB home page, call the index.html file that you created on the load balancer machine. You will then be re-directed to the Start page on one of the cluster machines. When you start the EDAB server on this cluster machine, it will automatically start the EDAB server on all the other machines in the cluster.
Once you have been directed to a particular server through the load balancer, your entire session will take place on that machine. However, all file I/O will take place on the load balancer machine. This ensures that all users will interact with the same set of reports, charts and dashboards which are stored in the file system. All other system information is stored in the EDAB database, which can be accessed by any server in the cluster.
The following instructions will help you setup EDAB using Apache Web Server as the load balancer and Tomcat Clusters. In this section, you will be modifying the following files:
<ApacheInstallDir>/conf/httpd.conf<ApacheInstallDir>/conf/workers.properties<TomcatInstallDir>/conf/server.xml
Setup EDAB cluster using Tomcat using the instructions in Section 8.4.1 - Tomcat 5.0.
Apache HTTP server:
Download Apache HTTP server 2.2.4 from The Apache HTTP Server Project (http://httpd.apache.org/)
Run the installer and select a standard install.
Note Do not install to
Program Filedirectory, the space will cause problem later, install-directory name must not have space in it, for example Apache2.2 is fineOpen the Apache Server Monitor and start the web server if it's not already running.
Point your browser to
http://localhost/to verify that Apache is running on port 80.Stop Apache.
Apache-Tomcat connector
Download Mod JK Tomcat connector from http://tomcat.apache.org/download-connectors.cgi.
Note You want to download the binary - click on → → →
Copy the
mod_jk-apache-2.2.4.soto the modules directory in your Apache installation.Rename it to
mod_jk.soOpen up
httpd.confin theconfdirectory of your Apache installation in a text edit, and add the following line at the end of the LoadModule statements:LoadModule jk_module modules/mod_jk.soCreate a file called
workers.propertiesin theconfdirectory. Add these lines to it:workers.tomcat_home=<tomcat_install_directory> workers.java_home=<jdk_install_directory> worker.list=balancer worker.worker0.port=8009 worker.worker0.host=192.168.0.8 worker.worker0.type=ajp13 worker.worker0.lbfactor=1 worker.worker1.port=9009 worker.worker1.host=192.168.0.8 worker.worker1.type=ajp13 worker.worker1.lbfactor=1 worker.worker2.port=8009 worker.worker2.host=192.168.0.10 worker.worker2.type=ajp13 worker.worker2.lbfactor=1 worker.worker3.port=9009 worker.worker3.host=192.168.0.10 worker.worker3.type=ajp13 worker.worker3.lbfactor=1 worker.balancer.type=lb worker.balancer.balance_workers=worker0,worker1,worker2,worker3 worker.balancer.method=B worker.balancer.sticky_session=TrueWe have specified the worker list to a single worker called balancer, and specified that the worker type of balancer is
'lb'or load balancer. The workers it manages areworker0, worker1, worker2andworker3. And we set the balance method to'B'or balance by busy factor. Apache will delegate the next request to the Tomcat instance which is least busy. Please note that there are several options for the balance method - consult the Apache/Tomcat documentation, which lists the options for workers properties, to help you decide the best method for your type of application.Note Port numbers must match the Connector port (with protocol=“AJP/1.3”) defined in tomcat's
server.xml.8009was the original port, and9009for the second instance of tomcat on the same machine.Edit the
server.xmlfor each instance of tomcat and add ajvmRouteattribute to theEngineelement:<Engine name="Catalina" defaultHost="localhost" jvmRoute="worker0">for the first instance and
<Engine name="Catalina" defaultHost="localhost" jvmRoute="worker1">for the second.
<Engine name="Catalina" defaultHost="localhost" jvmRoute="worker2">for the third.
<Engine name="Catalina" defaultHost="localhost" jvmRoute="worker3">for the last.
Specify the worker properties in
httpd.conf:Add these lines just after the LoadModule definitions:
JkWorkersFile c:/apache2.2/conf/workers.properties
JkLogFile c:/apache2.2/mod_jk.log
JkLogLevel info
JkLogStampFormat "[%a %b %d %H:%M:%S %Y] "
JkOptions +ForwardKeySize +ForwardURICompat -ForwardDirectories
JkRequestLogFormat "%w %V %T"
#use apache balancer
JkMount /EDAB balancer
JkMount /EDAB/* balancer
Start up
Startup Tomcat50, Tomcat51, Tomcat52 and Tomcat53
Start Apache Server
Go to
http://192.168.0.8:8080/EDAB/index.htmland start EDAB serverGo to
http://192.168.0.8/EDAB/index.jsp
Note The internal tomcat server (
http://192.168.0.8:8080/EDAB) is for Administrator to start and stop EDAB server and should not be available to other users. Other users must go through Apache web server(http://192.168.0.8/EDAB/) and their requests will be forwarded to Tomcat cluster which is invisible to them. Apache HTTP server will serve as loadbalancer.
The above example creates four instances of EDAB on two separate machines (192.168.0.8 and 192.168.0.10). To change the number of clusters and machines, modify the worker configuration in step 3.
In this section, you will be modifying the following files:
Admin Console
<JBossInstallDir>/server/default/deploy/loadbalancer.sar/META-INF/jboss-service.xml<EDABInstallDir>/index.html
The first step in setting up an EDAB cluster is to deploy EDAB to all the servers in the cluster. You will need to install EDAB on all the machines, and deploy it in the JBoss instance. You can follow the instructions in Section 8.3.7 - Oracle Application Server 10g R3 (10.1.3).
If you are using HSQL as the EDAB database you will need to change the configuration of this database on the load balancer machine. HSQL usually runs as an application process, and cannot be accessed from other machines. In order to make it available to the other servers in the cluster, it needs to be configured to run in client-server mode. For setup instructions, please see Section 1.3.2.1.2 - Running HSQL in Client-Server Mode.
Next, you will need to log in as Admin and enter the Admin Console. Go to → and add the entries for Server Host, Server Port Number and Cluster Member List.
Server Host: 192.168.0.8

Server Port Number: 8080

Cluster Member List: 192.168.0.8:8080
                     192.168.0.10:8080
The Server Host and Server Port Number entries should be the address and port number for the load balancing server. The first entry under the Cluster Member List heading should also be the load balancer server. It needs to be listed under this argument even if the load balancer is not acting as a cluster member. The order of the other servers should be the same in the Admin Console for each EDAB instance.
Next, you will need to deploy the balancer web application to the load balancer server. This is a stand-alone web application for JBoss that is included in the JBoss installation under <JBOSS_INSTALL_DIR>\docs\examples\varia\loadbalancer. To deploy the web application copy the contents of the /loadbalancer.sar/ directory to the load balancer server, and place it under the JBoss deploy directory (<JBOSS_INSTALL_DIR>\server\default\deploy if you follow the instructions from this manual).
Edit loadbalancer.sar/META-INF/jboss-service.xml to match your configuration. Modify <host-url> and add new <host> so the configuration file contains all the cluster members. The example below shows the configuration for two clusters. Value of <lb-factor> isn't important because it is not used in this JBoss version.
<hosts>

      <host>
            <host-url>http://192.168.0.8:8080/EDAB</host-url>
            <lb-factor>1</lb-factor> </host>
      <host>
            <host-url>http://192.168.0.10:8080/EDAB</host-url>
            <lb-factor>2</lb-factor> </host>

</hosts>
Uncomment the first Monitor service in the jboss-service.xml.
<!-- Monitor Services -->
<!-- A monitor that only checks that a given path is reachable -->
<mbean code="org.jboss.web.loadbalancer.monitor.SimpleMonitorService" name="jboss.web.loadbalancer:service=Monitor">

      <depends optional-attribute-name="Scheduler">jboss.web.loadbalancer:service=Scheduler</depends>
      <attribute name="Interval">15000</attribute>
      <attribute name="Timeout">20000</attribute>
      <attribute name="Path">/</attribute>

</mbean>
You can find a sample jboss-service.xml in <EDAB_DEPLOY_DIR>/Clustering/JBoss. Or you can take a look at <JBOSS_INSTALL_DIR>\docs\examples\varia\loadbalancer\loadbalancer.doc for more detailed description of the load balancer application and its configuration files.
If you use the Tomcat 5.0 plugin you must remove the <JBOSS_DEPLOY_DIR>/jbossweb-tomcat50.sar/ROOT.war directory because the load balancer also wants to be root.
Finally, you need to modify index.html page in the <EDAB_DEPLOY_DIR> directory on all the cluster members. The page can be blank. It only needs to have the following meta tag to the top of the page:
<meta http-equiv="Refresh" content="0; url=http://machine:port/EDAB/index.jsp">
Replace machine/port with the IP address/port of the machine the cluster member is running on. EDAB is EDAB context on the cluster member. Make the index.html page the default start page for all the cluster members. You can do this by editing the web.xml file under <EDAB_DEPLOY_DIR>/WEB-INF on all the cluster members. Change the following entry:
<welcome-file-list>

      <welcome-file>index.jsp</welcome-file>

</welcome-file-list>
to
<welcome-file-list>

      <welcome-file>index.html</welcome-file>

</welcome-file-list>
Once you have completed the deployment, start JBoss on all the servers in the cluster and then start JBoss on your load balancer server. Do not forget to start the HSQL database server first (if you are using it). To get to the EDAB home page, open http://machine:port, where machine is your load-balancing server and port is the port JBoss is running on (8080 by default). You will then be re-directed to the Start page on one of the cluster machines. When you start the EDAB server on this cluster machine, it will automatically start the EDAB server on all the other machines in the cluster.
Once you have been directed to a particular server through the load balancer, your entire session will take place on that machine. However, all file i/o will take place on the load balancer machine. This ensures that all users will interact with the same set of reports, charts and dashboards which are stored in the file system. All other system information is stored in the EDAB database, which can be accessed by any server in the cluster.
In this section, you will be modifying the following files:
Admin Console
<JRUNInstallDir>\lib\wsconfig\1\jrunserver.store<EDABInstallDir>/index.html<EDABInstallDir>/WEB-INF/web.xml
The first step in setting up an EDAB cluster is to deploy EDAB to all the servers in the cluster. You will need to install EDAB on all the machines, and deploy it in the JRun instance. You can follow the instructions in Section 8.3.4 - WebSphere. EDAB needs to be installed in the same context on all the cluster members.
If you're using HSQL as the EDAB database you will need to change the configuration of this database on the load balancer machine. HSQL usually runs as an application process, and cannot be accessed from other machines. In order to make it available to the other servers in the cluster, it needs to be configured to run in client-server mode. For setup instructions, please see Section 1.3.2.1.2 - Running HSQL in Client-Server Mode.
Next, you will need to log in as Admin and enter the Admin Console. Go to → and add the entries for Server Host, Server Port Number and Cluster Member List.
Server Host: 192.168.0.8

Server Port Number: 8080

Cluster Member List: 192.168.0.8:8080
                     192.168.0.10:8080
                     192.168.0.16:8080
The Server Host and Server Port Number entries should be the address and port number for the load balancing server. The first entry under the Cluster Member List heading should also be the load balancer server. It needs to be listed under this argument even if the load balancer is not acting as a cluster member. The order of the other servers should be the same in the Admin Console for each EDAB instance.
Use the following steps to complete the JRun deployment
This configuration uses the Apache web server as a load balancer server. You will need to install it on the load balancing machine.
Next, go to the JRun admin console on the load balancing server and log in. The default port of admin console is 8000.
Click Register Remote Server at the top of the page. Enter the IP address, server, and JNDI port of the cluster member which is hosted on a machine other than the load balancer. Repeat this step for all the cluster members which are hosted on other machines.
Then click Create New Cluster at the top of the page. Enter the name of the cluster and click . Select all the cluster members on the next page. Then click and .
Now run all the cluster members and run the JRun Web Server Configuration Tool. Here click . In the dialog that appears select the previously created cluster in the JRun server field. Select Apache web server and insert Apache configuration directory (
<APACHE_INSTALL_DIR>\conf). Then click and close the Web Server Configuration.Open the
<JRUN_INSTALL_DIR>\lib\wsconfig\1\jrunserver.storefile. There will be the similar entry to the one below:proxyservers=192.168.0.8:51000Add all the cluster members to this file (separate them with a semicolon “;”). The port is the cluster member proxy port (51000 by default). You can find this port in the admin console.
proxyservers=192.168.0.8:51000;192.168.0.10:51000
Finally, you need to modify index.html page in the <EDAB_INSTALL_DIR> directory on all the cluster members. The page can be blank. It only needs to have the following meta tag to the top of the page:
<meta http-equiv="Refresh" content="0; url=http://machine:port/EDAB/index.jsp">
Replace machine/port with the IP address/port of the machine the cluster member is running on (port is 8100 by default). EDAB is the EDAB context on the cluster member. Make the index.html page the default start page for all the cluster members. You can do this by editing the web.xml file under <EDAB_INSTALL_DIR>/WEB-INF on all the cluster members. Change the following entry:
<welcome-file-list>

      <welcome-file>index.jsp</welcome-file>

</welcome-file-list>
to
<welcome-file-list>

      <welcome-file>index.html</welcome-file>

</welcome-file-list>
Once you have completed the deployment, start JRun on all the servers in the cluster and then start Apache on your load balancer server. Do not forget to start the HSQL database server first (if you are using it). To get to the EDAB home page, open http://machine:port, where machine is your load-balancing server and port is the port Apache is running on (80 by default). You will then be re-directed to the Start page on one of the cluster machines. When you start the EDAB server on this cluster machine, it will automatically start the EDAB server on all the other machines in the cluster.
Once you have been directed to a particular server through the load balancer, your entire session will take place on that machine. However, all file i/o will take place on the load balancer machine. This ensures that all users will interact with the same set of reports, charts and dashboards which are stored in the file system. All other system information is stored in the EDAB database, which can be accessed by any server in the cluster.
In this section, you will be modifying the following files:
Admin Console
To deploy EDAB in a WebSphere cluster, you will first need to have a WebSphere cluster setup (using HTTP Server). We will call your deployed WebSphere cluster <Cluster_Name>
Next, you will need to deploy EDAB to each of the WebSphere cluster members. To do this you will need to WAR the /EDAB/ directory and deploy it using the WebSphere admininstration console. For more information about deploying EDAB in WebSphere see Section 8.3.6 - Oracle Containers for J2EE (OC4J) 10g (9.0.4.0/10.1.3.5). Follow the steps in this section until you get to Map modules to servers step. In this step map the EDAB Web application to the <Cluster_Name> and your HTTP server.
Make sure that you deploy EDAB on all the cluster members using the same context.
Next, you will need to log in as Admin and enter the Admin Console. Go to → and add the entries for Server Host, Server Port Number, Cluster Member List, Member Host and Member Port Number.
Server Host: 172.26.35.12

Server Port Number: 9080

Cluster Member List: 172.26.35.12:9080
                     172.26.35.13:9080
                     172.26.35.14:9080
                     172.26.35.15:9080

Member Host: 172.26.35.15

Member Port Number: 9080
The Server Host and Server Port Number entries should be the address and port number for the load balancing server. The first entry under the Cluster Member List should also be the load balancer server. It needs to be listed under this argument even if the load balancer is not acting as a cluster member. The order of the other servers should be the same in the Admin Console for each EDAB instance. The Member Host entry should be the IP address of the current machine, and the Member Port Number entry should be the server port number for the current machine. These entries will change for each cluster member.
In the WebSphere administration console, click on → → . The re-start the HTTP Server.
Next, start the WebSphere cluster. Navigate to the index.jsp page on the load balancer machine, and start the EDAB Server. Note that because the IBM HTTP server does the balancing, you do not need to change the start page for EDAB. Users can simply start their session by pointing to the index.jsp page on the load balancer machine. The HTTP server on that machine will re-direct their requests to the cluster members.