Cell scripting or conditional formatting allows you to dynamically modify certain object properties when specific conditions are met. Scripting allows you to highlight certain data values and to present a report that is easier to read and digest. A simple example of this would be a report showing financial results or cash flows. Scripting could be applied to a column field so that negative numbers are shown in red, dynamically highlighting areas of revenue or cash shortages.
In EspressReport scripts are element specific, meaning that in order to dynamically change the properties of a report cell, a script must be applied to that specific cell. Scripts can be applied to labels, column fields, formulas, or report sections.
![[Note]](../../../images/note.png) | Note |
|---|---|
Some of the syntax for EspressReport cell scripts has changed greatly between v2.51 and v3.0. In most cases the deprecated syntax will continue to work correctly. However, it is recommended that you check older templates to make sure the scripts still function correctly if you have upgraded to v3.0 or higher from v2.51 or lower. |
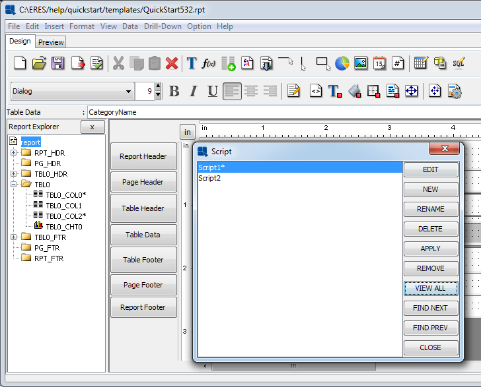
To create a script, first select the cell to which you would like to apply the script, and select Scripting from the Format menu or click the ![]() button on the toolbar. This will bring up a list of all the scripts that have been defined within the report.
button on the toolbar. This will bring up a list of all the scripts that have been defined within the report.
Script List Dialog
Like formulas, scripts are maintained on a report wide basis, and can be re-used in multiple places in a report. However, unlike formulas, scripts cannot be inserted into the report, they can only be applied to existing report elements. A star next to a script name in the list indicates that the script is applied to the current cell.
From this dialog, you can edit an existing script, create a new script, rename a script, delete a script, apply a script to the current element, and remove a script from the current element. If a script is being used, it can still be deleted (a message will appear asking if it is ok to proceed) and the script is first removed from any cell before being deleted. If the script is used by a security level, the script has to be removed manually first before it can be deleted. To apply a script to the currently selected report element, select a script from the list, and click . The script list will close and the script will be applied.
Any report element that has a script applied will have a small check mark in the upper left-hand corner of the cell. Scripts will not execute until you preview or export the report.
Script Indicators in Design View
If you select to create a new script by clicking from the script list dialog, the Formula Builder will open, allowing you to develop the script.
Formula Builder (Scripting)
Scripts are developed in the same formula builder interface as formulas. Although scripts use a different syntax, all of the formula fields, operators, and functions are also accessible in scripts. For more on formulas and the Formula Builder, please see Section 1.8 - Using Formulas & the Formula Builder. In addition to the options available for formulas, there are two additional options available when creating scripts. The Cell Attributes folder on the right-hand panel contains a list of the cell attributes (in addition to the value) that can be modified with a script. Attributes and their use are discussed in Section 1.9.2.1 - Formatting Actions. The button will bring up a color selection dialog that allows you to visually pick a color for a cell attribute. Selecting a color will automatically insert an array of RGB values into the script.
Script Color Dialog
For most scripts the syntax is fairly simple and consists of two basic components: a condition and an action.
if (Condition) {Action(s);}The condition is generally a Boolean expression derived using one of the Boolean operators discussed in Section 1.8.2.7.2 - Boolean Operators For example, ({Quantity} < 5) would return true when the value of the Quantity field is lower than 5. The AND and OR operators can be used to check multiple conditions. For example, (({Quantity} < 5) AND ({InStock} == "Yes")) would return true when the value of the Quantity field is lower than 5 and the InStock field equals "Yes".
So a simple script that changes the font color to red when negative values are present in the report field would look something like this:
if ({SubTotal} < 0) {
    FONTCOLOR=[255,0,0];
}
More complex scripts can be created by specifying multiple conditions for multiple actions, using an if else syntax.
if (Condition 1) {Action 1;}
else if (Condition 2) {<i>Action 2</i>;}
else {<i>Action 3</i>;}
There is no limit to the number of nesting levels (if else) that can be specified. Multiple actions for a single condition can also be specified.
if (Condition 1) {
    Action 1;
    Action 2;
    Action 3;
}
This will perform the multiple actions when the condition is met. Note that each line of the script must end with a semi-colon.
The following is a list of element attributes that can be modified using scripting.
- VALUE:
The action syntax that allows you to change the value of the element to which the script is applied is
VALUE=New Value;. The new value does not necessarily have to be of the same data type as the report element (for example you can replace a number with a string). However, changing a string to a number or a number to a date can cause formatting irregularities.- BGCOLOR:
The action syntax that allows you to change the background color of the element is
BGCOLOR=[R,G,B]; where R is a number for the red value of the new color, G is a number for the green value of the new color and B is a number for the blue value of the new color. You can automatically generate the RGB array using the button in the Formula Builder.- FONTCOLOR:
The action syntax that allows you to change the font color of the element is
FONTCOLOR=[R,G,B]; where R is a number for the red value of the new color, G is a number for the green value of the new color and B is a number for the blue value of the new color. You can automatically generate the RGB array using the button in the Formula Builder.- FONT:
The action syntax that allows you to change the font, the font style, and the font size of the element is
FONT=[Font Name,Font Style,Font Size];. The font name is the name of the font you would like to use (i.e. “Dialog”, “Serif”, etc,). The options for font style areBOLD,ITALIC, orBOLD+ITALIC. The font size is a numeric value indication the point size of the font. For example,FONT=[Dialog,BOLD,12];would change the font to 12 point bold Dialog.- ALIGN:
This action allows you to change the horizontal alignment of the data within the cell. The syntax is
ALIGN=Position;. The position options areleft,right, andcenter.- BORDERCOLOR:
The action syntax that allows you to change the border color of the element is
BORDERCOLOR=[R,G,B]; where R is a number for the red value of the new color, G is a number for the green value of the new color, and B is a number for the blue value of the new color. You can automatically generate the RGB array using the button in the Formula Builder.- BORDERTHICKNESS:
The action syntax that allows you to change the thickness of the element's border is
BORDERTHICKNESS=Thickness;. The thickness is an integer indicating the number of pixels. For example,BORDERTHICKNESS=2;would set the border thickness to be two pixels.- HYPERLINK:
The action syntax that allows you to set the hyperlink properties of the element is
HYPERLINK=[URL,"Hint","Target"];. The URL is the location that you would like the link to point to. The hint is the mouse over hint that will appear and the target is the specified target for the link. If you do not want to specify the hint or target, specify an empty string"". Note that you will not be able to click on the hyperlinks in the Preview window if you launched the Report Designer from thebatfile, but the links will still work if you were to export the report to DHTML, or PDF format.- BOOKMARK:
This action allows you to specify a named location within the report. When you export to DHTML, it will become an anchor tag. When you export to PDF it will become a bookmark within the generated PDF file. The syntax is
BOOKMARK=Name. The bookmark can be any string value.- XPOSITION:
The action syntax that allows you to change the X position of a cell within a section is
XPOSITION=Position;(in inches or centimeters depending on which measurement is selected). For example,XPOSITION=1.2;would set the left-hand edge of the report element 1.2 inches/centimeters away from the left-hand edge of the section.- YPOSITION:
The action syntax that allows you to change the Y position of a cell within a section is
YPOSITION=Position;(in inches or centimeters depending on which measurement is selected). For example,YPOSITION=0.3;would set the top edge of the report element 0.3 inches/centimeters away from the top of the section.- WIDTH:
The action syntax that allows you to set the width of a report element is
WIDTH=Size;(in inches or centimeters depending on which measurement is selected). For exampleWIDTH=1.5;would set the width of the element to be 1.5 inches/centimeters.- HEIGHT:
The action syntax that allows you to set the height of a report element is
HEIGHT=Size;(in inches or centimeters depending on which measurement is selected). For exampleHEIGHT=0.25;would set the height of the element to be 0.25 inches/centimeters.- VISIBLE:
This action allows you to control whether a cell is visible or not. The syntax is
VISIBLE=True/False;. Setting visible to false will make the report element invisible.
In addition to modifying these properties for the current cell, you can also retrieve these properties from other report elements. You can retrieve the value from a report element in the same manner that you do in formulas either {Column Field}, @Formula, :Parameter, etc, or using the id() function for other cells or labels. For more on this, please see Section 1.9.2.3 - Using Formulas.
You can retrieve all the other attributes using the following syntax ATTRIBUTE(Report Element). For example, FONTCOLOR(id(RPT_HDR_LB0)) would return an integer array [R,G,B] representing the font color of a label in the Report Header section. You can use this to run comparisons based on attributes or to match the attributes of the current cell with those of another report element. For example, BGCOLOR=BGCOLOR({ProductName}); would change the current cell's background color to match that of the ProductName column.
Depending on which type of element the script is being applied, certain formatting actions may have no effect. For example, you can set scripts on lines and rectangles, but you can only modify their bounds and colors.
Utilizing the if else conditionals and the Image URL formatting option, you can create image URL scripts that change images dynamically based on data in your report. Suppose you want to include two simple images to help readers determine if the sales for a particular category has achieved the desired goal. Let's say that the sales goal for each category is 100 units sold. Using this information, you can write the following script to display the success image when the goal is met and the failed image when the goal is not met.
if(@SUM_Quantity > 100) {
    value = "http://www.quadbase.com/images/green.jpg";
} else {
    value = "http://www.quadbase.com/images/red.jpg";
}
Create a new formula cell that has a string data type (you can simply use "" for the content) and apply this script to the cell. Then, set the data formatting for this cell to be "Image Url". More information about data formatting can be found in Section 1.5.7.3 - Data Formatting for Formulas and Column Fields Here is how the report will look using this script.
Scripted Image URL
In addition to the if else statements you can also define variables and arrays in a script. Variables and arrays are defined at the beginning of the script (before any statements).
If you have a constant or expression that you intend to use in multiple places is a script, it can often be easier to define a variable rather than re-typing the constant or expression every place that it is used. A variable can be declared at the beginning of a script using the following syntax: DataType VariableName;. The data type is the type for the variable value and can be one of Number, Boolean, String, or Date.
| Note |
|---|---|
|
The following example uses variables that contain an expression.
String Line1;
String Line2;
Line1 = {Address1} + "\n";
Line2 = {City} + ", " + {State} + " " + {Zip};

if ({Address2} == NULL) {

    VALUE = Line1 + Line2;
} else VALUE=Line1 + {Address2} + "\n" + Line2;
This script pieces together several report fields to create an address entry. The first two lines of the script declare the variables. The script then concatenates fields and strings depending on whether there is an Address2 entry or not. Using the variables prevents having to re-type the expressions. Note that “\n” is used to break the text to a new line.
You can also assign a value to a variable as part of an action in a script. You can use this to modify the variable value based on some conditions, and then return the variable value to the cell. This is useful if you only want to write one value statement. The following example assigns a value to a variable:
if ({Flags} == "M") {
    LinkAppend = "Main";
} else if ({Flags} == "R") {
    LinkAppend = "Remote";
} HYPERLINK = ["StatPage.html#" + LinkAppend, "", ""];
In this example a variable is defined without an initial value. The value of the variable is assigned based on a string flag in the report. At the end of the script a hyperlink is defined for the element that uses the variable value to specify a page location.
In addition to variables, you can also declare arrays at the beginning of a script. Specific values from the array can then be retrieved later. This is useful if you have a number of fixed values that you will be using in different places in the script like months or days of the week. An array declaration is similar to a variable declaration and uses the following syntax: DataType[] ArrayName = [Value1, Value2, Value3, ...];. Data types for arrays are the same as for variables and can be one of Number, Boolean, String, or Date. The variable name can be anything except an operator or function name. The initial value assignment is optional.
You can retrieve a value from an array using the following syntax: ArrayName[Index]. The following example uses an array to replace the numeric values for a Month column (1-12) and replaces them with the proper month names.
String[] MonthNames = ["January","February","March","April",
"May","June","July","August","September","October",
"November","December"];

VALUE = MonthNames[({Month} - 1)];
Notice that the index specified is {Month}-1. This is because the first month value is 1 and the first index value for the array is 0.
Like variables, you can also assign or overwrite values in an array as part of an action. The syntax for this is ArrayName[Index]=Value;.
You can use any of the EspressReport formulas from the main report or any sub-reports (for more on accessing sub-report formulas, see Section 1.8.3 - Subreport Formula Access) in both the condition and action components of the script, as well as for variable values. Most commonly formulas are used to retrieve values either from the current element or other report elements. You can retrieve the value from column fields using {Column Field}, the value from existing report formulas using @FormulaName and the user supplied values for query and formula parameters using :ParamName and ?ParamName respectively.
In addition to these methods, there is one additional function that can be used in scripts.
- this() -
This function returns the value of the current element (i.e. the cell to which the script is applied). The syntax is
this()without any arguments. The function can be useful if you're reusing scripts, or if you want to ensure that the script is referring to the cell to which it is applied. For exampleIf (this() < 0) {FONTCOLOR=[255,0,0];}would turn the font red, when the value of the current cell is less than zero.
You can also use the formulas to build expressions for comparison or to change an element's value. For more information about EspressReport formulas and their syntax, please see Section 1.8 - Using Formulas & the Formula Builder.
Using cell scripts you can check for null values within report columns. To specify a null as a constant, simply use the word null without any delimiters. So a simple script that checks for nulls would look like this:
if (this() == null) {
    VALUE="yes";
} | Note |
|---|---|
Even if you have set the null data handler in Report Designer, you can still use script in this manner. This is because the script will execute before the null handler has a chance to convert the content of the cell. |
Using scripts, you can retrieve and modify values for specific rows of column fields. Normally when you retrieve or replace the value of a column field you will get/replace the first value from the column, or the current row if the script is applied to a field in the Table Data section. However, you also have the option of specifying which row you would like to get/replace. To do this, you can append a column field with the following syntax: .row(Row Index). The row index is the index value associated with each row in a report starting with 0. For example {ProductName}.row(3) would return the fourth value of the ProductName field.
You can obtain the current row index as well as the total number of rows in the report using the getRowIndex() and getTotalRowIndex() functions respectively. The following example uses this feature to hide repeated values in a column field.
if (({Category}.row(getRowIndex()) == {Category}.row(getRowIndex()-1)) AND (getRowIndex() <> 0)) {
    FONTCOLOR=[255,255,255];
}
This example assumes that the background color for the report is white, and hides the field by adjusting the font color accordingly.
In addition to conditional if else statements, EspressReport also allows you to add loops to scripts. Used in conjunction with variables and row-specific options/formatting, loops are useful if you need to perform running totals/calculations independent of the current row or section of the report. The basic syntax for loops is:
while (Condition) {Action(s);}The specified actions will be performed as long as the condition (Boolean expression) is true.
For example, say you have the following report:
| Product | Quantity | Price |
|---|---|---|
| Chair | 6 | $327.00 |
| Chair | 4 | $218.00 |
| Chair | 12 | $418.00 |
| Chair | 5 | $221.00 |
| Chair | 18 | $248.00 |
| Table | 4 | $875.00 |
| Table | 2 | $1,024.00 |
| Table | 8 | $967.00 |
| Table | 7 | $1,106.00 |
Adding a formula that calculates the total quantity to the Table Footer (sum({Quantity})) would return 66. However, say you only wanted to show the total quantity for chairs in the Table Footer. To do this you would write a loop. Applying the following script to the aggregation.
Number i;
Number s;
i = 0;
s = 0;

while (i < getTotalRowIndex()) {

    if ({Product}.row(i) == "Chair") {

        s = s + {Quantity}.row(i);

    }

    i = i + 1;

}

VALUE = s;
will return 45 - the sum of the quantity column for Chair. The script loops through each row in the report, and checks to see if the value for the Product column is “Chair”. If it is, the Quantity value for that row is added to the variable s.
In addition to individual cells, scripts can also be applied to report sections. Based on conditions within the report data, individual section options can be turned on/off, and section background colors can be set. To add a script to a report section click on the button with the section name at the left-hand side of the Designer. You can also right click on a blank portion of the section field and select from the pop-up menu.
Writing section scripts is exactly the same as writing scripts for report elements, and they use the same syntax. The only difference instead of a Cell Attributes folder in the Formula Builder, you will see a Section Attributes folder containing the various formatting actions that can be performed with section scripts.
The following is a list of section attributes that can be modified using scripting (not all options are available for every report section).
- BGCOLOR:
The action syntax that allows you to change the background color of the element is
BGCOLOR=[R,G,B];where R is a number for the red value of the new color, G is a number for the green value of the new color and B is a number for the blue value of the new color. You can automatically generate the RGB array using the button in the Formula Builder.- PRINT_ON_NEW_PAGE:
This action allows you to turn on/off the print on new page section option. The syntax is
PRINT_ON_NEW_PAGE=True/False;For more information about the print on new page feature, please see Section 1.5.3 - Section Options.- RESET_PAGE_NUMBER:
This action allows you to turn on/off the reset page number section option. The syntax is
RESET_PAGE_NUMBER=True/False;For more information about the reset page number feature, please see Section 1.5.3 - Section Options.- VISIBLE:
This action allows you to control whether a section is visible or not. The syntax is
VISIBLE=True/False;Setting visible to false will make the section invisible. Using this attribute coupled with the nested section feature (Section 1.5.1.1 - Nested Sections) allows you to create different headers/footers to display depending on the data.- HEIGHT:
This action allows you to set the height for the section. The syntax is
HEIGHT=Size;(in inches or centimeters depending on which measurement is selected). For exampleHEIGHT=0.25;would set the height of the section to be 0.25 inches/centimeters.
| Note |
|---|---|
Scripts that set or reference section attributes can only be applied to sections. They cannot be applied to other report elements. |
You can also add comments to a script to explain its design and operation. A comment is preceded by two slashes //. Anything following this on the same line is treated as a comment. You can break comments into multiple lines, but each line must begin with //.
If you have scripts applied to cells in your report, you can access these values using the syntax .getScriptValue(). For example, you may have this data:
String, int
Month, Revenue
January, 3567
"February", 6854
"March", 5421
"April", 8425
"May", 5611
"June", 2356
"July", 6543
"August", 2563
"September", 4432
"October", 8841
"November", 1023
"December", 2265
If you wish to take this data and create a year to date revenue column, you could use the following script, which would display the scripted value from the previous row added to the revenue from the current row. This script is written to be put on a formula consisting of the number 0 as a column in the table data section, refered to within this script as {formula1}.
if(getRowIndex()==0)

    VALUE={revenue};
else
    VALUE={revenue} + {formula1}.getScriptValue(getRowIndex()-1);
This would yield a report like this:

For reports that contain a number of scripts or scripts applied to a number of elements, there are several options available to help you manage and find the elements that the scripts are applied to. In the script dialog, you will notice that in addition to the standard options such as remove, delete, and rename, there are also buttons to view all, find next, and find previous elements. Make sure that you select a script before using these buttons.
- VIEW ALL -
this button will open the Report Explorer if it is not already open and highlight every element that the selected script has been applied to with an asterisk. The tree will automatically expand the sections that have highlighted cells. Clicking on one of these elements will center the designer view on that element allowing you to change or remove the applied script. The highlights will be changed if you select another script and click on VIEW ALL again. Closing the script dialog box will remove all the highlights and the explorer tree will collapse.
View All Result
- FIND NEXT and FIND PREVIOUS -
these buttons are used to cycle through elements that the selected script has been applied to. If you already have an element selected in the Designer when clicking on these buttons, the search will begin at the current element. If no elements are selected, the search will begin at the beginning of the report. If you select another script and click FIND NEXT, the asterisk will shift to the newly selected script and the first element that has the script applied will be highlighted in the designer. and only cycle through visible elements. If you want to see invisible elements with the script, use which shows all invisible elements as well as visible elements.

For more information on the Report Explorer, please see Section 1.5.8 - The Report Explorer