EspressReport for WebObjects provides seamless integration with WebObjects. It not only provides an easy way to integrate with standard EspressReportAPI by using WOComponent classes to return dynamic pages, but also supports generating report with WebObjects’s non-java-standard collection class NSArray. This makes it very easy for users who use enterprise objects to retrieve data.
EspressReport for WebObjects also supports advanced reporting features, such as streaming report with charts, drill-down reports, and parameterized reports.
EspressReport for WebObjects is available as separate jar file, EspressReportForWebObjects.jar. Integrating it with your WebObjects project is very easy, just add it to your project frameworks. The source is available. You can change the source file and add them back to your project.
This chapter covers basic integration of EspressReport within a WebObjects application environment, as well as step-by-step examples for using some of the different features in EspressReport.
This section explains how to integrate some of the basic Report API functionality within a WebObjects application.
Step 1: Create a QbReport object
The following code shows how to create a QbReport object from scratch. For more detailed information about creating report from different data sources, please refer to Section 2.3 - EspressReport Report API.
// not using EspressManager, we will use a datasource from file
QbReport.setEspressManagerUsed(false);

// Set up column mapping
ColInfo colInfo[] = new ColInfo[14];
for (int i = 0; i < colInfo.length; i++)

    colInfo[i] = new ColInfo(i);

// allocate the QBReport Object using the specified parameters
QbReport report = new QbReport((Applet)null, QbReport.COLUMNAR, "/EspressReport/help/examples/DataSources/text/sample.dat", colInfo, null);
Step 2: Then, add more code to the above code so that the method returns a WOComponent. The entire code for the method now looks like this:
public WOComponent returnReport() {

    // allocates a new WOComponent with static type WOReport
    // this is possible because WOReport extends WOComponent
    WOReport nextPage = (WOReport)pageWithName("WOReport");

    QbReport.setEspressManagerUsed(false);
    ColInfo colInfo[] = new ColInfo[14];
    for (int i = 0; i < colInfo.length; i++)
        colInfo[i] = new ColInfo(i);

    QbReport report = new QbReport((Applet)null, QbReport.COLUMNAR, "/EspressReport/help/examples/DataSources/text/sample.dat", colInfo, null);

    // load in the WBReport into the WOReport
    nextPage.setReport(report);

    // configure to export the report in DHTML format
    nextPage.setExportFormat(QbReport.DHTML);

    // return the WOComponent (super-class of WOReport)
    return nextPage;

}
The class WOQbReport extends QbReport in the ReportAPI and is the main class used to support WebObjects. Its constructors take a NSArray of EOGenericRecord as data source and create reports based on it.
Before we can create a report, we need a data source to be used by the report. We will assume that we are using a Database with some EOModel mapped on top of it. The EOModel will contain a mapping of entities (tables), attributes (fields), and relationships (foreign keys) to the Database. For a review of concepts on how to setup the EOModel, please read the next section. You can safely skip this section if your understanding of the EOModel and EO Fetch Specification is strong.
he EOModel is an abstraction that separates the database layer from business logic. Using the EOModel we are able to manipulate database data as if they were Objects. After the user has setup the proper EOModel using the EOModeler, he/she will be ready to fetch data based on attributes of the EOModel.
In the EOModel, there are entities (similar to tables of SQL) and attributes (similar to columns in the tables of SQL). Entities in the EOModel are mapped to tables and views in the database. Attributes in the EOModel are mapped to columns of the tables and views in the database. In addition, the EOModel also contains relationships, which are key based logical associations among entities. It is important that the user understands the concept of Entities, Relationships, and Attributes before setting up their own EOModel. Please review the relevant topics of an EOModel before setting up your EOModel.
After we have setup an EOModel for our database, we are ready to obtain data from it. Recall that the way to obtain data as a NSArray is by writing Fetch Specifications. An EOFetchSpecification is an Object that specifies what are the qualifications of data we want. In a way, writing Fetch Specification for an EOModel is similar to writing a Query for the database. In fact, it is true that if we have a Fetch Specification for an EOModel, we can always write a corresponding query for a database. However, the reverse is not true. Not all queries can be written as a Fetch Specification. In this way, a Fetch Specification serves as an abstraction that helps programmers deal with data in an object oriented way, but loses the power that queries have over the control of database data.
Having said that, let’s look at an example of translating a SQL Query for a database to a Fetch Specification. Remember this is not always possible but for our example, we have restricted our task to illustrate how it can be done.
Consider a database schema with four tables: Orders, OrderDetails, Categories, and Products.
- Orders:
stores information about a customer order.
Attributes -
OrderID,ShipCity, andShipState.Primary Key -
OrderID
- OrderDetails:
details about a particular order.
Attributes -
OrderID,ProductID,QuantityPrimary Key -
ProductID
- Categories:
categories of product.
Attributes -
CategoryID,CategoryNamePrimary Key -
CategoryID
- Products:
information about a product.
Attributes -
CategoryID,ProductID,ProductName,UnitsInStockPrimary Key -
ProductID
Next, consider the query.
SELECT Orders.OrderID, Orders.ShipCity, Orders.ShipState, Categories.CategoryName,
Products.ProductName, OrderDetails.Quantity
FROM Orders, OrderDetails, Categories, Products
WHERE Orders.ShipState = ‘NY’
AND Products.CategoryID = Categories.CategoryID
AND OrderDetails.OrderID = Orders.OrderID
AND OrderDetails.ProductID = Products.ProductID
ORDER BY Orders.OrderID DESC, Orders.ShipCity ASC;
This query joins four tables and obtain orders that are only shipped to NY, and orders the records in descending order by the OrderID column and orders it again in ascending order by the quantity column before returning the data records.
Now, let’s look at how to convert this SQL query to a Fetch Specification.
To have a restriction on the query, we will need to pass in an EOQualifier object to the EOFetchSpecification constructor. The static method qualifierWithQualifierFormat() from EOQualifier returns an EOQualifier. If we simply pass in a String that is similar to a SQL Where clause in the first argument of the qualifierWithQualifierFormat() method, we can create a valid EOQualifier object that restricts the data being fetched. We construct the EOQualifier simply by including the following code:
EOQualifier qual = EOQualifier.qualifierWithQualifierFormat

    ("shipstate = NY", null); // we set the binding to null for simplicity
In the above code, the Where clause from the SQL Query is converted to an EOQualifier Object by passing in a String argument. It is also possible to include AND and OR to combine one or more Boolean operators in the argument of the EOQualifier. In addition, the EOQualifier class also has a collection of sub-classes that are designed for other restrictions on the query. Some of these sub-classes are Boolean Qualifiers, EOAndQualifier, EOOrQualifier, and EONotQualifier.
Now that we have a qualification, all we need is an ordering for the Order ID and ShipCity. By passing a NSArray of EOSortOrdering Objects to the EOFetchSpecification Constructor, we can accomplish this task. Here is the code:
EOSortOrdering shipdateOrdering = EOSortOrdering.sortOrderingWithKey

    ("shipcity", EOSortOrdering.CompareAscending);

EOSortOrdering orderidOrdering = EOSortOrdering.sortOrderingWithKey

    ("orderid", EOSortOrdering.CompareDescending);

NSArray sortOrderings = new NSArray

    (new Object[] {shipdateOrdering, orderidOrdering});
Finally, construct the EOFetchSpecification Object using an entity name, the previously constructed EOQualifier, and the NSArray of EOSortOrdering Objects:
EOFetchSpecification fetchSpec = new EOFetchSpecification

("Orders", qual, sortOrderings);![[Note]](../../../images/note.png) | Note |
|---|---|
Using the SQL Statement approach or the Fetch Specification approach to obtain data from the database should give the same results. |
Also note that for the Fetch Specification to work correctly, you have to set up the EOModel with the Relationship correctly defined. That is, for the joining of the identities to work automatically, you have to have joined the identities in your EOModel for the database. For information on how to use the EOModeler, please consult online documentation for the EOModeler at Apple's web site.
After an EOModel has been created, we are ready to write a fetch specification and obtain Data Objects from the Database using the EOModel. Lastly, we will use these Data Objects, in the form of a NSArray Object, as a parameter to the WOQbReport Constructor to create our report. The following code illustrates this concept:
EOQualifier qual = EOQualifier.qualifierWithQualifierFormat

    ("shipstate = 'NY'", null);

EOSortOrdering shipdateOrdering = EOSortOrdering.sortOrderingWithKey

    ("shipcity", EOSortOrdering.CompareAscending);

EOSortOrdering orderidOrdering = EOSortOrdering.sortOrderingWithKey

    ("orderid", EOSortOrdering.CompareDescending);

NSArray sortOrderings = new NSArray

    (new Object[] {shipdateOrdering, orderidOrdering});

EOFetchSpecification fetchSpec = new EOFetchSpecification

    ("Orders", qual, sortOrderings);

EOEditingContext myEditingContext = this.session().defaultEditingContext();
NSArray data = myEditingContext.objectsWithFetchSpecification(fetchSpec);

String[] entities = new String[]{"Orders", "OrderDetails", "Products", "Categories"};
WOQbReport report = new WOQbReport(null, QbReport.SUMMARY, data, entities, colInfo, null);
In the above code, we first instantiated an EOFetchSpecification Object to retrieve data from the database via the EOModel. Then fetch the data using the default Editing Context. Finally, we call the WOQbReport constructor and pass in the NSArray as the data source to create our report. Note that we also pass in a String array of Entity names to the constructor of the WOQbReport. This is because we also want to display the attributes of the entities that relate to the Orders Entity. It is also important to note that the entities OrderDetails, Products, and Categories all are “related” to the Orders entity in some type of relationship setup in the EOModel.
For an example WebObjects Project that creates a WOQbReport using a NSArray as the data source, please use the project EspressReportExamples in the folder <EspressReport installation dir>/help/examples/webobjects/.
This section explains step-by-step how to integrate EspressReport into a WebObjects application using Eclipse.
Xcode is a suite of tools for developing software on Mac OS X, developed by Apple. It includes (among other things) the compiler and other necessary tools. Xcode comes with the OS X install CD (although it is not installed by default).
Eclipse is a Java IDE and the latest Eclipse application, for the Mac, can be downloaded from http://www.eclipse.org/downloads. Before launching Eclipse, please edit <eclipse folder>/Eclipse.app/Contents/MacOS/eclipse.ini and add the following parameters to the file in order to increase the memory and heap space of the Eclipse application:
-XX:MaxPermSize=128m-Xmx512m
After saving the file, start Eclipse.
WOLips is a set of Eclipse tools for WebObjects development. You can download and install the plug-in (through Eclipse) by going to → . This opens the Available Software panel. The first time you go through this process, you will need to add the WOLips site to the list. Click on and it should pop up a new dialog. Select on the right-hand side from the dialog. In the Add Site panel that appears, enter WOLips in the name field and enter the URL for the stable version of WOLips, http://webojects.mdimension.com/wolips/stable, for the location field and click .
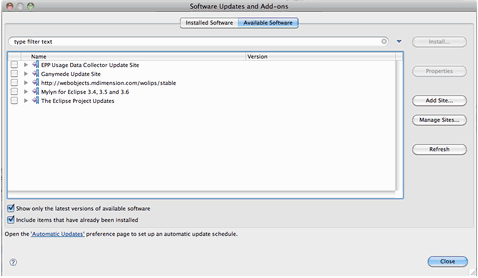
After the WOLips site is added to the list, fully expand the list to display all its offerings. Select only Standard Install. After installation, restart Eclipse.
This is an external Java program that helps programmers generate the java source for their EOs. Download the templates from http://webobjects.mdimension.com/wolips/EOGenerator/Velocity%20EOGenerator%20Templates/ and place them in the /Applications/Developing/VelocityEOGeneratorTemplates folder.
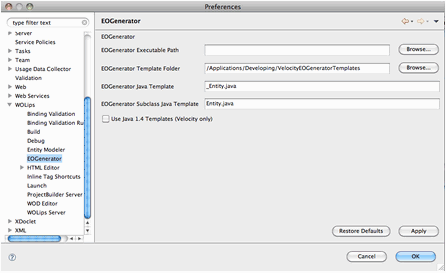
Inside this template folder you will find two standard templates: _Entity.java and Entity.java . In Eclipse, select → → and enter the following information:
EOGenerator Template Folder: /Applications/Developing/VelocityEOGeneratorTemplates
EOGenerator Java Template: _Entity.java
EOGenerator Subclass Java Template: Entity.java
You are now ready to create your first WebObjects example with EspressReport.
In Eclipse, select the WOLips perspective. This is indicated in the upper right corner of the window. If you cannot find the WOLips button, click on the double right arrow at the very edge of the window and choose Other, then select the WOLips perspective from the list and click .
In WOLips perspective, CTRL+Click in the Package Explorer tab and choose . This will bring up a Select a.. window. Choose WedObjects Application under the WOLips folder from the popup dialog. When the New WebObjects Project dialog opens, enter EspressReportApp as the name of the project, check the Use default location box to use the default workspace location, and click Next to create the project.
Clear the Base Package and Component Package fields in the next window and click . You should see an project created in your Package Explorer. Expand your project and verify that it contains the following: Sources, JRE System Library, build, Components (and under Components, Main WO) and build.xml.
Also, expand Sources and then (default package) and edit each of the java files present (Application.java, DirectAction.java, Main.java and Session.java) to remove the package . and import .Main lines. After editing, save the files.
In the Package Explorer, select Components/Main WO from the tree. Click on the Component tab at the bottom of the main editor and in the HTML area (the top panel) add:
    <!DOCTYPE HTML PUBLIC "-//W3C//DTD HTML 3.2//EN">

    <html>
        <head>
            <title>Untitled</title> </head>

        <body>
            <webobject name = "ReportComponent"></webobject> </body>

    </html>
Click in the bottom panel of the Component editor to edit the WOD file and enter
ReportComponent : WOReportComponent {
}
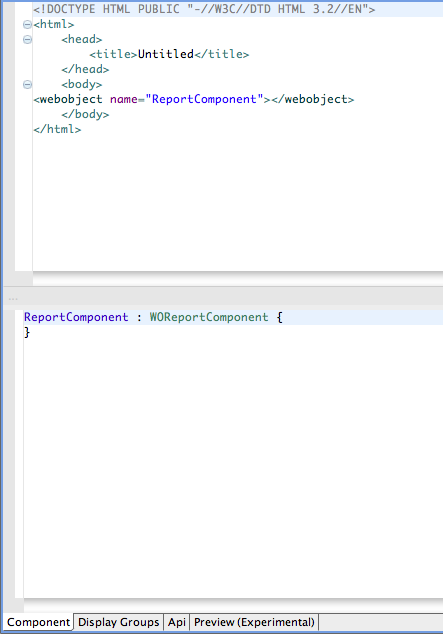
Save the modifications.
Select EspressReportApp/Components from Package Explorer and CTRL+Click to show a pop up dialog. Select → and then select WOComponent under WOLips. The New WebObjects Component dialog opens. Enter WOReportComponent as the component name. Deselect Create HTML contents and Create api file and click .
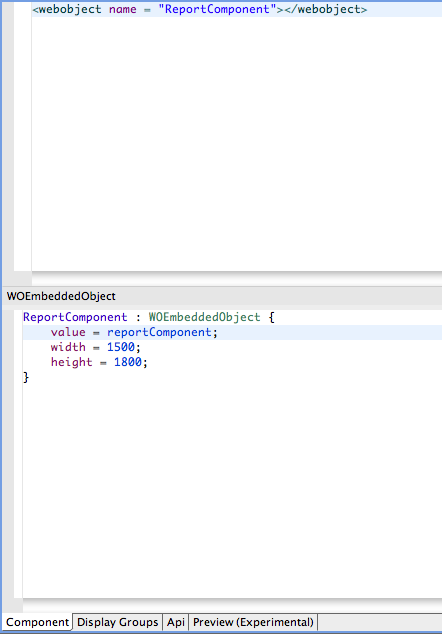
You should see a new WOReportComponent.java in your source folder and a WOReportComponent WO folder at the Components folder. Select WOReportComponent WO from Package Explorer tree and switch to the component tab. Type in the following in HTML panel (UPPER PANEL):
<webobject name = "ReportComponent"></webobject>
Then, type the following in the WOD definition window (LOWER PANEL) and save:
ReportComponent : WOEmbeddedObject {

    value = reportComponent;
    width = 1500;
    height = 1800;

}
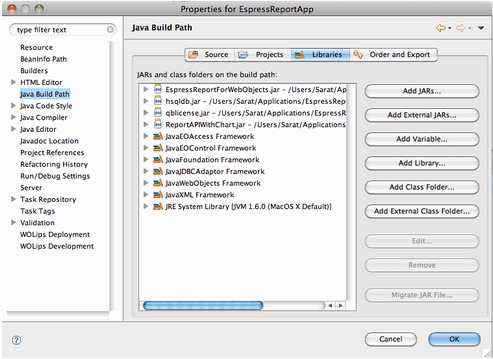
CTRL+Click on the EspressReportApp folder from Package Explorer tree and select Properties from the popup menu. Then click on Java Build Path from the left side in the new popup dialog. Select Add External Jars and browse and add EspressReportForWebObjects.jar, ReportAPIWithChart.jar, hsqldb.jar and qblicense.jar from the <EspressReport Install Directory>/lib folder.
Drag ParameterizedNSArray.java and WOReportComponent.java from the <EspressReport Install Directory>/help/examples/WebObjects folder to EspressReportApp/Sources/(default package) in package explorer.
Click on the WOReportComponent.java file underneath the Sources folder and modify path to sample.dat to point to <EspressReport Install Directory>/help/examples/DataSources/text/sample.dat .
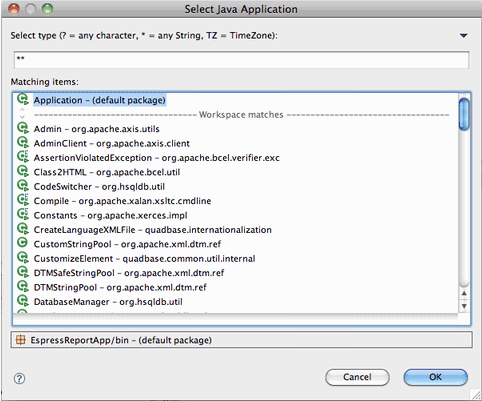
CTRL+Click on the project name and select → . Choose Application - (default package) in the Select Java Application dialog and click . Then you should see a report which displayed in your default web browser.
CTRL+Click on EspressReportApp/build/EspressReportApp.woa/Contents/Resources and select New: Other. Select EOModel from WOLips folder in the popup dialog. Enter WoodView for the EOModel name and choose JDBC for Adaptor type. Please make sure Use EOGenerator File is checked and click . Switch to the Entity Modeler Prespective.
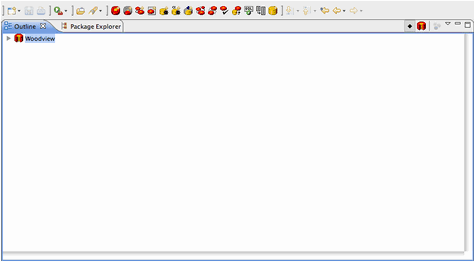
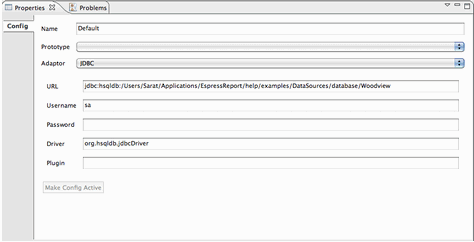
In the Entity Modeler, select Outline from the left tabbed panel, expand WoodView folder. Select Default and click on Properties in the bottom panel below. Fill in the username (sa) and password (leave it blank). For URL, enter jdbc:hsqldb:<EspressReport Install Directory>help/examples/DataSources/database/woodview and for Driver, enter org.hsqldb.jdbcDriver.
Click on in the toolbar button to create a new entity. Click on the Basic Tab in the Properties pane and change the new entity's name to Orders, the table name to Orders and set the class name to com.EspressReportApp.eo.Orders.
Name: OrderDetails
Table Name: Order_Details
Class Name: com.EspressReportApp.eo.OrderDetails
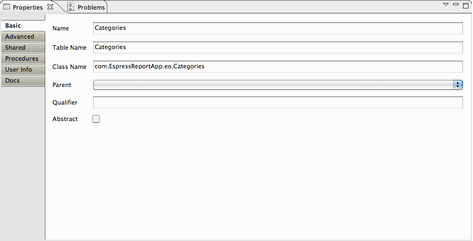
Name: Categories
Table Name: Categories
Class Name: com.EspressReportApp.eo.Categories
Name: Products
Table Name: Products
Class Name: com.EspressReportApp.eo.Products Select the Orders entity and click on the New Attribute from the toolbar button. After a new attribute is created, select the Properties pane and enter the following:
Name: orderid
Column: OrderID
External Type: INTEGER
Data Type: Integer - Integer
Key icon (Primary Key): checked
Diamond icon (Class Property): checked
Lock icon (Used for Locking): checked
Repeat the above steps to create the following attributes for the Orders entity:
Name: shipcity
Column: ShipCity
External Type: CHAR
Data Type: String - String S
External Width: 50

Key icon (Primary Key): unchecked
Diamond icon (Class Property): checked
Lock icon (Used for Locking): checked

Name: shipstate
Column: ShipState
External Type: CHAR
Data Type: String - String S
External Width: 50
Key icon (Primary Key): unchecked
Diamond icon (Class Property): checked
Lock icon (Used for Locking): checked
Add the following attributes for the OrdersDetails entity:
Name: orderid
Column: OrderID
External Type: INTEGER

Data Type: Integer - Integer
Key icon (Primary Key): unchecked
Diamond icon (Class Property): checked
Lock icon (Used for Locking): checked

Name:  productid
Column: ProductID
External Type: INTEGER
Data Type: Integer - Integer
Key icon (Primary Key): checked
Diamond icon (Class Property): checked
Lock icon (Used for Locking): checked

Name: quantity
Column: Quantity
External Type: INTEGER
Data Type: Integer - Integer
Key icon (Primary Key): unchecked
Diamond icon (Class Property): checked

Lock icon (Used for Locking): checked
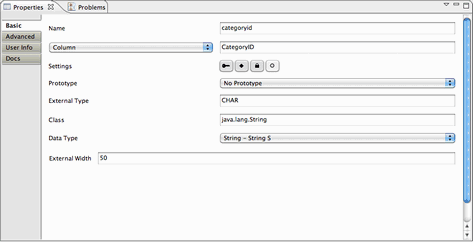
Select the entity Categories and create the following attributes:
Name: categoryid
Column: CategoryID
External Type: CHAR
Data Type: String - String S
External Width: 50
Key icon (Primary Key): checked
Diamond icon (Class Property): checked
Lock icon (Used for Locking): checked

Name: categoryname
Column: CategoryName
External Type: CHAR
Data Type: String - String S
External Width: 50 Key icon (Primary Key): unchecked

Diamond icon (Class Property): checked
Lock icon (Used for Locking): checked
Add the following attributes for the Products entity:
Name: categoryid
Column: CategoryID
External Type: CHAR
Data Type: String - String S
External Width: 50
Key icon (Primary Key):un checked
Diamond icon (Class Property): checked
Lock icon (Used for Locking): checked

Name: productid
Column: ProductID
External Type: INTEGER
Data Type: Integer - Integer

Key icon (Primary Key):checked
Diamond icon (Class Property): checked
Lock icon (Used for Locking): checked

Name: productname
Column: ProductName
External Type: CHAR
Data Type: String - String S
External Width: 50
Key icon (Primary Key):un checked
Diamond icon (Class Property): checked
Lock icon (Used for Locking): checked

Name: unitsinstock
Column: UnitsInStock
External Type: INTEGER
Data Type: Integer - Integer
Key icon (Primary Key):un checked
Diamond icon (Class Property): checked

Lock icon (Used for Locking): checked
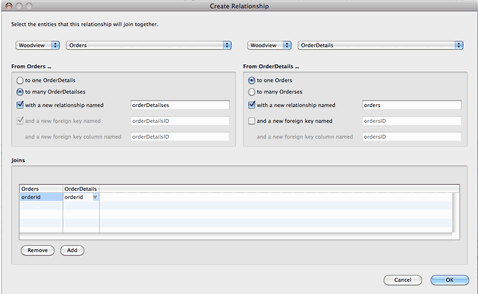
CTRL+Click on Orders and select New Relationship from the popup menu. The Create New Relationships dialog opens. Map Woodview.Orders and Woodview.OrderDetails together.
In left panel From Orders…, select to many OrderDetails, check the checkbox for write a new relationship named and uncheck the checkbox for foreign key. In right panel From OrderDetails…, select to one Orders, check the checkbox for write a new relationship named and uncheck the checkbox for foreign key. At the Joins panel, map Orders.orderid and OrderDetails.orderid together and click .
CTRL+Click on OrderDetails and select New Relationship from the pop up menu. Map Woodview.OrderDetails and Woodview.Products together.
In left panel From OrderDetails…, select to one Products, check the checkbox for write a new relationship named and uncheck the checkbox for foreign key. In right panel From Products…, select to many OrderDetails, check the checkbox for write a new relationship named, and uncheck the checkbox for foreign key.
At the Joins panel, map OrderDetails.productid and Products.productid together and click
CTRL+Click on Products" and select New Relationship from the popup menu. Map Woodview.Products and Woodview.Categories together.
In left panel From Products…, select to one Categories, check the checkbox for write a new relationship named and uncheck the checkbox for foreign key. In right panel From Categories…, select to many Products, check the checkbox for write a new relationship named and uncheck the checkbox for foreign key.
At the Joins panel, map Products.categoryid and Products.categoryid together and click
After creating the entities, attributes and relationships, click the button from the toolbar. The window should come up with no errors message.
Select the button from the toolbar to save the view model.
Delete the woodview.ecogen file (if it exists) from EspressReportApp/build/EspressReportApp.woa/Contents/Resources. CTRL+Click on the WoodView EOModel from the package explorer and select → from the pop up menu. CTRL+Click on the generated woodview.ecogen and select EOGenerate from the popup menu. It should return without any errors and you should see new java files created under the Sources folder.
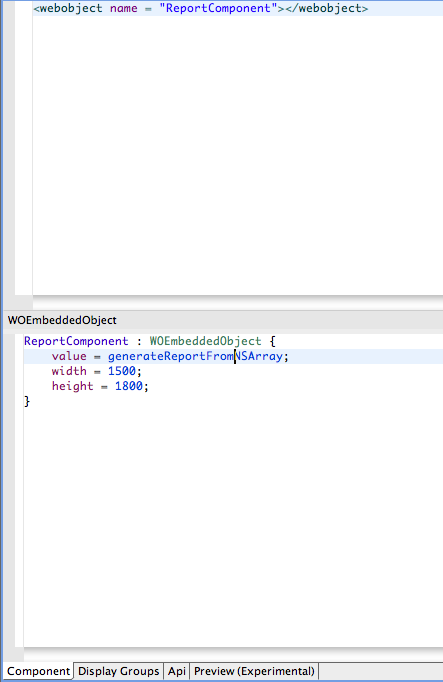
Select WOReportComponent WO from Package Explorer tree and switch to the Component tab. In the WOD definition window (LOWER PANEL), replace the value attribute to generateReportFromNSArray
ReportComponent : WOEmbeddedObject {

    value = generateReportFromNSArray;
    width = 1500;
    height = 1800;

}CTRL+Click the project, EspressReportApp, in the Package Explorer pane and select → from the popup menu. As before, choose Application - (default package) from the list. The report should pop up from your default web browser.
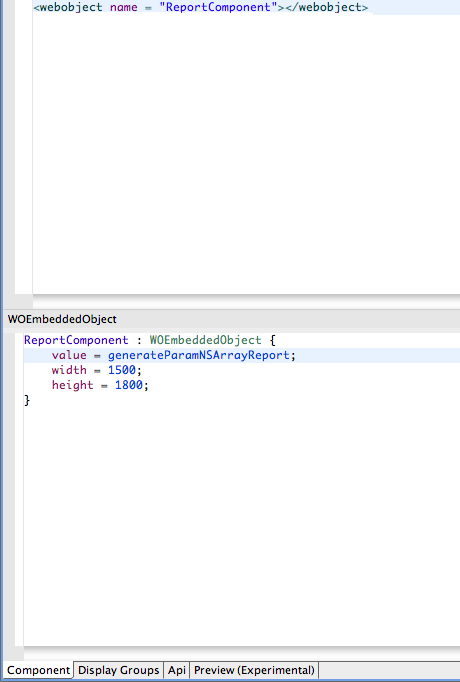
Select WOReportComponent WO from Package Explorer tree and switch to the Component tab. In the WOD definition window (LOWER PANEL), replace the value attribute to generateParamNSArrayReport
ReportComponent : WOEmbeddedObject {

    value = generateParamNSArrayReport;
    width = 1500;
    height = 1800;

}CTRL+Click the project, EspressReportApp, in the Package Explorer pane and select → from the popup menu. Again, choose Application - (default package) from the list. You will then get prompted by the parameter input dialog. Type in NY for the city and click . The report should popup from your default web browser.
All files (those in the EspressReportsForWebObjects.jar file and the two additional files) are located under <EspressReport Install Directory>/help/examples/WebObjects folder.
| Note |
|---|---|
By default, EspressManager is not used. If you want to have EspressManager up and running, you will need to modify the source code to suit your needs. If EspressManager is not running for drill-down reports, reports with a sub-report, or reporta with A chart, you will need to specify the path using the following methods:
|