Data sources in ERES are maintained in XML data registry files. These files are created and managed from within the Organizer. Detailed documentation about data sources can be found in Section 2.4 - Working with Data Sources.
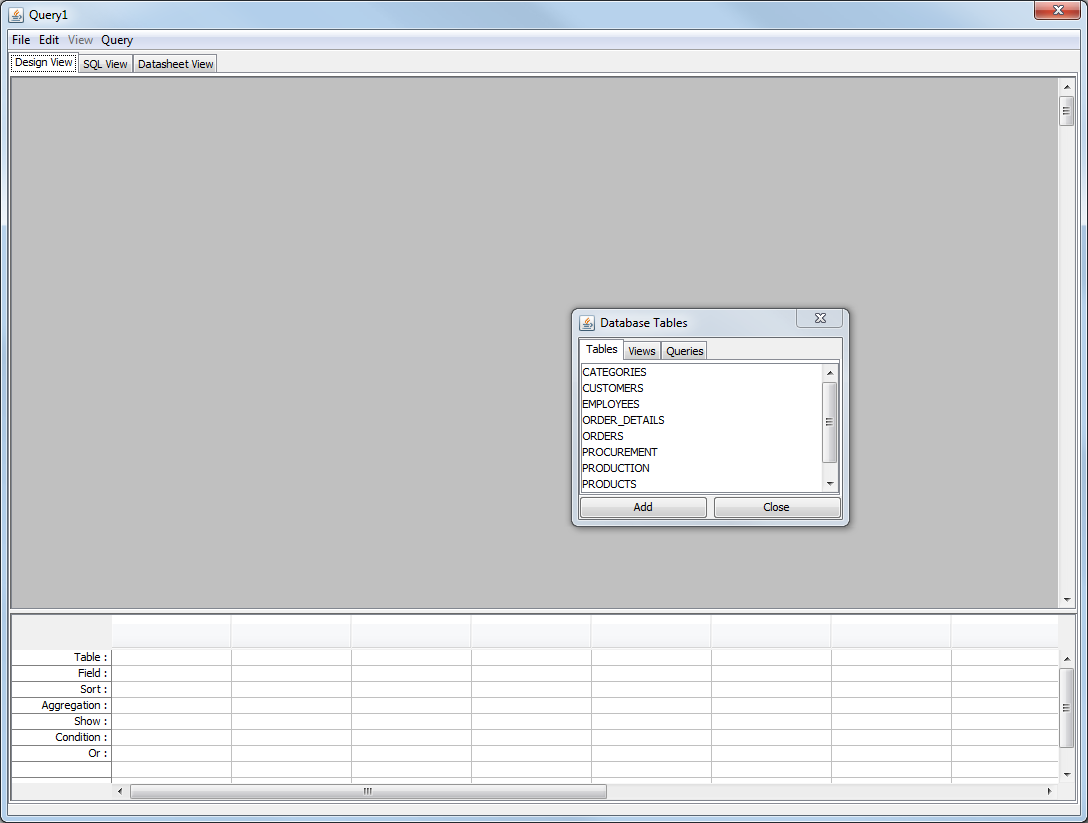
To create a new data registry, open the Organizer and click the button ![]() . This will bring up a dialog containing all the registries defined in ERES.
. This will bring up a dialog containing all the registries defined in ERES.
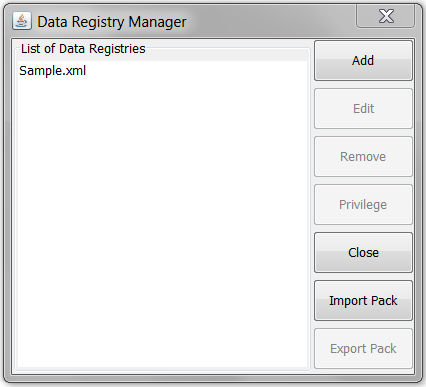
Registry List Dialog
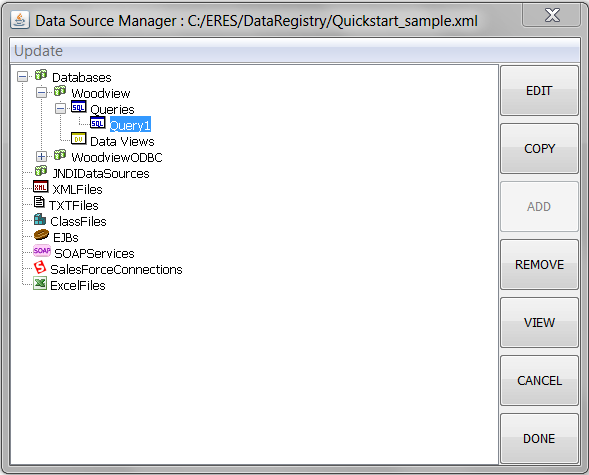
Click the button in this dialog to add a new data registry. A dialog will open prompting you to specify a name for the registry. Enter any name you would like and click . The registry will be created and the Data Source Manager window for the new registry will open.
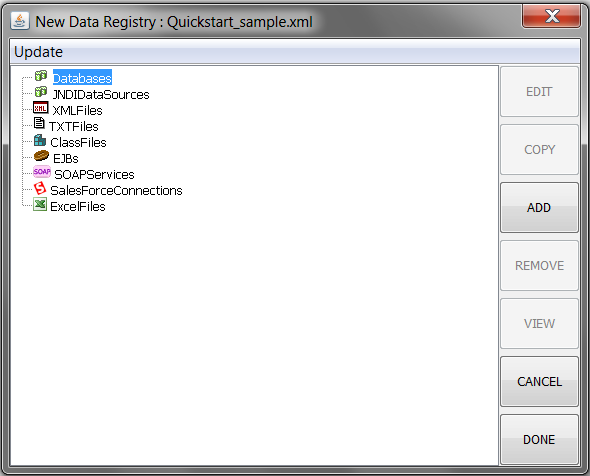
Data Source Manager Window
ERES allows you to connect to JDBC compliant data sources. Few examples are included with your installation.
In this tutorial, we will set up a JDBC connection to the Woodview HSQL database that comes with the ERES Installation. If you are running ERES using the configuration described in Section Q.1.1 - Setup then the HSQL JDBC driver will already be in the classpath of your Tomcat server, as HSQL is also used as the default ERES database. If this is not the case, or if you are using a different database for ERES, you will need to make sure that your database driver (hsqldb.jar for HSQL) is in the <ERESInstallDir>/WEB-INF/lib directory, or in Tomcat's classpath.
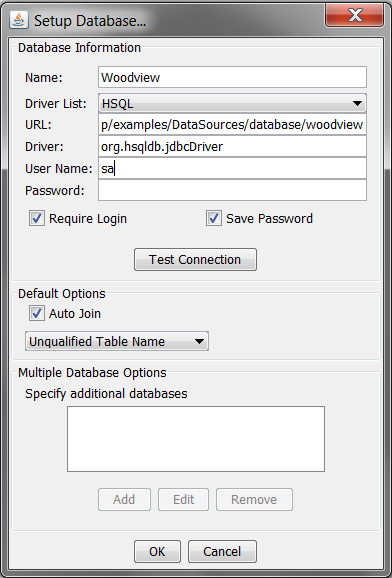
The classpath and Woodview sample database were already created during installation, so you can select the Woodview database in your registry. From the Data Source Manager window, click on the Databases node in the left panel, select Woodview and hit the Edit button to reach the following Setup Database panel, where HSQL is on the Driver List, jdbc:hsqldb:help/examples/DataSources/database/woodview for the URL, and org.hsqldb.jdbcDriver as the Driver. Click on both the Require Login and Save Password boxes. Next, enter sa for the User Name and leave the Password blank will connect to the built-in HSQL database.
Add Database Dialog
The procedure for connecting to other databases is very similar. First, select the type from the database list and then fill in the values. The JDBC Driver will be automatically provided so it is usually not necessary to modify this field. Here is an example connecting to a MySQL database.
URL: jdbc:mysql://192.168.0.55:3306/woodview
Driver: com.mysql.jdbc.Driver
User Name: root
Password: ******
Leave the Auto Join and Table Name properties alone, and click the button to make sure you've entered the information correctly. Click to bring back up the Data Source Manager window, where there will be a new node under Databases for Woodview.
ERES provides a number of different interfaces to query a database to retrieve the report data. You can type a SQL statement, use the Query Builder, or use data views to create a query interface that insulates the end user from the database structure. In this example, we will use the Query Builder to create a query.
![[Note]](../../../images/note.png) | Note |
|---|---|
You can use either the JDBC or ODBC data source for this example, the data is the same. The screen shots are from the HSQL Database. |
To create a new query, click to expand the Woodview, orWoodviewODBC node in the left-hand frame of the Data Source Manager. Two sub-nodes will appear, one called Queries and one called Data Views. Select the Queries node and click . A dialog will appear prompting you to specify a name for the query and to select whether to launch the Query Builder or to enter an SQL statement.
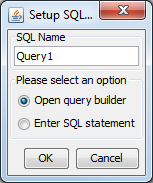
Query Name Dialog
Enter any name you would like, select Open query builder, and click on . The Query Builder will launch. You will see a separate window containing all of the tables for Woodview sitting over top of the main Query Builder window.
Query Builder Dialog
To add a table to the query, select the table in the Tables window and click the button. You can also double click on the table name. Using one of the two methods, add the following tables to the query:
CATEGORIES
CUSTOMERS
ORDER_DETAILS
ORDERS
PRODUCTS
The tables will appear in the top half of the Query Builder window. You will see the join lines connecting various fields in the tables.
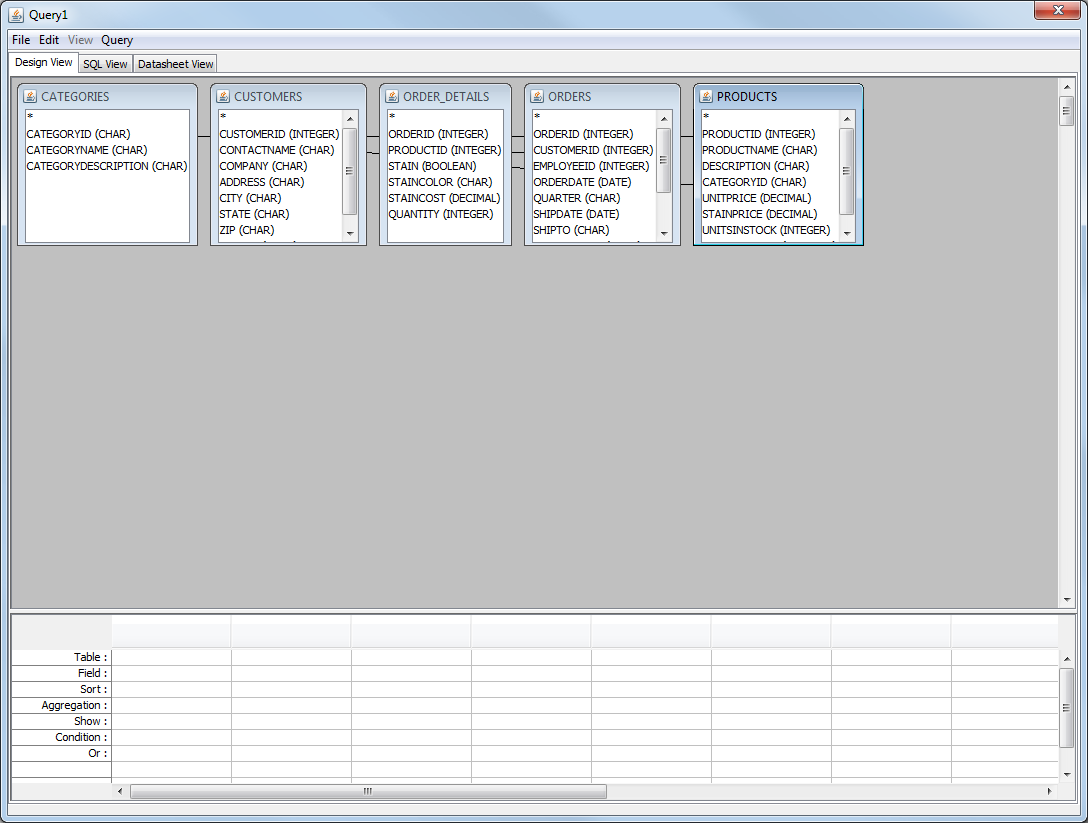
Query Builder with Tables
To add a field to the query, you can either double click on the field in the table window or double click on the Table and Field fields in the lower (QBE) portion of the Query Builder window and select the table and field from the drop-down menu. Using either method, add the following fields to the query.
ORDERID from ORDERS
COMPANY from CUSTOMERS
REGION from CUSTOMERS
CATEGORYNAME from CATEGORIES
PRODUCTNAME from PRODUCTS
UNITPRICE from PRODUCTS
QUANTITY from ORDER DETAILS
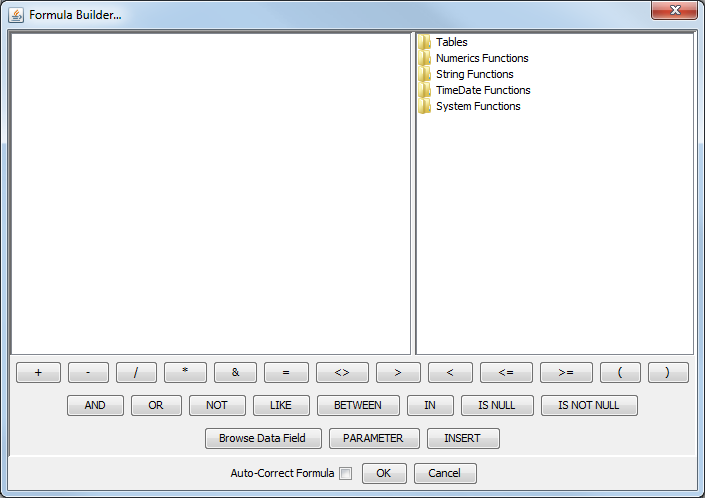
In the eighth column, which should be blank, right click in the Field field and select Build from the pop-up menu. This will open the Formula Builder interface allowing you to create a computed column.
Formula Builder Window
To construct the column, first click on the button. Then double click on the Tables folder. It will open up into five nodes, one for each table you selected for the query. Opening a table folder will list all of the column fields in that table. Open up the PRODUCTS folder, select UNITPRICE and click . Then click the button. Next, insert STAINCOST from the ORDER_DETAILS table. Then click on the button. Click the button and finally insert QUANTITY from the ORDER_DETAILS column. The finished formula should look like this:
(PRODUCTS.UNITPRICE + ORDER_DETAILS.STAINCOST) * ORDER_DETAILS.QUANTITY

Formula Builder Window with Formula
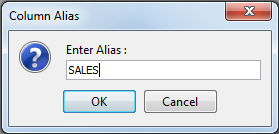
Click and the computed column will be added to the query. Next, we will give the column you built an alias. Right click on the column and select Alias from the pop-up menu. A dialog will appear prompting you to specify a column alias.
Column Alias Dialog
Click, and you will see the column name change in the Query Builder. Now click on the Datasheet View tab in the Query Builder. Your query will run and you should see the first thirty records of the query results.
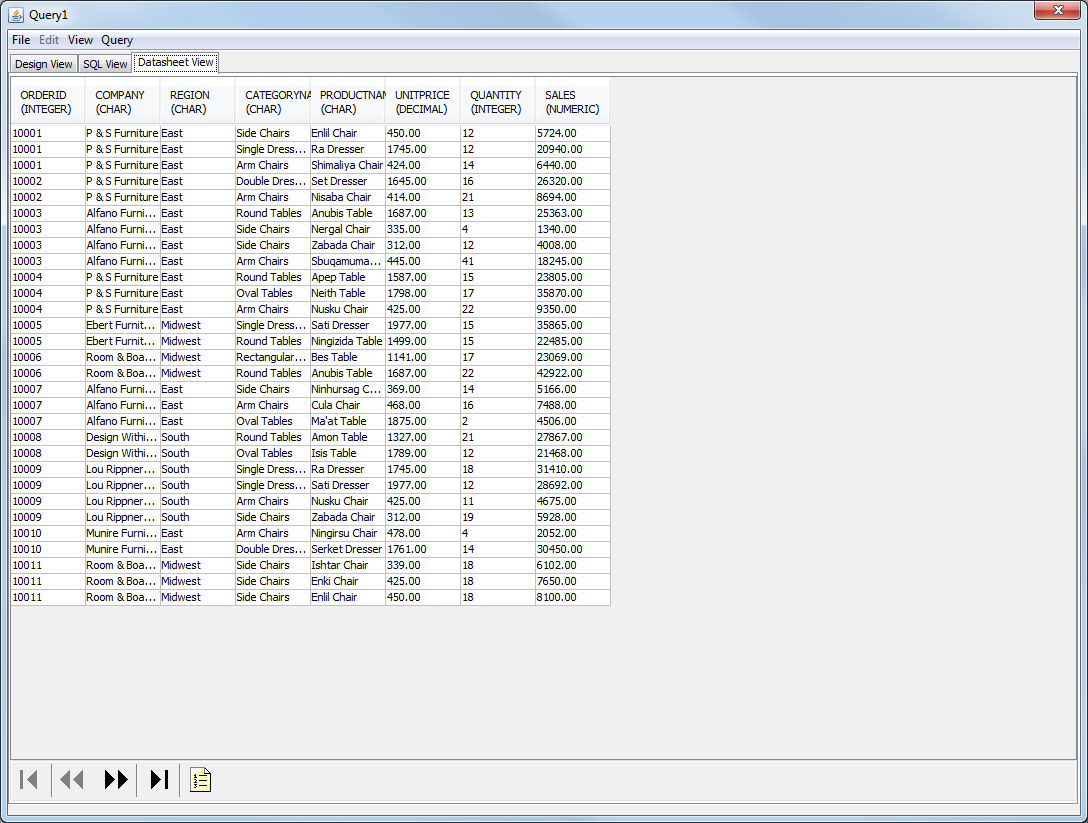
Query Builder Datasheet View
Now that you have finished designing the query, select from the File menu to save the changes. This will close the Query Builder window and return you to the Data Source Manager window. There will now be a node under Queries for the query you have just designed.
Data Source Manager With Query
ERES allows you to easily parameterize queries, allowing report and chart data to be dynamically filtered at run-time. In this exercise we will add parameters to the query created in Section Q.3.1.2 - Create a Query.
To open the query that you created, select it and click the button in the Data Source Manager. Your query will re-open in the Query Builder. The Tables window will open on top of the Query Builder. Click to close the Tables window and scroll down in the lower (QBE) portion of the Query Builder window until you see the Condition field. Right click in the Condition field under the ORDERID column and select Build from the pop-up menu. This will bring up the Formula Builder allowing you to construct a condition for the query.
Double click on the Tables folder within the Formula Builder to expand it. Then expand the ORDERS node and double click on the ORDERDATE field. Next click the button and then click the button. This will bring up a dialog prompting you specify a name for the query parameter.
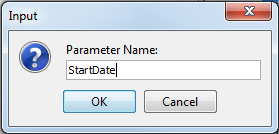
Parameter Name Dialog
Enter StartDate for the parameter name and click . The parameter will be added to the query. Then click the button. Click the button again. Enter EndDate as the second parameter name. The finished condition should now appear as
ORDERS.ORDERDATE BETWEEN :StartDate AND :EndDate
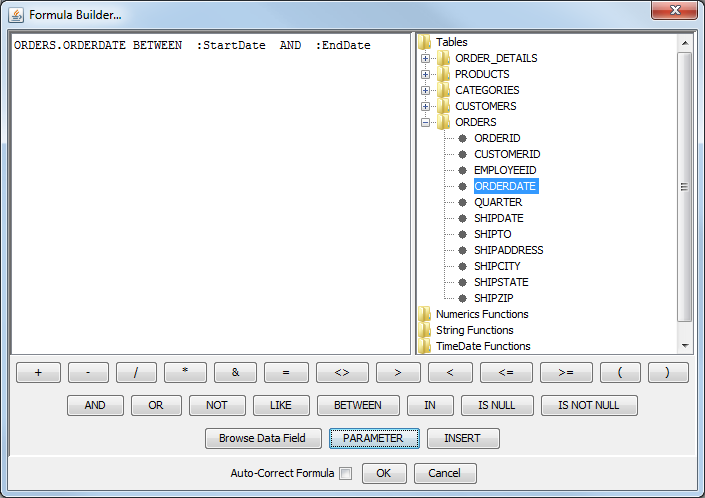
Formula Builder with Conditions
Click to close the Formula Builder and return to the Query Builder window. Now click on the Datasheet View tab. Because you have just added two parameters to the query, an initialization dialog will appear, asking you to specify some properties for the query parameters.
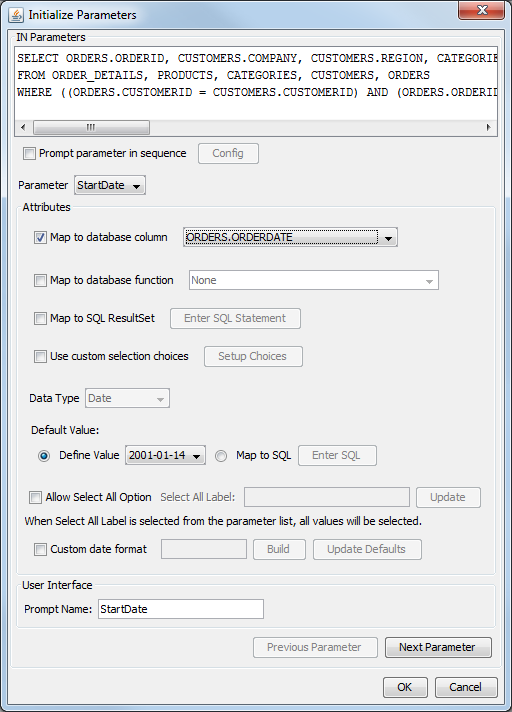
Parameter Initialization Dialog
From this dialog, select to map the parameter to a database column by clicking the option under Attributes. Select ORDERS.ORDERDATE from the drop-down menu. This will automatically fill in the Default Value and Data Type options. Next, modify the Prompt Name to read Start Date. Click the button and map the EndDate parameter to the same column. Click on the drop-down menu to select an end date. Select a date far enough from the start date that by default you will have more than a couple records to work with (this makes report design easier). Change its Prompt Name to read End Date.
Click to close the initialization dialog once you have specified all the options. A new dialog will appear prompting you to select a date range by which to filter the result set.
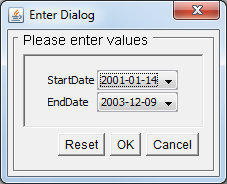
Parameter Selection Dialog
Select the Start and End date that you would like and click . You will now see the filtered result in the datasheet window. Now, click from the File menu to save the changes that you have made to the query.
A unique feature in ERES is the ability to create data views. Data views are local schemas/views that allow an administrator to pre-configure a group of tables and fields, so that end users need only select fields and define simple conditions to create a query. Data views are also used with the ad hoc QuickDesigner. To create a data view, select the Data Views node under Woodview or WoodviewODBC and click .
| Note |
|---|---|
You can use either the JDBC or ODBC data source for this example, the data is the same. The screen shots are from the HSQL Database. |
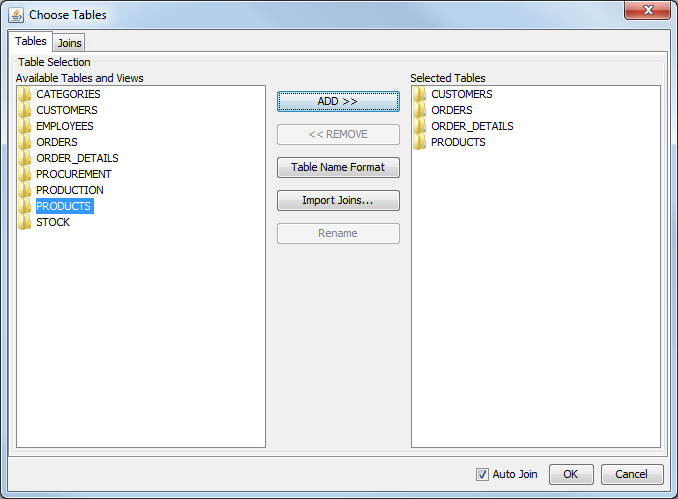
This will open a new dialog asking you to select database tables that you would like to use. Select the following tables:
CUSTOMERS
ORDER_DETAILS
ORDERS
PRODUCTS
Data View Tables Dialog
Next, click on the tab. You will see a representation of the tables like in the Query Builder. You can see the auto-join lines between the tables. This window can be used to join the tables or modify the auto-joins if necessary. Click to finalize the table selection. The next window allows you to select and group fields for the view. At the top of the window you can specify a name for the view. Call the data view Invoicing.
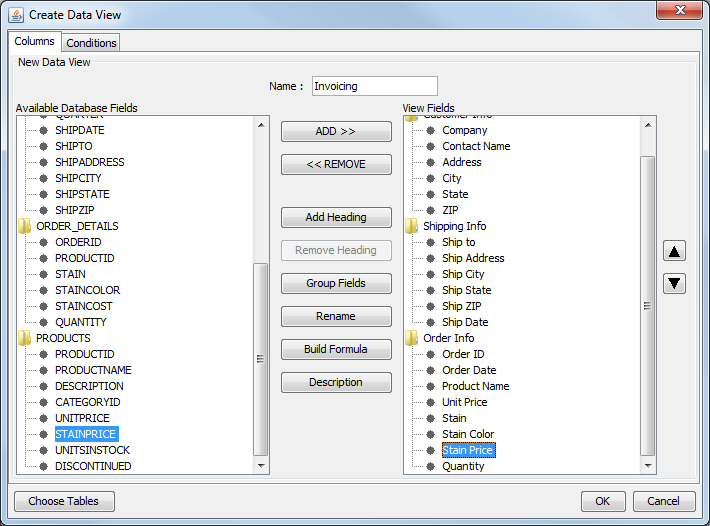
Next, double click on the CUSTOMERS folder to reveal the fields for that table. Add the following fields by selecting them and clicking the button:
COMPANY
CONTACTNAME
ADDRESS
CITY
STATE
ZIP
Now add fields from the other tables as follows:
ORDERS:
SHIPTO
SHIPADDRESS
SHIPCITY
SHIPSTATE
SHIPZIP
SHIPDATE
ORDERDATE
ORDER_DETAILS:
ORDERID
STAIN
STAINCOLOR
QUANTITY
PRODUCTS:
PRODUCTNAME
UNITPRICE
STAINPRICE
Next click the button. At the prompt specify the name Customer Info. Add two more headings in this manner, one called Shipping Info and one called Order Info. Once the headings have been created, select the following fields (Using CTRL+Click or SHIFT+Click for multiple selection):
COMPANY
CONTACTNAME
ADDRESS
CITY
STATE
ZIP
Once the fields are selected, click the button and select Customer Info from the drop-down list. The fields will be moved under that heading. Next, select the following fields in the same manner:
SHIPTO
SHIPADDRESS
SHIPCITY
SHIPSTATE
SHIPZIP
SHIPDATE
Add these fields to the Shipping Info group in the same manner as you did before. Next, select the following fields:
ORDERDATE
ORDERID
STAIN
STAINCOLOR
QUANTITY
PRODUCTNAME
UNITPRICE
STAINPRICE
Add these fields to the Order Info group. Next, select the CONTACTNAME field on the right-hand (view) side and click the button. In the dialog, specify the name Contact Name. Repeat this for each field, giving it a clear name rather than a single word.
Next, select the Order ID field on the right-hand (view) side and click the up arrow button to move the field to the top of the Order Info heading. Use the arrows to arrange the items in the Order Info heading in the following order:
Order ID
Order Date
Product Name
Unit Price
Stain
Stain Color
Stain Price
Quantity
Data View Fields Window
Now the data view has been completed. Click in the fields dialog to save the view. It will be saved as a new node under Data Views in the Data Source Manager.
Now that a data view has been created, you can write queries against the view. This allows users to develop queries without knowing the underlying structure of the database. It also allows administrators to limit which database elements the user has access to. In this exercise we will create a query for the data view you created in. Section Q.3.1.3 - Create a Data View.
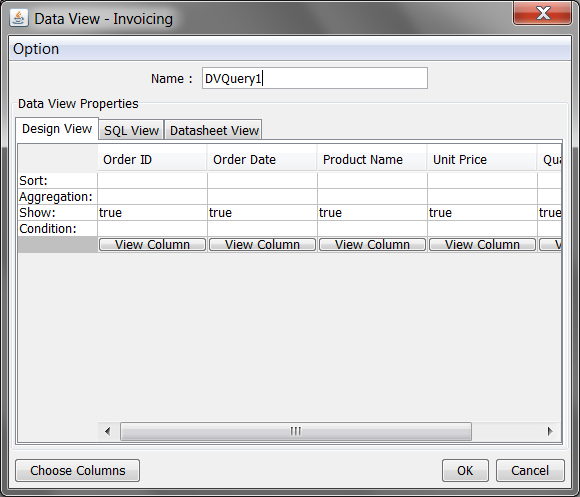
In the Data Source Manager, select the Invoicing data view. Then click the button. This will open a dialog, prompting you to select fields from the view. To select fields, first double click on a heading to expand it. Add the following fields to the query by selecting them and clicking .
Order ID
Order Date
Product Name
Unit Price
Quantity

Data View Query Field Selection Dialog
Once you have finished adding the fields, click . This will bring up a new window allowing you to set conditions, grouping, and ordering for the query. Like the Query Builder this window also allows you to preview the query result with the Datasheet View tab.
Data View Conditions Dialog
First specify a name for the query in the space provided at the top. Then double click on the Condition field for the Order Date column. This will bring up a dialog allowing you to specify a condition for the field.
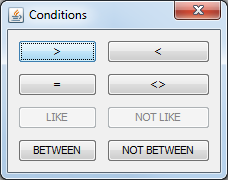
Specify Condition Dialog
Click the button. A new dialog will appear prompting you to specify a start and end date with which to filter the results. Select 2003-10-12 as the first date and 2003-12-09 as the second.
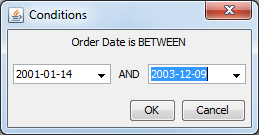
Specify Condition Fields Dialog
Click to close the dialog and add the condition. You will be taken back to the conditions window. Now you can click on the Datasheet View tab to preview the query. Click in the main window and the query will be saved using the name you provided. You will then be taken to a screen showing the result of the data view query. Options in this screen allow you to use the results to create a report or chart. Click in this dialog to close the interface and return to the Data Source Manager. There will now be a new node for your query under the Invoicing data view.
In addition to database data, ERES can also draw data from flat files(XML and text). In this exercise we will setup a text file data source in the registry. To add a new text file, select the node labeled TXTFiles and click the button. This will bring up a dialog allowing you to specify a display name and the location for the text data source.
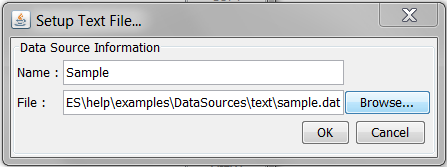
Setup Text File Dialog
Enter any display name you would like. Then click the button and browse to the help/examples/DataSources/text directory. Select the sample.dat file. After you have finished entering information, click . You will see a new node in the Data Source Manager for the text file.