There are seven main components of EspressReport, namely: Report Designer, Chart Designer, Report API, Report Viewer, Page Viewer, EspressManager, and Scheduler.
- Report Designer:
Report Designer is a GUI tool that allows users to build reports in a point-and-click environment. Included with the Report Designer are interfaces to access data, query databases, and design charts. The Report Designer can run as a client application or in a client-server configuration with the Designer loaded as an applet through a web browser.
- Chart Designer:
Chart Designer is a GUI tool that allows users to build and design charts in a point-and-click environment. Launched from within Report Designer, it allows users to create charts that can be embedded within reports or stand-alone charts that can be run using the Report API.
- Report API:
Report API is an easy-to-use application programming interface that allows users to imbed reporting functionality into their applications, servlets, or JSPs, either on the server-side or client-side. It can run on most platforms with few or no changes because it is pure Java. Any and every part of the report is customizable using the API, giving users full control over report formatting at run-time. Reports can be created and deployed with just a few lines of code.
- Report Viewer:
Report Viewer is an integrated applet that allows users to view and interact with reports. The applet shows reports in a paginated format, giving users an opportunity to navigate around reports using a pop-up menu. Also, report templates can be directly hyperlinked together by using the applet. EspressReport can generate HTML pages with the applet imbedded, without requiring any code.
- Page Viewer:
Page Viewer is an integrated applet like Report Viewer that uses page serving technology. With Page Viewer, pages in the report are only sent to the client when requested. This allows users to view or preview large reports.
- EspressManager:
EspressManager serves as the “back end” to the Report Designer and Scheduler interfaces. It supports Report Designer running as an applet. EspressManager handles the data access and file I/O activities on the server-side. Additionally, EspressManager provides database connection and data buffering. EspressManager also runs the scheduling process on the server-side, executing reports according to the user-defined jobs. It can run as an application process on the server, or it can be deployed as a servlet within an application server.
- Scheduler:
The Scheduler is a small interface that runs in conjunction with EspressManager. It allows users to schedule reports and other events, as well as manage scheduled tasks.
EspressReport has a number of different configurations in which it can run both at design-time and at run-time. At design-time, the Report Designer GUI interface, which includes data access tools and charting tools, can be loaded as an application on a client machine or as a JNLP(More about Applets in JNLP: Section 1.2.7 - Run Applets in WebStart with JNLP file in a client server architecture. The following diagram illustrates EspressReport running with the Report Designer at design-time:
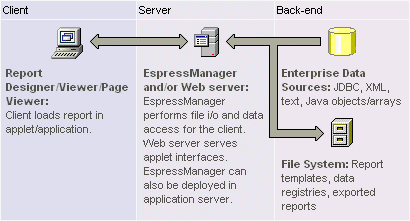
EspressReport Designer Architecture
When the Report Designer is running, the EspressManager component runs on the server-side. It can run either as an application process or as a servlet deployed within an application server/servlet runner. The EspressManager performs data access and file I/O which is prevented by the client applet due to security restrictions. The EspressManager also provides connection and data buffering for database connections, as well as concurrency control for a multi-user development environment. The EspressManager must be running in conjunction with the Report Designer.
At run-time, the EspressManager does not need to be running. EspressReport is designed to run embedded within other application environments. It can have a minimal deployment of the API classes and report template files. The following diagram illustrates EspressReport running in a servlet/JSP environment:
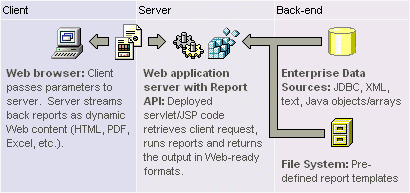
EspressReport in a Servlet Environment
When running in an application server, the Report API can be used to generate reports within servlets and JSPs, and stream the generated reports to the client browser. Clients can also view reports by loading the Report Viewer applet or the Page Viewer applet.
Report generation can be handled on demand, triggered by application processes, or scheduled. A Scheduler interface is also provided with EspressReport. EspressManager must be running in order to run the Scheduler.
In addition to running in a client-server environment, EspressReport can be run in a thick-client application. The Report API can be used in conjunction with the Viewer and/or Page Viewer to show or generate reports in an application interface. In this configuration, EspressManager does not need to be running, as the whole process can be contained on the client side. Note that this is not the case for applets.
There are four versions of EspressReport installer available: one for Windows, one for Unix, one for Mac OS X, and a pure Java version.
- Windows Version
To start the Windows installer, run the
installER.exefile and the installer will launch.- Unix Version
To start the Unix installer, run the
installER.binfile and the installer will launch.- Mac OS X Version
To start the Mac installer, double click the
InstallER.zipfile to extract theInstallER.appfile. Double-click onInstallER.app, and the installer will launch.- Pure Java Version
To start the pure Java installer, a Java Virtual Machine, the equivalent of Java 1.8 or higher, must already be installed on the machine where EspressReport is to be installed. Make sure that the JVM is included in your path (or move the
installER.jarfile to the same directory as the JVM). From a command prompt navigate to the directory where you have placed theinstallER.jarfile, and type the following command:java -jar installER.jar. The installer will then launch.
Once the installation program has launched and you agree to the license agreement, the first option asks you to specify the directory into which you would like to install EspressReport.
The default location is \EspressReport\. You can specify a new directory or browse to one by clicking the button.
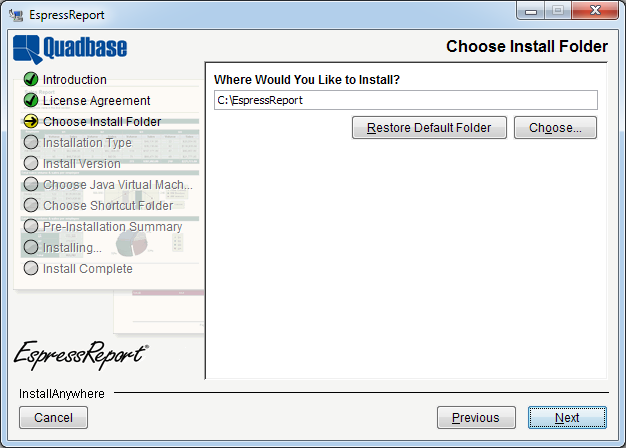
Choose Location Dialog
Once you choose the installation directory, the next option asks you whether you want to install the evaluation or licensed version.
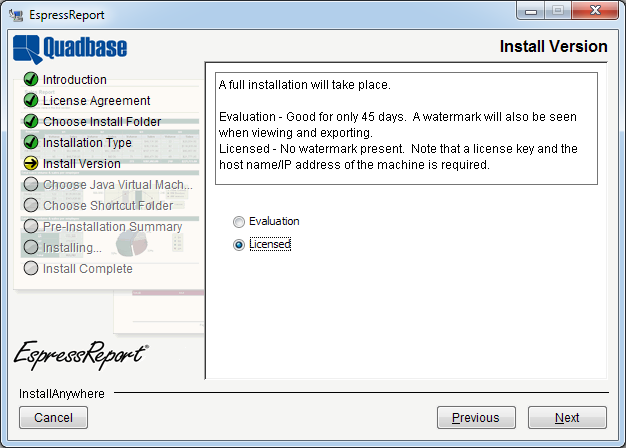
Install Version Dialog
If you select to install a licensed version, the next dialog will prompt you to enter your license key and verify the host name of the machine on which you're installing EspressReport.

Enter License Key Dialog
After you enter all informations, the installer will attempt to register your license key with Quadbase. If the registration fails, you will be unable to install the release version of EspressReport. However, you will still be able to install the evaluation version. After the installation is complete, you can register your key online at https://www.quadbase.com/register/, or contact Quadbase Sales for additional help.
![[Note]](../../../images/note.png) | Note |
|---|---|
After the installation is complete, the release version will only run for the hostname specified in this dialog, so double-check it to make sure it's correct. You can also use the IP address of the machine if you prefer. |
The next window allows you to specify which Java Virtual Machine version should be used to run EspressReport. (Since it is a Java program, you will need JVM to run it.)
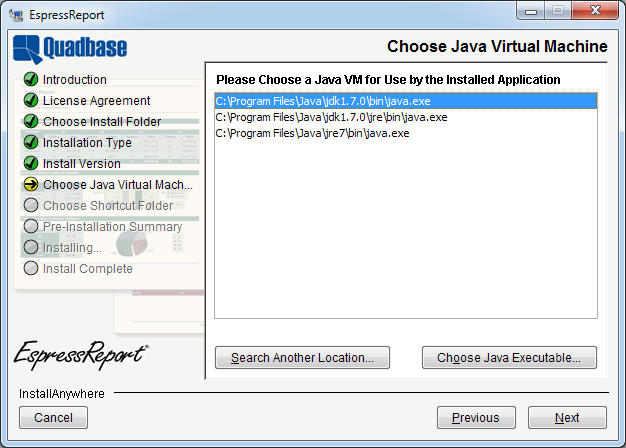
Choose JVM Dialog
The dialog prompts you to select which Java Virtual Machine you want to use. A list of compatible JVMs on the system will be displayed, allowing you to pick one. If the JVM you want to use is not listed, you can click the button to browse to it. When using the windows installer, you can also choose to install the JVM bundled with the installer, if a compatible JVM has not been found.
| Note |
|---|---|
The JVM that is bundled with the installer only provides Java Runtime Environment. In order to develop and execute Java code using the EspressReport API, you will need to have Java Development Kit and/or compiler/IDE. Also, if you're using pure Java or Mac OS X version of the installer, this option will not appear. Make sure that you're running the installer with the JVM you wish to run the program. |
The last option in the installer is for Windows or Mac OS X version of the installer. It allows you to specify the location of program shortcuts. By default the shortcuts are added to a program group called EspressReport in the Start Menu.
For Mac OS X, you can create aliases on desktop, in dock, or in a folder of your choice.
After you complete the last option, you will be shown a summary of all the options you've selected. Click the button and the program will install.
The configuration for EspressReport is already set and it can be run without changing anything. However, if you want to:
Change the port number that EspressManager use
Change the webroot
Add/delete/modify user
You will need to modify the configuration settings. These settings are stored in a text file called config.txt. It is in the following location: <EspressReportInstallDir>/userdb/config.txt. A sample configuration file is shown below:
[port]
22071

[webroot]
C:\Intepub\wwwroot

[users]
{user-name encoded-password}
guest
Name1 Password1
Name2 Password2

[smtp host]
quadbase.com

[smtp secured]
true

[smtp ssl]
true

[smtp port]
587

[smtp username]
guest

[smtp password]
password
Under the [port] section, you can set the port number for EspressManager to use. This number is set to 22071 by default. You can also give an explicit IP address here for EspressManager to use instead of making EspressReport query the machine for the IP address. An explicit IP address can be given by adding the address after the port number. For example, changing:
[port]
22071
to
[port]
22071, 204.147.182.31
will result in EspressManager always using that IP address when it starts. You can specify multiple domains for EspressManager to establish a connection in the [port] section of the config.txt file. Domains are added after the IP address in the [port] section.
[port]
port number, ip address, domain1, domain2, ..., domain_n
The search sequence is IP address, domain_n, then domain1.
Under the [user] section, each line consists of username and password. Default username is guest with no password. You can remove this line and add as many additional users as you like. Each username and password are separated by one or more spaces (usernames and passwords cannot contain spaces). Also, usernames and passwords are case sensitive.
Each development license allows only one concurrent user to be logged on. If you purchased more than one development license, you can set up the development kits on separate machines or set up concurrent users on a single machine.
| Note |
|---|---|
There is no limit to the number of users that have login privileges to EspressManager. This license restriction applies only to the number of simultaneous users. |
The [smtp host] section allows you to specify the smtp server name used for sending email notification or reports with the scheduler. For more information about using the scheduler, please see Section 1.13 - Scheduling.
If your SMTP server requires authentication, fill in the following sections as well. If your SMTP server uses SSL/TLS, set [smtp ssl] to true.
[smtp secured], [smtp ssl], [smtp port], [smtp username], [smtp password]
Otherwise, you can leave these sections blank.
When EspressManager starts for the first time, it will generate a configuration file called EspressManager.cfg in the directory in which it is started. This file contains the IP address and port number on which EspressManager is listening, as defined in the config.txt file. When Report Designer is started, it will look for this file for connection information to EspressManager. If it is not able to find this file, it will use the default IP of 127.0.0.1 (localhost) and port 22071.
Other EspressReport components and applications/servlets/JSPs using the Report API will also (by default) look for the EspressManager.cfg file to make a connection to EspressManager. However, with the Report Viewer, Page Viewer, and Report API, you can explicitly set the IP and port that the component should use in order to connect to EspressManager. For more information about deploying EspressReport components, please see Section 2.7 - Deployment.
All applets have a maximum memory heap size of 16 megabytes by default. In Windows, this can be increased by going to Control Panel and selecting Java (or Java Plugin). Click on the Java tab and then button. Enter -Xmx256M (without the quotes) under Runtime Parameters and click the button.
Before ReportDesigner can be started, EspressManager must be running. In most cases, EspressManager should be started on the web server, but it is possible to use EspressReport on a stand-alone machine by running both EspressManager and ReportDesigner locally. The assigned IP number will be 127.0.0.1. This will create a log file <EspressReportInstallDir>/EspressManager.log, which can be used to monitor resource usage as well as diagnose problems. It is not necessary to install or start EspressManager on each ReportDesigner user machine.
To start EspressManager, run EspressManager.bat or EspressManager.sh file in the EspressReport root directory (this file is generated automatically during installation). For Windows installations, you can use program shortcuts that were added to Start menu or desktop, depending on the options that were specified during installation. EspressManager will then start automatically with default properties.
You can there also Add/delete/modify users.
"Manage Users" button can be used to add and remove user name and encrypted password in the config.txt file.
You can also configure EspressManager with your own settings using several arguments that have been provided. The argument starts with dash - followed by a command. No space is needed in each argument, but at least one space is required to separate different arguments.
You can enter these arguments in the command line when starting EspressManager and you can also edit the espressmanager.bat/espressmanager.sh file to add arguments.
Arguments in the text file are also picked up when EspressManager is started as a servlet process. For more information about this, please see Section 1.2.4.2 - Starting EspressManager as a Servlet.
- -help
When you type
-help, the EspressManager provides information on available arguments and their meaning.-hor-?can also be used to get the same online help information.- -log
When you type
-logargument, a log file is created and all the client/server network information will be stored. An administrator can open the log file to evaluate each user's request. The log is saved asEspressManager.log.- -monitor:ON/OFF
When you specify
-monitorargument, the EspressManager monitor appears as a graphic user interface that can be used to view the status as well as modify the EspressManager settings.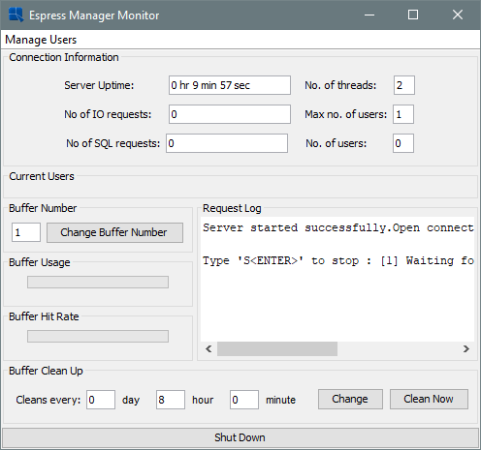
EspressManager Monitor
- -runInBackground:ON/OFF
This argument allows you to specify whether to run EspressManager as a background process or not. Running as a background process eliminates user input for shutdown and allows EspressManager to be run from a script. In order to make this argument work properly, it should be used in conjunction with the
-monitor:OFFargument. When running EspressManager this way, the only way to shut it down is to end the process.- -recordLimit:nn
This argument allows you to set a maximum limit for the number of records EspressManager will retrieve from a database when executing a query. Once the maximum is reached, EspressManager will stop running the query. This feature prevents users from retrieving more records than can be stored in memory, and prevents crashes due to out of memory errors.
- -queryTimeout:sss
This argument allows you to specify a timeout interval in seconds for chart queries. Once the query execution time passes the timeout argument, EspressReport will abort the query. This feature prevents users from accidentally creating run-away queries.
- -DBBuffer:nnn
If a database is being used as data source for a chart, you can choose to buffer both the database connection and the data used for the chart using this argument. The number of connections and queries that will be stored depends on the number specified in the DBBuffer argument from 1 to 999.
- -DBCleanAll:ddhhmm
Data in the data source may be updated periodically. Therefore, when the data buffer options is used (i.e. DBBuffer has a non-zero value), you may want to refresh the buffer to get the latest data. The
-DBCleanAllargument can be used to indicate a time period after which data is cleared from the buffer and fetched from the data source. The value of ddhhmm meansdddays,hhhours andmmminutes. EspressManager also supports omitted format, meaning that it will translate the value with the assumption that the omitted digits are the higher digits. For example:-DBCleanAll:101010means clean the buffer every 10 days, 10 hours, and 10 minutes.-DBCleanAll:1010means clean the buffer every 10 hours and 10 minutes.-DBCleanAll:10means clean the buffer every 10 minutes.
This argument is invalid if the
-DBCleanAllargument is set to 0 (i.e. always clean memory).The refresh interval is printed when EspressManager is started.
- -RequireLogin
This argument is used to apply security to ReportDesigner when it is launched via the API. Normally, when ReportDesigner is called via the API, there is no user authentication. This allows users to apply their own authentication to the programs, but it can also allow unauthorized users access to the server. To prevent this, users can turn on this argument (values are true/false) to force authentication for ReportDesigner when it is called from the API. With this argument turned on, every time a
QbReportDesignerobject is displayed, a correct username and password (defined in theconfig.txtfile) must also be supplied via API method calls. For more information about calling ReportDesigner from the API, please see Section 2.3.5.7.11 - Calling Report Designer from Report API.- -QbDesignerPassword
This argument allows you to set password when the
-RequireLoginargument is turned on. Instead of using a login from theconfig.txtfile, you can set a specific password that must be supplied to the server via a method call when displaying aQbReportDesignerobject. For more information about calling ReportDesigner from the API, please see Section 2.3.5.7.11 - Calling Report Designer from Report API.- -ScheduleCallBackClass:classfile:
This argument allows you to specify a class for the scheduler listener mechanism. The listener returns a handle to a scheduled report before the schedule executes. For more information about this feature, please see Section 2.4.8 - ICallBackScheduler Interface.
- -ListenerManagerClass:classfile:
This argument allows you to specify a class for the scheduler listener mechanism. The listener returns a handle to a scheduled report before the schedule executes. For more information about this feature, please see Section 2.4.9 - Scheduler Listener.
- -PageCleanUpTime:ddhhmm:
This argument allows you to specify a cleanup interval for the
/pages/directory in EspressReport. Files are generated in this directory when users invoke the page viewer component using a report template (.pak/.rpt) or aQbReportobject. For more information about the page viewer, please see Section 2.2 - Introduction to Page Viewer. The time arguments for this argument are the same as for the-DBCleanAllargument.- -MaxRecordInMemory:nnn
This argument allows you to set the maximum number of records that should be allowed in memory. Unlike the record limit which stops the query, this feature will begin paging the data to temporary files in the system when the threshold is reached. The viewing/exporting of the report will continue, but the data will be read from the paging files. This feature prevents the system from running out of memory when running reports.
- -MaxCharForRecordFile:nnn
This argument allows you to set the maximum characters allowed per field in the paging file that is generated when record file storage is invoked. Any characters in a record in the data that are longer than this argument will be truncated in the finished report.
- -FileRecordBufferSize:nnn
This argument allows you to set the number of records that should be paged at a time when the record file storage is invoked. The size of the buffer affects performance, so the larger the buffer size, the faster the report is generated.
- -globalFormat:xmlfile:
This argument allows you to supply a global format XML file to set the default look and feel of report elements. Everytime a user selects to create a blank report, the format properties in this file will be applied. For this argument, file path to the XML file relative to EspressManager must be specified, i.e. (
-globalFormat:Templates/FormatFile.xml). For more information about the global formatting features, please see Section 1.5.9.1 - Global Formatting.- -fontMapping:xmlfile:
This argument allows you to supply a font mapping XML file to set the default font mapping for PDF export. Everytime a user creates a report, the system font mapping will be applied. For this argument, file path to the XML file relative to EspressManager must be specified, i.e. (
-fontMapping:Templates/FontFile.xml). For more information about the font mapping features, please see Section 1.7.2.1 - PDF Font Mapping.- -htmlDpi:nn:
This argument allows you to hard-code the screen resolution that should be used when exporting reports to DHTML or HTML format. By default, the system resolution is used. However, this can cause some discrepencies when reports are generated on a Linux or a Unix server and viewed on a Windows client. Generally, setting DPI to 96 (
-htmlDpi:96) will produce a consistent export.- -singleTableForDistinctParamValue
When you use
-singleTableForDistinctParamValueargument, the parameter dialog for parameterized charts will be drawn differently. When you map a parameters to a database column, the distinct list will be drawn by running select distinct on the mapped field only. The default behavior (without this argument) will use the joins and conditions in the original query to constrain the distinct parameter list. For more information about parameterized queries, please see Section 1.3.2.2.2 - Parameterized Queries.- -schedulerBuffer:nnn:
This argument allows you to create a pool of Reports for the scheduler to use. This feature can be helpful when you have multiple schedule jobs that run the same report. Instead of reloading the same report for each job, the jobs can use the report in the buffer. This improves schedule execution time. For large numbers of simultaneous schedule jobs, the best performance is achieved when the schedule buffer is set to the same size as the schedule thread limit.
- -xmlEncoding:encoding:
This argument allows you to specify the encoding that EspressReport should use when writing XML files. This includes data registry files, XML report templates, XML exports, XML global formatting, and font mapping files. This parameter needs to be set in both EspressManager and Report Designer. For more information about XML encoding, please see Section 1.7.1.2 - XML Encoding.
- -paperSize:LETTER/A4
Set this argument to define the default paper size. Note that you will need to set this parameter in the
reportdesigner.bat/.shfile as well.

If you're running on Mac OS X and you selected to create aliases when installing, you will need to modify the espressmanager.app package to change the EspressManager settings. To do this, right-click (Ctrl+Click) on espressmanager.app and select from the pop-up menu. Next, navigate to the Contents folder where you will see a file called Info.plist. Opening this file in a text editor adds the arguments to the lax.command.line.args under Java properties.
Many of the EspressManager configuration features highlighted in the previous section can also be set using a stand-along EspressManager configuration interface provided with EspressReport. To launch the interface, make sure the EspressManager is not running, then execute ManagerConfig.bat/.sh. A configuration window will open.
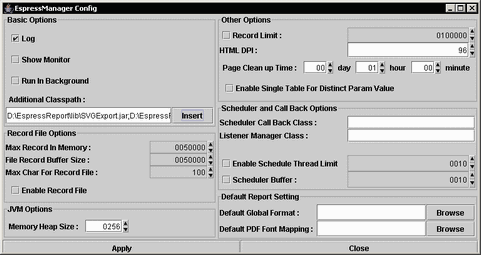
EspressManager Configuration Window
The following configuration options can be set in this interface:
Log
EspressManager Monitor on/off
Run in Background on/off
Record Limit
HTML DPI
Page Clean-up Time
Single Table for Distinct Param Value
Scheduler Callback Class
Listener Manager Class
Scheduler Thread Limit
Schedule Buffer
Record File Settings
Default Global Format
Default PDF Font Mapping
For a description of all the options listed above, please see the previous section. In addition to the configuration options, users can also append EspressManager's CLASSPATH using this interface. Database drivers and other external classes can be added to EspressManager by clicking the button and browsing to the desired file.
When you click the button, all changes will be saved to espressmanager.bat/.sh.
In addition to running as an application process, EspressManager can be run as a servlet within an application server/servlet runner. In this environment, EspressManager uses http to communicate with the client instead of sockets. The advantage to this configuration is that EspressManager can share the same port as the application server which makes it easier to deploy from behind firewalls. In addition, users can perform remote administration when running EspressManager this way.
To deploy EspressManager as a servlet, complete the following steps. As an example, Tomcat is located at C:\Tomcat and EspressReport installed to C:\ER70
To link Tomcat installation with our product installation, access the file "C:/Tomcat/conf/server.xml", and add your code defining one or more product installations between the "Valve" and "Host" sections.
<context path="/ER70" docBase="/home/user/Quadbase/TomcatER/ER"><Manager pathname=""/></context>
For Windows operating systems
Access the folder "C:/Tomcat/bin," copy the file "startup.bat" and paste it in your chosen installation of ER. Then, open the file and edit code to direct the Tomcat startup file to the Tomcat installation folder.
set "CATALINA_HOME=C:\Tomcat"
For Linux operating systems
Create a startup.sh file in <ER install directory> and make it executable.
Type the following two lines into the newly created <ER install directory>/startup.sh file
EXECUTABLE="<path to tomcat>/bin/catalina.sh"
exec "$EXECUTABLE" start "$@"
For example:
EXECUTABLE="/home/user/tomcat/bin/catalina.sh"
exec "$EXECUTABLE" start "$@"
| Note |
|---|---|
The rest of this guide is the same for Windows and Linux. |
To make changes in the launching files, first, select the "EspressReport.jsp" find the end of the file and find the commented lines, and remove the comments.
<!-- Use these params if running EspressManager as servlet
<param name="comm_protocol" value="servlet"/>
<param name="comm_url" value="<%=codebase%>"/>
<param name="servlet_context" value="servlet"/>
-->
These are the parameters for connecting to EspressManager servlet, "servlet_context" may need edit, for example, in Tomcat/conf/servlet.xml, you configure your application as "/ER70", the value will be "ER70/servlet".
In the next step, you will need to edit "reportdesigner.bat" or "reportdesigner.sh" and append the following parameter at the end of the file: "-servlet:http://your-server-ip:your-port/ER70/servlet". Please note that this parameter must be placed at the end of the file, as placing it anywhere else will result in the designer being treated as a Java parameter and not run as intended.
When running EspressManager as a servlet, all components that connect to EspressManager need to be modified to take this into account. This includes Report Designer, Report Viewer, and any application/servlet/JSP using the Report API. For more information about EspressReport deployment, please see Section 2.7 - Deployment.
- Stand-Alone
If you're running Report Designer locally, first start the EspressManager by executing
espressmanager.bator.shfile then executereportdesigner.bator.shfile (You can also executeshortcuts/aliasesfor Windows or Mac). A dialog box will appear prompting you to log on to the EspressManager. If you have set up users in theconfig.txtfile enter your user name and password. If you have not set up users, enter the user nameguestand passwordguest. Click the button. This will launch the application.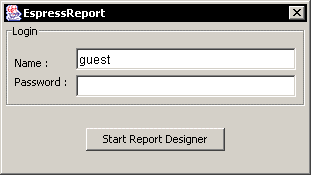
Report Designer Login Window
- Browser
If you're running Report Designer remotely, make sure that EspressManager is running on the remote machine, then type the URL for EspressReport in your browser, i.e.
http://machinename/espressreport/index.html. The page will contain a dialog prompting you to log on to EspressManager. If you haven't modified the users inconfig.txtfile, enterguestas the username with no password and then click the button. This will launch the application in a new window.Note Because EspressReport requires a JVM the equivalent of Java 1.8 or higher, you will need to download the Java plugin in order to run Report Designer via browser. Also, the applet in the index.html page is configured to run on a Windows client. If you're running the applet on another platform, you will need to modify the HTML source of the page. In the HTML source, there are two applets - one of which is commented out. To run on a non-Windows client, comment out the first applet and un-comment the second one.
If EspressManager is running as a servlet, as described in Section 1.2.4.2 - Starting EspressManager as a Servlet, you will need to make some modifications before ReportDesigner can be started successfully.
- Stand-Alone
If you're running ReportDesigner using
.bator.shfile, you will need to modify the file to indicate that EspressReport is running as a servlet and to point to the location of the EspressManager servlet. To do this, add the following argument to the.bator.shfile -servlet:http://IP Address:Port/Context.For example:
-servlet:http://127.0.0.1:8080/servletindicates that the EspressManager is running on localhost with port 8080 in/servlet/context. Below is an example of the modified reportdesigner.batset JAVA_EXECUTABLE=C:\ER70\jre\bin\java set PATH=%PATH%;.\lib "%JAVA_EXECUTABLE%" -Xmx256M -classpath ".\lib\axis.jar;.\lib\axis-commons-logging.jar;.\lib\axis-commons-discovery.jar;.\lib\axis-jaxrpc.jar;.\lib\barbecue.jar;.\lib\ExportLib.jar;.\lib\FlashExport.jar;.\lib\hsqldb.jar;.\lib\javaws.jar;.\lib\jsqlparser.jar;.\lib\jsyntaxpane.jar;.\lib\qblicense.jar;.\lib\ReportDesigner.jar;.\lib\SVGExport.jar;.\lib\wsdl4j.jar;.\lib\xercesImpl.jar;.\lib\xml-apis.jar;.\lib\zxing-core.jar;.\lib\zxing-javase.jar;.;.\lib\commons-codec.jar;.\lib\commons-collections.jar;.\lib\commons-compress.jar;.\lib\commons-io.jar;.\lib\commons-math3.jar;.\lib\log4j-api.jar;.\lib\poi.jar;.\lib\poi-ooxml.jar;.\lib\poi-ooxml-schemas.jar;.\lib\SparseBitSet.jar;.\lib\xmlbeans.jar;" quadbase.reportdesigner.designer.ReportClient -templatesDirectory:Templates -servlet:http://192.168.0.51:8080/ER70/servlet
- Browser
If you're running ReportDesigner through a Java Web Start jnlp application that is connecting to EspressManager running as a servlet, you will need to add the following applet-desc parameter tags near the end of ER70\EspressReport.jsp file, which in our example, is shown below
The following parameter tags need to be added within the element of
applet-descofjnlpcontents:<applet-desc name="Espress Report Designer" main-class="quadbase.chart.designer.InitApplet" width="300" height="150"> <param name="comm_protocol" value="servlet"/> <param name="comm_url" value="http://127.0.0.1:8080/ER70"/> <param name="servlet_context" value="ER70/servlet"/> </applet-desc>The first parameter indicates that the EspressManager is running as a servlet. The second one is the URL (saved in a JSP expression,
<%codebase%>) that the application server is using, and the third one is the servlet context under which the EspressManager is deployed.Restart your Tomcat server.
To access the ReportDesigner, open your web browser and go to the following address:
http://127.0.0.1:8080/ER70/index.html. You may either need to openEspressReport.jnlp(Firefox/Chrome) directly or save it to your download directory and run the jnlp file from there to open the ReportDesigner (Microsoft Edge).
![[Tip]](../../../images/tip.png) | Tip |
|---|---|
Sometimes Enable 2 Options:
The jnlp file can be launched. |
![[Caution]](../../../images/caution.png) | Caution |
|---|---|
Jnlp file is cached since the "Keep Temporary files" enabled. You need go to Java Control Panel, from Web Settings, click to delete "Cached Applications and Applets". Then you can get updated Jnlp file launched. |
If you upgraded from an older version, you may notice some changes in the default behavior. Although the backward compatibility is kept as much as possible, sometimes a new behavior is preferred. The new behavior should be better for most users, but if you already have some charts or reports from an older version, you may want to keep the old behavior, so your charts and reports look exactly the same as before. That is why we provide backward compatibility patches.
| Caution |
|---|---|
Patches are for advanced users only. Please apply them only if you need them and if you know what you are doing. If you are not sure, please contact support. |
The patches can be found in <EspressReport_Installation_Directory>/lib/Patches directory. They are stored in JAR archives. To apply a patch, you only need to add the appropriate JAR file to the classpath of your application as described below.
If you want to apply a patch to all designers (for reports and charts) and viewers, you have to edit espressmanager.bat and reportdesigner.bat files (if you use Windows), or espressmanager.sh and reportdesigner.sh files (if you use other OS) in your EspressReport installation directory and add relative path to the patch JAR file (e.g. ./lib/Patches/patch1.jar) to the classpath parameter. If you are running Report Designer from HTML page, you also have to edit index.html file in your EspressReport installation directory and add relative path to the patch JAR file to the archive attribute of the applet tag.
If you are using API, you have to include the patch JAR file in the classpath of your application.
Below is a list of all available patches in the current version.
patch1.jar | - turn off chart axis padding by default
|
patch2.jar | - add left margin for annotation text in charts
|
patch3.jar | - use 0 to 1 as min/max value when chart axis autoscale for axis pt less than 1
|
patch4.jar | - turn off new pie chart label placement algorithm (calculate label placement based on pie sector position)
|
patch5.jar | - always use integer value for chart axis auto scale
|
patch6.jar | - disable minimum and maximum error check for chart axis scale
|
patch7.jar | - turn off Single color for categories feature for columnar and bar charts by default
|
patch8.jar | - line chart end to end revert single point data to display on left axis |
patch9.jar | - display stack label despite not having enough space in the stack to render it |
Trying to run Java Applets in newer browsers and/or with newer Java versions can lead to problems with Applets being deprecated or not supported any more. Officially were Applets blocked to run in common browsers from about year 2016. However, it is still possible to run Applets in a similar use case as before (open a Java application from a remote server via your browser) thanks to Java WebStart technology that's supported by Java 8. Both Applets and Java Web Start are marked as deprecated technologies from Java 9.
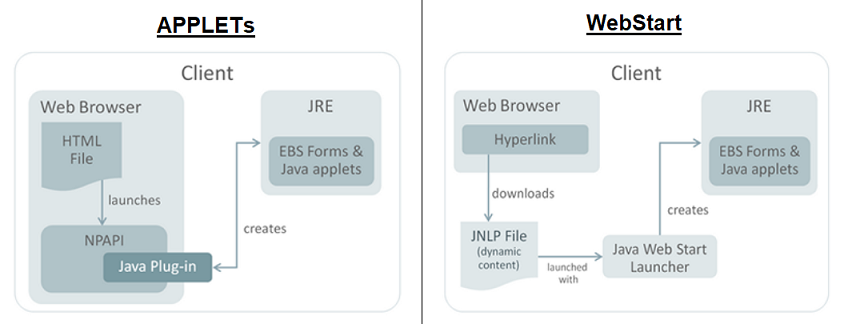
Applets vs WebStart
In this case, EspressReport is Java 8 compiled application and is best to use it with Java 8. For using Applets with WebStart in newer versions, you must use some different implementation of WebStart. Popular choices are OpenWebStart or IcedTea-Web and it is already included in some newer Java distributions.
To run a Java Applet via a Java Web Start JNLP file, you have to specify the applet-desc parameter in the JNLP file configuration file.
   <applet-desc
      name="Chart Viewer"
      main-class="quadbase.chartviewer.Viewer"
      width="800"
      height="600">
	<param name="filename" value="help/examples/ChartAPI/data/test.tpl"/>
	<param name="preventSelfDestruct" value="true"/>
  </applet-desc>
The param tags specify parameters for the applet. The parameters are different for each applet. The specific parameters are mentioned in the documentation chapter for each applet.
JNLP files can be either run locally when the required libraries (containing the compiled source code) are loaded as a local file or remotely when the libraries are loaded via HTTP/HTTPS.
To run an Applet in a JNLP file remotely via HTTP/HTTPS, the EspressManager has to be run as a servlet in an application server. See the following chapter to learn how to do that: Section 1.2.4.2 - Starting EspressManager as a Servlet
When running JNLP files remotely via HTTP/HTTPS, the parameters comm_protocol, comm_url and servlet_context need to be added to the applet-desc element. You can either fill in the values manually (as the following code example shows) or you can have the values filled automatically in a JSP file.
<applet-desc
	 name="Espress Report Designer"
	 main-class="quadbase.reportdesigner.designer.ReportClient"
	 width="380"
	 height="160">
	<param name="comm_protocol" value="servlet"/>
	<param name="comm_url" value="http://127.0.0.1:8080"/>
	<param name="servlet_context" value="Espress70/servlet"/>
</applet-desc>
| Note |
|---|---|
If you want to pre-fil the values automatically in a JSP file, the actual values highly depend on your server configuration. The previous example is just illustrative. |