The EspressDashboard Organizer is a powerful graphical user interface that allows users to design charts and reports and organize them with other files in virtual folders. The Organizer contents are automatically published to the Menu page and users can automatically generate URLs to run reports and charts. In addition, schedule and archive jobs are created and maintained through the Organizer. The Organizer also includes the user permissions and security level setting options.
To start the Organizer, click the link labeled Organizer in the Start page. This will open a pop-up window. Confirm ERES_Organizer.jnlp file open by Java Web Start Launcher. Then the Organizer will open.

Opening Organizer
If you use Chrome as a browser, you have to save EDAB_Organizer.jnlp at first, and then to open it from your download directory. You will see the next dialog. Click and Organizer will open.
Opening Organizer in Chrome
Since the Organizer is at heart a file management system, it is no coincidence that the application window resembles a file browser. The left-hand side of the window contains a list of projects and their associated sub-folders, while the right-hand side lists the contents of a folder in the upper pane and the project/folder descriptions in the lower pane.
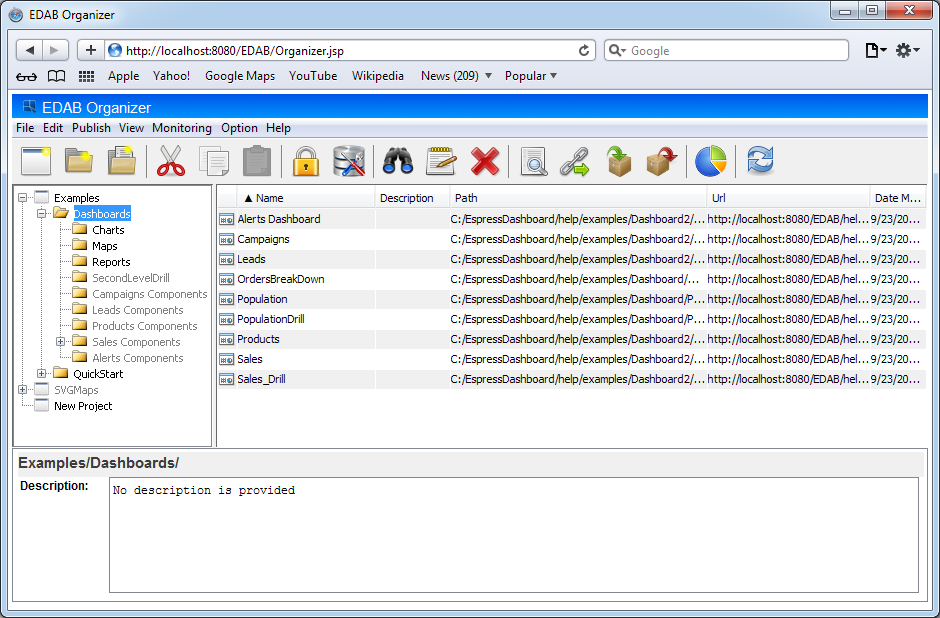
Organizer Interface
Most of the Organizer functions can be controlled using the drop-down menus located at the top of the Application window.
This menu performs most of the file operations. Options in this menu include:
- New
If you select this option, another menu pops up.
- Project
Creates a new project in Organizer.
- Folder
Creates a new folder in current project/folder.
- Chart
Launches ChartDesigner. (see Section 3.1 - Introduction to Chart Designer).
- Dashboard
Launches DashboardBuilder (see Chapter 5 - Designing Dashboards).
- Manage Data Sources:
This option allows you to set-up and manage data registries, their associated data files, and database queries.
- Open File:
This will open the currently selected file. If the file is a chart then the Chart Designer will open, allowing you to edit the chart. If the file is a report file then the Report Designer will open allowing you to edit the report.
- Create PAK:
Pack a GXML (Google Map), SXML (SVG Map) or DSB (Dashboard) file and its components (Templates, Tooltips etc.) into a single file (see Section 2.1.4.3 - Dashboard and Map Packages).
- Unpack File:
Unpack a GPAK (Google Map), SPAK (SVG Map) or DPAK (Dashboard) pack file into Organizer (see Section 2.1.4.3 - Dashboard and Map Packages).
- Delete:
This will delete the currently selected project, folder, or file.
- Refresh:
This will refresh your Organizer window, allowing it to reflect the latest changes/modifications performed by other users.
- Exit:
This will close the Organizer.
This menu allows you to edit, and cut/paste files, folders and projects. Options in this menu include:
- Insert File:
This allows you to insert a report or chart into the selected project/folder.
- Edit:
This allows you to edit the currently selected project, folder, or file. For projects and folders, you can change the project/folder name as well as its description. For files, you can change the display name, the location path or URL, and the description.
- Set User Privileges:
This option is only available to the administrator. It allows you to set owner privileges for defined users and groups.
- Set Security Levels:
This option is only available to the administrator. It allows you to setup and maintain user/group security levels that are applied to reports.
- Change Ownership:
This option is only available to the admininstrator. It allows you to change the owner of the selected file, folder, or project.
- Cut:
This removes the selected project, folder, or file, and places it on the clipboard.
- Copy:
This makes a copy of the selected project, folder, or file, and places it on the clipboard.
- Paste:
This pastes the current clipboard project, folder, or file into the currently selected project or folder.
This menu allows you to setup and view published dashboards. Options in this menu include:
- Preview Menu Page:
This will load the EDAB Menu page in a new browser window.
- Generate Dashboard URL:
This option generates a dashboard URL for the currently selected dashboard.
This menu allows you to search for files or edit charts. Options in this menu include:
- Search:
This allows you to search through projects, folders, and files.
- Chart Designer:
This will open the Chart Designer, allowing you to design or modify charts.
Set up and manage alert monitoring tasks.
- Set alert monitoring
Create new alert monitoring task. See the Section 10.4 - Monitoring chapter to learn more about alert monitoring.
- View alert monitoring tasks
Shows list of all active monitoring tasks and allows you to edit them. To learn more, visit the Section 10.4.3.2 - Monitoring list chapter.
This menu allows you to set and view several of the Organizer options. Options in this menu include:
- Set Designer:
This allows you to specify whether to open every chart in the same Chart Designer window (thus closing the current chart), or to open a new Chart Designer window for each chart opened.
- Set URL Mapping:
This allows you to set up and modify virtual directories.
- Repair Broken Links:
This allows you to search for, repair, or delete any broken links to files in the Organizer.
- Update Directory:
This allows you to update the path of certain items in the Organizer. This is helpful if you are moving files between installations or moving complete installations.
The toolbar at the top of the Organizer window offers easy access to some of the most commonly used features. The buttons perform the following functions:
| Create a new project |
| Insert a new folder into the current project |
| Insert a new file into the current project or folder |
| Cut the currently selected project, folder, or file, and place on the clipboard |
| Copy the currently selected project, folder, or file, and place on the clipboard |
| Paste the current clipboard project, folder, or file into the currently selected project or folder |
| Delete the currently selected project, folder, or file |
| Set user privileges (Administrator only) |
| Manage Data Registries, files, queries, etc. |
| Search for projects, folders, or files |
| Edit the currently selected project, folder, or file |
| Preview the menu page |
| Generate a URL for the currently selected dashboard |
| Pack a map or a dashboard and it's components into a single file (see Section 2.1.4.3 - Dashboard and Map Packages) |
| Unpack a GPAK (Google Map), SPAK (SVG Map) or DPAK (Dashboard) pack file into Organizer (see Section 2.1.4.3 - Dashboard and Map Packages). |
| Go to Chart Designer |
| Refresh the Organizer window |
Projects and their associated folders are the central part of the Organizer interface. They provide the primary means of organizing charts and reports. Projects are the top level of organization. You can use different projects for different users, for different groups in your organization, or to group charts and reports representing different data or information. You can insert many layers of sub-folders into the top-level project, creating just about any organizational structure.
It is important to note that all folders in the Organizer are virtual folders, meaning that they do not necessarily have a physical location on the server machine or mirror an actual directory structure. Projects and folders in the Organizer are pointers to real directories and files that may be stored in a variety of locations.
To create a new project, you can do one of the following: click the button on the toolbar, select New Project from the File menu, right click in the left-hand pane and select New Project from the pop-up menu, or press Ctrl+P. A node labeled new project will appear at the top of the file tree in the left-hand pane.
To edit the project name and description, first select it, then you can do one of the following: click the button on the toolbar, select Edit from the Edit menu, or right click, and select Edit from the pop-up menu. A dialog will then appear, prompting you to change the project name and description. Once you have entered your desired changes, click and the new project name and description will be displayed in the lower right-hand pane.
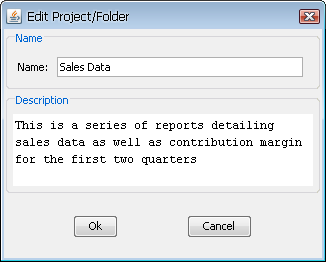
Edit Project/Folder Dialog
To insert a sub-folder into a project or folder, first select the project or folder in which you would like to place the new sub-folder. Then you can either click the button on the toolbar, select New Folder from the File menu, right-click in the left-hand pane and select New Folder from the pop-up menu, or press Ctrl+F. A node labeled new folder will appear under the currently selected project or folder.
To edit the folder name and description, first select it, and then you can either click the button on the toolbar, select Edit from the Edit menu, or right-click, and select Edit from the pop-up menu. A dialog will then appear prompting you to change the folder name and description. Once you have entered your desired changes, click , and the new project name and description will be displayed in the lower right-hand pane.
You can insert files of any type into projects and folders. However, if you want your files to be accessible to other users or visible within the Menu, then files should be viewable within a web browser (i.e. HTML pages, image files, etc.). They can also be chart, report, or dashboard files (CHT, TPL, RPT, QPT, QCH, DSB, or XML format). Files added to the Orgnizer must be accessible via http protocol, and may need to be mapped via URL mapping. For more about URL mapping in Organizer see Section 2.1.5 - URL Mapping.
To add a file, first select the folder or project in which you would like to place the file. Then you can either click the button on the toolbar, select Insert File from the Edit menu, or right click in the upper right-hand pane, and select Insert File from the pop-up menu. A dialog box will appear, prompting you to enter a display name for the file (by default the file name is used), the location of the file (a direct path) and a description of the file. (If you select a path that is not the server root or a mapped virtual directory, you will be prompted to map one.) Click and the file will be inserted into the current directory or folder.
To insert more than one file at a time, click the button on the insert file dialog, and use CTRL+Click to select multiple files in the browse dialog. Then when you click all of the files will be added to the Organizer.

Insert File Dialog
The list of files in the currently selected folder will be displayed in the upper right-hand pane of the Organizer. Each entry shows the file's display name, the file type, the file description, path, and URL.
To edit the file's display name, location, or description, first select the file that you would like to edit. Once you have selected a file, you can either click the button on the toolbar, select Edit from the Edit menu, or right click, and select Edit from the pop-up menu. A dialog box will appear allowing you to make changes to the display name, location, and description. Click and the changes will be reflected in the file list.
To open a file, first select it, and then you can click the button on the toolbar, select Open File from the File menu, or right click and select Open File from the pop-up menu. If the file is a chart (CHT, TPL, or QCH) format, it will be opened in the Chart Designer. If the file is a report (RPT, QPT, or XML) format, it will be opened in the Report Designer. If the file is a dashboard, the Dashboard Builder interface will open in a new window. All other file types will be opened in a web browser window.
To arrange files within folder or project, open the folder (click on it in the left-hand side tree-list) and then click on a column header in the right-hand side. Files in the folder/project will be arranged by the content of the selected column. To switch between ascending and descending order, click on the column header again.
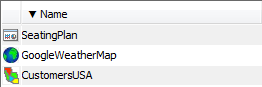
A folder arranged by the file names in descending order.
A single map or a single dashboard usually consists of several files (for example, a dashboard needs several chart/report/map templates, a svg map needs a svg image, drill-down template, etc) which could make moving maps or dashboards to another machine very difficult, because you would have to move all the linked files as well. Fortunately, you do not have to move each file manually. A dashboard or a map and can be packed into a single file along with all the linked files (dashboard templates, drill-down templates, etc) without even knowing which exact files are needed for the dashboard or map to work. The packed files can be moved or archived quickly and easily.
To pack a dashboard or a map (both SVG and Google maps can be packed), select the dashboard (.dsb) or map (.sxml or .gxml) file in Organizer and then click on the ![]() icon on the main Organizer tool bar. A dialog will pop up prompting you to select the pack file name. Enter a file name or use the default one and click . Another dialog should show up confirming that the package was created successfully and showing you the full file path. The packed file will be also automatically inserted into the current Organizer folder/project.
icon on the main Organizer tool bar. A dialog will pop up prompting you to select the pack file name. Enter a file name or use the default one and click . Another dialog should show up confirming that the package was created successfully and showing you the full file path. The packed file will be also automatically inserted into the current Organizer folder/project.
Packed files can be viewed in the Menu page without being unpacked, but they can not be modified in the Map Builder or in the Dashboard Builder. In order to modify a packed dashboard or map, you need to unpack the gpak, spak, or dpak file first.
To un-pack a dpak, spak, or gpak file that has not been inserted into Organizer, click on the ![]() icon on the main Organizer tool bar. A dialog will pop up, allowing you to choose the file on your hard drive and to enter a name which will be used for the main unpacked file (
icon on the main Organizer tool bar. A dialog will pop up, allowing you to choose the file on your hard drive and to enter a name which will be used for the main unpacked file (.dsb, .sxml or .gxml file).
If you want to unpack a file that has been inserted into Organizer, select the file in Organizer and then click on the ![]() . The same dialog will pop up but the file path and the file name fields will be filled automatically.
. The same dialog will pop up but the file path and the file name fields will be filled automatically.
To view the list of all files that are stored in the package, click on the button. A new window will open.
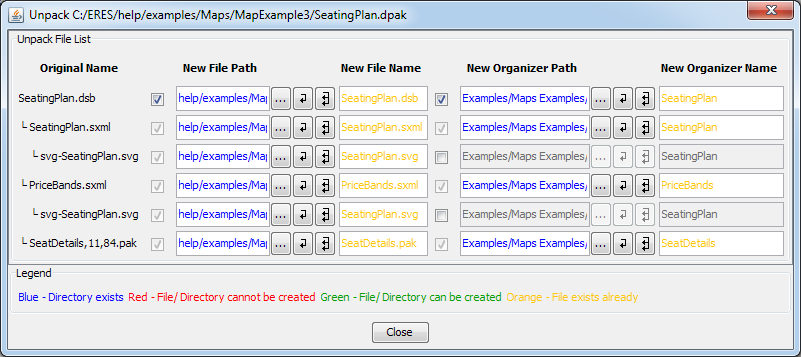
Unpack File List Dialog
In this window, you can edit both physical and Organizer file path of all files that can be un-packed from the package (which also allows you to resolve potencial file name conflicts). After you are done editing the file paths, click the and then click to unpack the package.
The EDAB will now try to unpack all files from the packed file to their original locations. If there are any filename conflicts (i.e. there already is a file with the same name in the same path on your hard drive or in Organizer), the following dialog will show up:

If you click , all existing files will be overwritten by the files from the package without no further questions. If you click , the Unpack File List dialog will open again allowing you to edit the filename conflicts. Then click to unpack the files into their locations and to insert them into Organizer.
Any report or chart that is added to the Organizer needs to be accessible via URL. This is so that reports can be run/viewed through the menu page, using URLs, or retrieved through the API. In order for the Organizer to know the URL path to charts and reports, you need to set the URL mapping.
The first, and most important, thing to map is your EDAB installation. You should have a virtual directory setup in the app server/servlet container where you have deployed the server that points to your installation. If you selected to install Tomcat with EDAB then a virtual directory has automatically been setup where http://MachineName:Port/EDAB points to the EDAB installation directory. In order for Organizer to read and write files to your installation directory you will need to make sure that this mapping is correctly set.
URL mapping can also be used to set the URL path for other servers or virtual directories on your server whose report/chart files you would like to import to the Organizer. Please note that only the admin can create and change the URL Mapping entries. You will have to log in as the admin user to make changes to the URL Mapping.
To set up a virtual directory, select Set URL Mapping from the Option menu. A dialog will appear listing all of the virtual directories that have been set up. (By default, the Web root for the app server/servlet container where you have deployed the server is mapped to the URL http://machinename:port/ depending on your machine name and specified port number. To add a virtual directory, click on . A dialog will appear allowing you to enter or browse to a direct path. Once you have specified the path, then enter the corresponding URL. Click and the virtual directory will be added. You can also edit and remove mapped URLs from the main dialog.

URL Mapping List & Add Mapping Dialog
You will also be prompted to specify URL mapping any time you add a file from a new location that has not been mapped with a corresponding URL.
Because Organizer uses virtual directories, it is possible to have files in many different physical locations listed in the Organizer. While this makes it easy to publish reports and charts, it can be difficult to manually keep track of all the files. Specifically, if the files are moved or the directory structure is changed, then the Organizer will not be able to find the files and the links within the Menu page may no longer work.
You can use the Repair Broken Links feature in the Organizer to automatically check the status of the listed files. The Organizer will check all of the files within your projects and folders to check whether the path/URL specified is still correct.
To check for broken links, select Repair Broken Links from the Option menu. The Organizer will then check all of your files and pop up a list of any broken links found. You can then choose to repair any broken links by specifying a new path or file/filename, or you can remove the files from the Organizer.
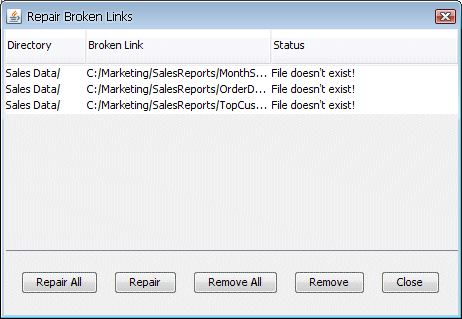
Broken Links List
Sometimes you may want to update the directory path of certain items in the Organizer. The Update Directory feature is helpful if you are moving files between installations or if you are moving complete installations.
In order to update the directory paths of items in the Organizer, select Update Directory from the Option menu. The update directory dialog will then open.
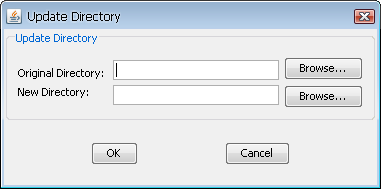
Update Directory Dialog
The dialog allows you to specify the original directory (the directory you want to update) and the new directory. You can either use the buttons to select directories or just type directory paths manually.
Please note that when you are updating directories using the update directory feature, all the organizer items that contain the original path in their directory paths will be updated. For example, if you specify the original path as C:/EDAB and the new path as D:/Install/EDAB, all the items in the Organizer that contain C:/EDAB in their paths such as (C:/EDAB/Reportfiles/SalesReport.qrp, C:/EDAB/ChartFiles/MonthSales.cht, C:/EDAB/DashboardFiles/Dashboards/SalesDashboard.dsb, ...) will be updated to (D:/Install/EDAB/Reportfiles/SalesReport.qrp, D:/Install/EDAB/ChartFiles/MonthSales.cht, D:/Install/EDAB/DashboardFiles/Dashboards/SalesDashboard.dsb, ...). Also note that the new directory (the updated directory) needs to be added to your URL mapping. Otherwise, you won't be able to repair broken URL links after the update, so the affected organizer items won't work correctly. For more information about URL mapping and repairing broken URL links, please see Section 2.1.5 - URL Mapping and Section 2.1.6 - Repairing Broken Links.
Example:
For instance, assume that you have moved the MonthSales.qrp, OrderDetails.qrp, and TopCustomers.qrp reports from the C:/EDAB/ReportFiles/SalesReports directory to the C:/Marketing/SalesReports directory. The following image shows the reports in the Organizer before the updating process:

Example - Reports in the Organizer - Before Directory Updating
Select Update Directory from the Option menu in the Organizer to open the update directory dialog. In the dialog, specify the original directory as C:/EDAB/ReportFiles/SalesReports and similarly the new directory as C:/Marketing/SalesReports.
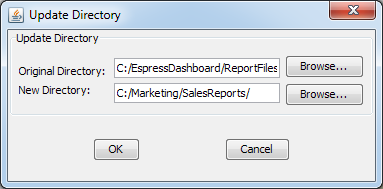
Example - Update Directory Dialog
Once you have properly specified the directories, press the button. The following dialog will then appear showing you the list of updated organizer items as well as number of updated files.
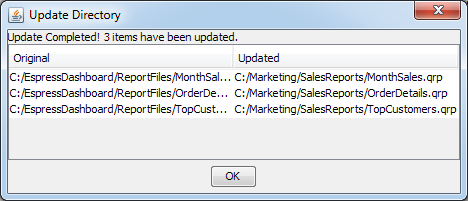
Example - Update Results Dialog
Next, click the button in the dialog. This will bring you back to the Organizer. The image below shows updated reports paths after the updating process.
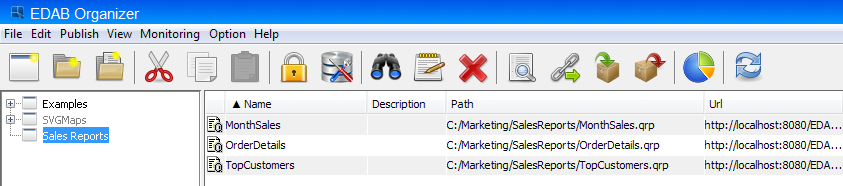
Example - Reports in the Organizer - After Directory Updating
Now you have to repair the broken URL links. Otherwise, URLs of the affected organizer items will remain mapped to the original directory. In order to repair broken URL links properly, you have to add the new directory (the directory you have specified in the Update directory dialog C:/Marketing/SalesReports) as new URL link to your URL mapping. To open the URL mapping dialog, select Setup Url Mapping from the Option menu in the Organizer. The dialog will then appear.

Example - Setup URL Mapping Dialog
In order to add a new URL link, click the button, another dialog will pop-up prompting you to specify the Virtual Directory and Corresponding URL. Specify the virtual directory as C:/Marketing/SalesReports and the corresponding URL e.g. as http://<MachineName>:<Port>/Marketing/SalesReports. After that, click . For more information about URL mapping, please see Section 2.1.5 - URL Mapping.
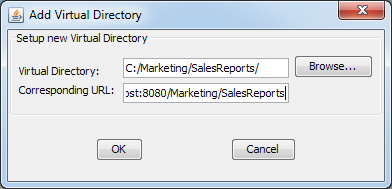
Example - Inserting New URL Link
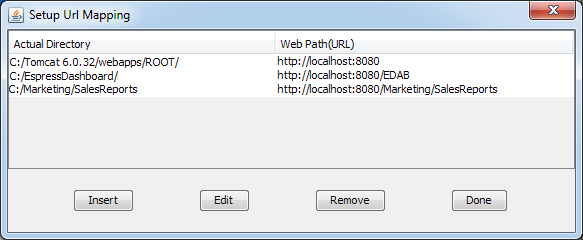
Example - Setup URL Mapping Dialog - New URL Link Added
Once you have specified the URL link, click the button again. The repair broken links dialog will then appear prompting you whether you want to check for broken links now. Click . Please note that if you click , you may check for broken URL links by selecting Repair Broken Links from the Option menu in the Organizer. For more information about repairing broken URL links, please see Section 2.1.6 - Repairing Broken Links.
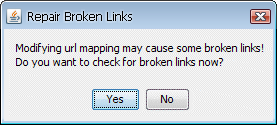
Example - Repair Broken Links Dialog
If you have correctly specified the URL mapping, you should get the following dialog that will inform you that broken links have been successfully fixed. Clicking the button will bring you back to the Organizer.
Example - Repair Broken Links - Links Successfully Fixed
![[Note]](../../../images/note.png) | Note |
|---|---|
If you did not specify the URL link in the URL mapping or did not specify the URL link correctly, the dialog below will appear informing you that broken URL links cannot be repaired. If you got this dialog, return back to the URL mapping dialog and add/modify the URL link as described in previous steps. After that try to repair broken links again. |
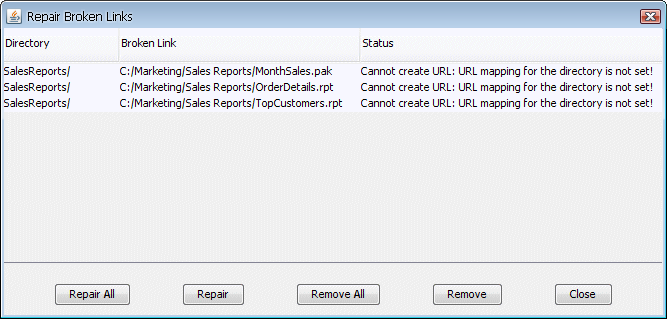
Example - Repair Broken Links - Error During Links Fixing
Now you may check whether the URL fields of the organizer items have been correctly repaired. The URL fields should be similar as the ones shown on the image below.

Example - Reports in the Organizer - After Repairing URL Links
Often, if you have many files in many folders in the Organizer, it can be hard to find a specific file. To locate files or folders, you can use the search function. To search, you can either click the ![]() button on the toolbar, select Search from the View menu, or right click in the upper right-hand panel and select Search from the pop-up menu. The search dialog will then appear.
button on the toolbar, select Search from the View menu, or right click in the upper right-hand panel and select Search from the pop-up menu. The search dialog will then appear.

Search Dialog
The search dialog prompts you to enter a search string in the project or folder in which you would like to search. By default, the currently selected project or folder is listed. If you leave the Look In field blank, it will search all projects.
Other options allow you to include sub-folders in your search, and to match the search string to filenames, descriptions, and URLs. You can also match case in your search by selecting the Case Sensitive option.
In EDAB, you can limit the open and insert dialogs in Organizer, Report Designer, and Chart Designer by adding a parameter to the Organizer. If launching the Organizer through the JSP page, edit /EDABOrganizer.jsp and add the following line:
<param name="BrowseRootDir" value="<Directory>"/>
For instance, the follow limits the browse directory to the EDAB root directory located under C:\EDAB
<param name="BrowseRootDir" value="C:\EDAB"/>
If starting the Organizer using the bat file, edit EDABOrganizer.bat and add the following option at the end of the command.
... quadbase.reportorganizer.manager.OrganizerClient -BrowseRootDir:<Directory>