A sub-report is a report within a report. The sub-report is nested entirely within a section of a primary report. Each sub-report has its own data source and look and feel. Using sub-reports you can create reports that use un-related data. You can also create a report that has more than one data table.
In EspressReport, sub-reports are generally unrelated to the primary report (however, parameterized sub-reports can be linked to column fields in the primary report, see Section 1.11.4 - Linked Sub-Reports). Each sub-report uses its own data source and it can be designed independently from the primary report. Each sub-report runs entirely within the section in which it is placed in the primary report. You can either use an existing report (.pak, .rpt or .xml) template or create a new one for a sub-report.
To add a sub-report to an existing report, click the ![]() button on the toolbar or select Insert Sub-Report from the Insert Menu. A second menu will then open giving you the option of adding a new sub-report or re-using an existing sub-report. To insert a new sub-report, select .
button on the toolbar or select Insert Sub-Report from the Insert Menu. A second menu will then open giving you the option of adding a new sub-report or re-using an existing sub-report. To insert a new sub-report, select .
The cursor will turn to a cross. Position it where you would like to insert the sub-report and click. A dialog box will then appear, asking you whether you would like to use an existing report or create a new one.
You can use any existing report in either .pak, .rpt or .xml format as the sub-report. If you select to use an existing report, you will be prompted to specify the location of the report file. After you specify the file, it will be inserted as a sub-report.
If you select to create a new report for the sub-report, the Report Wizard will launch, allowing you to go through the process of designing the report from data source selection to report mapping. Once you have finished with report mapping, the new report will be inserted as a sub-report.
After a sub-report has been added, a new tab will appear at the top of the Report Designer window.
Sub-Report Tab
Selecting the Sub-Report tab will open a new design pane that allows you to modify the sub-report. You can modify the sub-report in the same manner as you modify any report. For each sub-report you add, new tab will appear. When you have a sub-report, the Preview tab becomes context sensitive. If you click on the Preview tab from the Sub-Report tab, the preview pane will only contain the sub-report. If you click on the Preview tab from the Design tab then you will preview the main report with the sub-report embedded.
Within the Design window, the sub-report will appear as a gray rectangle. It can be moved and re-sized like any object. You can also edit a sub-report by double-clicking on the corresponding rectangle in the Design window.
Sub-Report in Design Window
Sub-reports run entirely in the section in which they are placed and will generally repeat each time the report section repeats. This means, that if the sub-report is placed in the table header section, it will only run once (unless the Print on Every Page option is enabled). However, if the sub-report is placed in the Group Header section, then the sub-report will repeat for each group in the report.
The exception to this is the table data section. Sub-reports inserted into the table data section will not repeat for each row, but will rather run alongside the data in the primary report. This allows you to create a report with the effect of two data tables running next to each other.
The size of the gray rectangle in the main report Design window represents the size of the sub-report, so if the sub-report is larger than the space you allow in the Design window, portions of the sub-report may be truncated.
Fixing a sub-report's size within the main report may not be the best approach if the number of records in the sub-report will vary. You can solve this by setting the sub-report to have variable height. Dynamic sizing for sub-reports is set in the same manner as for other report cells using the resize to fit option. For more, please see Section 1.5.7.11 - Moving and Resizing Report Elements.
You can also set the width of the sub-report to be dynamic. This feature is most useful for crosstab type reports where the number of columns in the report can vary as the data or filters change. This set the sub-report to always draw wide enough to fit all the visible columns in the sub-report. To set dynamic width for the sub-report, right click on the sub-report in the Design window, and select Auto Resize Width from the pop-up menu. This will bring up a dialog allowing you to enable or disable this feature.
Resize Width Dialog
![[Note]](../../../images/note.png) | Note |
|---|---|
If you set a sub-report to have variable height, any objects placed directly below the sub-report in the same section of the primary report will not shift to accommodate the resized sub-report. Hence, these objects may be overlapped by the sub-report. |
To ensure that objects are not overlapped, it is recommended that you place sub-reports with dynamic height in their own report sections. If necessary, you can add nested sections to the report. For more on this, see Section 1.5.1.1 - Nested Sections.
There are two ways to remove a sub-report from a primary report. You can simply select the sub-report object in the primary report and delete it. This will remove the sub-report from the primary report but it will keep it available. This means that the sub-report tab is still active and the sub-report can be re-inserted into the primary report.
The other method is to select Remove Sub-Report from the Edit menu. A second menu will then open with a list of all the sub-reports embedded in the current report. Select the sub-report you would like to remove. This option will completely remove the sub-report. The sub-report tab will be removed and the sub-report will no longer be available.
Sometimes you may want sub-reports to be coordinated with the data in the primary report. For example, if you have grouped data, you may want to filter a sub-report so that it shows data pertinent to each group. You can use linked sub-reports to do this.
Sub-reports are linked to primary reports using query parameters. So to create a linked sub-report, the sub-report must have a parameterized query. After you have created the sub-report, you can link it by selecting Sub-Report Parameter Mapping from the Data menu. This will bring up a dialog allowing you to map column fields from the primary report to query parameters in the sub-report. This operation is similar to that used in drill-down.
Sub-Report Parameter Mapping Dialog
The dialog contains a tab for each parameterized sub-report. Each parameter in the sub-report can be mapped to a different column field in the primary report.
Normally when linked sub-reports execute, the sub-report will issue its query each time it runs using the current value of the report column. However, if your report is configured such that the sub-report executes a large number of times, these repeated queries can have an impact on performance. If you check the last option in this dialog called Limit Sub-report query execution, EspressReport will try to merge the sub-report queries, and limit the number of calls to the database when the sub-report runs. Note that this option will only take effect if the sub-report uses a database query to retrieve the data. This will not effect sub-reports that use parameterized classes or xml files as the data source.
When using linked subreports, it is recommended that you do not use the cascading parameters functionality, as this may potentially cause incorrect data to appear (depending on the cascading parameters and the order in which they are presented). The default value of the parameter will always be selected instead of the value passed by a column in the main report.
Although linked sub-reports will run in any configuration, and in any report section, it is important to be aware of the behavior of sub-reports when creating a linked presentation. As noted in Section 1.11.2 - Editing a Sub-Report sub-reports will only run as many times as the section in which they are placed, and will only run once when placed in the Table Data section.
Therefore, if you place a linked sub-report in a section that runs only once (Table Header, Report Header, Table Data, etc) the sub-report will only run once and it will use the first value from the column to which it is linked to filter the report. To generate a linked presentation, where the sub-report runs for each value in the column to which it is linked, you should use a summary break layout. By setting the column as a row break, and placing both the column and the sub-report in the Group Header section you will get the desired result.
| Note |
|---|---|
If a relationship between the column and the sub-report already exists in the database, you may want to generate a side-by-side master & details layout instead of linked sub-reports. Using the master & details layout will result in better performance. For more on this, please see Section 1.4.4.1 - Data Mapping. |
In addition to taking a value from a column in the main report, a sub-report can also share parameter values with the main report or with other sub-reports. In this arrangement, a user can enter values to filter the main report's data and have the same filters apply to the sub-report data.
Parameter linking is only available if parameters share the same data type. By default, if you create a sub-report that has parameters with the same name and data type as those in the main report, they will be linked. When parameter values are supplied to the main report, they are also automatically passed to the sub-report.
The parameter linking behavior can be modified by navigating to the sub-report that you would like to modify and selecting Sub-Report Parameter Sharing from the Data menu (in the Sub-Report tab). This will bring up a dialog allowing you to modify the linking behavior for the sub-report parameters.
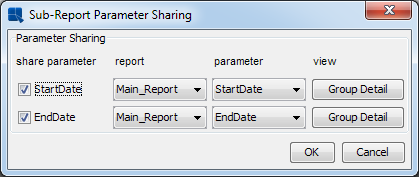
Parameter Sharing Dialog
For each parameter defined in the sub-report, you can enable/disable the linking. You can also set which parameter in the main report or in another sub-report you would like to link to. The button will launch a dialog showing the current relationships for that parameter.
Once you have specified the settings that you would like for all parameters, click the button to apply the changes.
For more about query parameters and initialization, please see Section 1.3.2.2.2 - Parameterized Queries of this guide.
| Note |
|---|---|
Parameter linking will be overridden if you elect to map a column field from the main report to the sub-report parameter as described in Section 1.11.4 - Linked Sub-Reports. |