Queries in QuickDesigner work in conjunction with EspressReport's ad-hoc query interface Data Views. Data Views allow an administrator to pre-select tables and fields from a database and create a local view from which end users can run queries. For more information about data views and setup, please see Section 2.4.3.3 - Data Views.
In QuickDesigner, if you select either a data view or a data view query as the data source, you will be taken to the QuickDesigner query interface where you can create or modify a query based on the data view.
If you select a data view as the data source, the next QuickDesigner page will open allowing you to select fields from the view for your query.
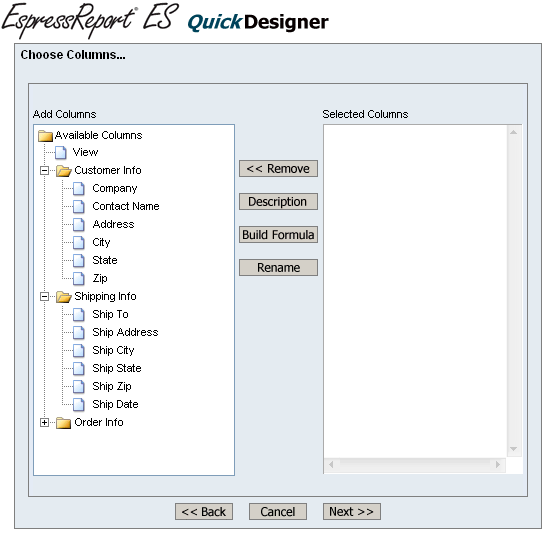
Select Columns Dialog
A select list for each heading in the view is generated on the left-hand side. To select fields for the query, select a field on the left-hand side (use Ctrl+click for multiple selections). The selected columns will be added to the dialog on the right-hand side. To remove fields, you can select the columns from the right-hand side and click the button.
You can view any description associated with a field in the view, by selecting the field and clicking the button. This will open a new window showing the description.
You can also create computed columns from the select columns dialog. To create a computed column, click the button. This will launch the Formula Builder interface in a new window.
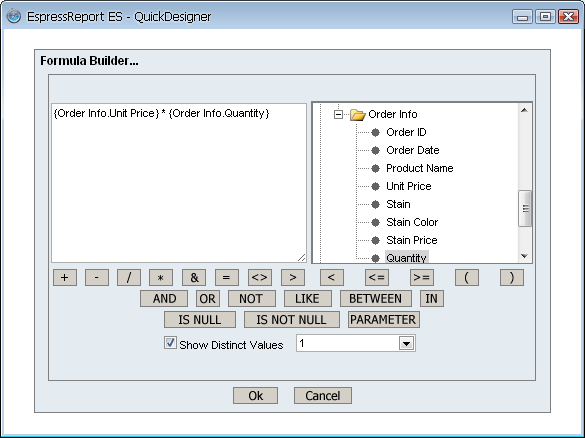
Formula Builder Window
The right-hand side of the Formula Builder contains a list of fields in the view, as well as the database functions. The buttons at the bottom are available operators and conditionals. The Boolean and conditional operators are more commonly used for building conditions which is covered in Section 3.18.2 - Setting Conditions.
Once you have finished constructing the field, click to close the Formula Builder and return to the conditions window where the computed field is added to the select list. You can edit the formula by selecting it in the list and clicking the button again.
You can also create an alias for any expression column by selecting it and clicking the button. This will bring up a new window for you to specify the alias.
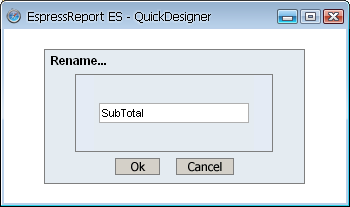
Rename Dialog
Once you have finished selecting the columns you would like to use for the report or chart, click the button to set conditions.
Suppose you have a database that has encrypted fields, e.g. social security numbers, tax ID, passport numbers, etc in a tax payer database or immigration database. How do you allow authorized users of your (ERES) system to make ad hoc reports or view reports online so that they can see the actual field values? The other concern is that you do not want any users of your system to know the encryption/decryption key but you want them to be able to see the decrypted data.
ERES provides an advanced feature that allows you to run Quick Designer and Menu Page/report URL with automatic decryption enabled.
To do this, you need to do two things:
You need to create an XML file that gives the database URL, database driver, name of column to be decrypted, and the function to be applied when the data is being retrieved. An example file is as follows:
<?xml version="1.0"?>
<!DOCTYPE ReplaceColumnInfoList SYSTEM "QBReplaceColumnInfoList.dtd">
<ReplaceColumnInfoList>
      <ReplaceColumnInfo>
            <Driver>com.mysql.jdbc.Driver</Driver>
            <URL><![CDATA[jdbc:mysql://prodigy:3306/CAIT]]></URL>
            <TableName>user</TableName>
            <Pair>
                  <ColumnName>user.SSN</ColumnName>
                  <ReplaceValue><![CDATA[cast(AES_DECRYPT(user.SSN,'1111111111111111') as CHAR)]]></ReplaceValue>
            </Pair>
      </ReplaceColumnInfo>
</ReplaceColumnInfoList>
The DTD file used is shown below.
<?xml encoding="US-ASCII"?>
<!ELEMENT ReplaceColumnInfoList (ReplaceColumnInfo*)>
<!ELEMENT ReplaceColumnInfo (Driver, URL, TableName, Pair*)>
<!ELEMENT Pair (ColumnName, ReplaceValue)>
<!ELEMENT Driver (#PCDATA)>
<!ELEMENT URL (#PCDATA)>
<!ELEMENT TableName (#PCDATA)>
<!ELEMENT ColumnName (#PCDATA)>
<!ELEMENT ReplaceValue (#PCDATA)>
In this example, we are using a MySQL database, the table name is user, the encrypted column is SSN. When a query is run, the function
AES_DECRYPT(user.SSN, '1111111111111111')will replaceuser.SSNwherever it may appear in the SQL statement. The functionAES_DECRYPTis the decryption function in MySQL. The key for decrypting the data is'1111111111111111'in this example.You need to set the path to the XML file in the Admin Console (Server Options tab, Security Options category - see Section 1.4.1.3 - Server Options for more details) and then restart the ERES server.
Once this is set up, when you run a report in Menu Page, using generated report URL or generating reports in QuickDesigner, you will be able to see the real (decrypted) values of the encrypted columns.
You can find the example XML and DTD files shown above under the <ERESInstallDir>/help/examples/DataDecryption/ directory. You will also find a script that you can use to generate some sample data in MySQL.
When you run a report (in Menu Page, Quick Designer or with report URL) with the following query,
select user.firstName, user.lastName, user.SSN from user;
you will see the following result set:
| firstName | lastName | SSN |
|---|---|---|
| John1 | Smith1 | 1111 |
| John2 | Smith2 | 2222 |
| John3 | Smith3 | 3333 |
| John11 | Smith11 | 11111 |
This query below,
select user.firstName, user.lastName, user.SSN from user where SSN LIKE '1%';
should produce the following result in your report.
| firstName | lastName | SSN |
|---|---|---|
| John1 | Smith1 | 1111 |
| John11 | Smith11 | 11111 |
You can specify multiple fields in the xml file. To add another field from the same table, simply add another <pair> element. To add a field from another table or datasource, add a full <ReplaceColumnInfo> element. This feature also supports sub-reports and drill-downs. Any field in these components matching the information in the xml will also be decrypted.
![[Note]](../../../images/note.png) | Note |
|---|---|
If you are entering SQL for your query, you must use the full name for the field in order for this feature to work. For example, |
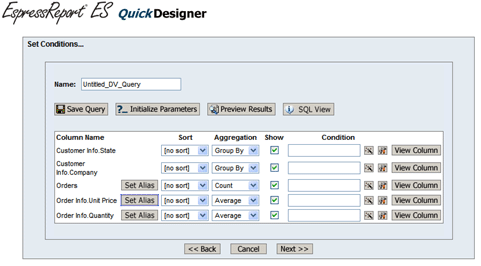
After selecting fields, or if you select a data view query as the data source, the conditions window opens allowing you to set aggregation, grouping, and filtering for the selected columns.
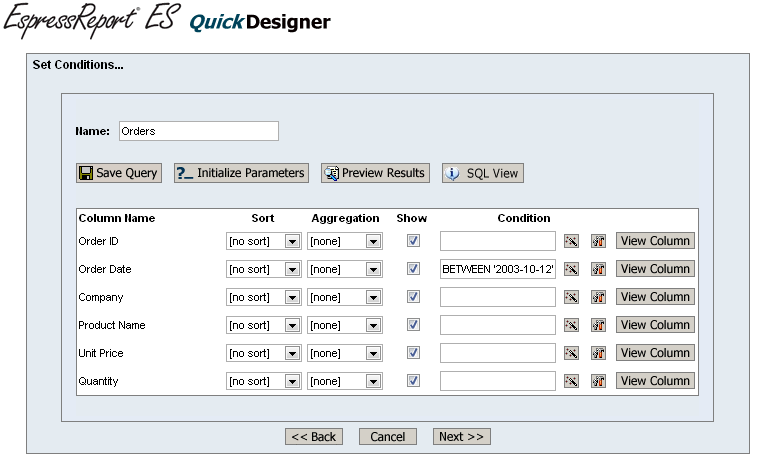
Conditions Dialog
Each selected column is listed along with several options:
- Sort:
This allows you to indicate if the column should be sorted. You can select whether to sort in ascending or descending order.
- Aggregation:
This allows you to specify any grouping or aggregation in the query. Note this option will produce an aggregated result set from the database, not a report with grouping (which shows detail records and is created using the data mapping options described in Section 3.19.1 - Report Mapping Options).
- Show:
This option indicates whether the column should be visible or not.
- Condition:
This field allows you to enter a filtering condition for the column. There are also two buttons next to the field that allow you to generate a filtering condition.

Condition Wizard: This will bring up a dialog allowing you to set basic conditions from a field. The first dialog allows you to select which condition to apply and whether you would like to enter values or select them from a list.
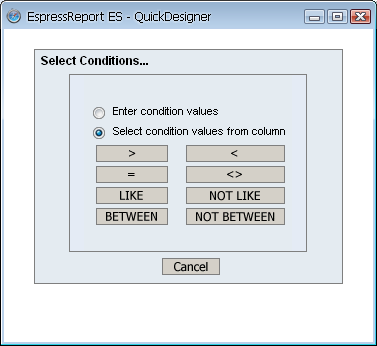
First Condition Wizard Dialog
Once you have selected the condition, a new dialog opens allowing you to set the values for the condition.
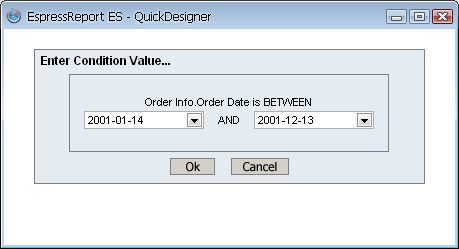
Second Condition Wizard Dialog
Select the values that you would like and click . The condition will automatically be added to the conditions field.

Build Condition: This will bring back up the Formula Builder, allowing you to construct an expression for the condition.
- View Column:
This allows you to see distinct values for selected columns. When you click this button, a small window will open showing values for the column.
You can preview the query at anytime by clicking the button. This will bring up a new window showing the query result.
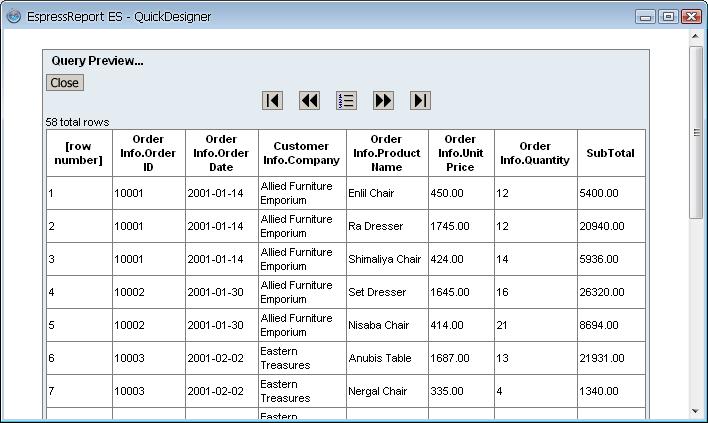
Query Results Screen
By default the window shows the first 15 records of the result set. You can navigate through the result set using the icons at the top and bottom of the window.
| Go to the first page of the data table. |
| Go to the previous page of the data table. |
| Set the number of records to display per page. This will open a new dialog prompting you to specify the record number. |
| Go to the next page of the data table. |
| Go to the last page of the data table. |
QuickDesigner also allows you to define query parameters. Parameters are defined in the same way as with other query interfaces - using the ":" character. You can define parameters directly in the conditions field, using the convention of :ParameterName to define a parameter.
Parameters can also be defined in the Formula Builder when building conditions. To define a parameter this way, click the button for the field, and in the formula builder, click the button to insert a parameter. This will bring up a new dialog allowing you to enter the parameter name.
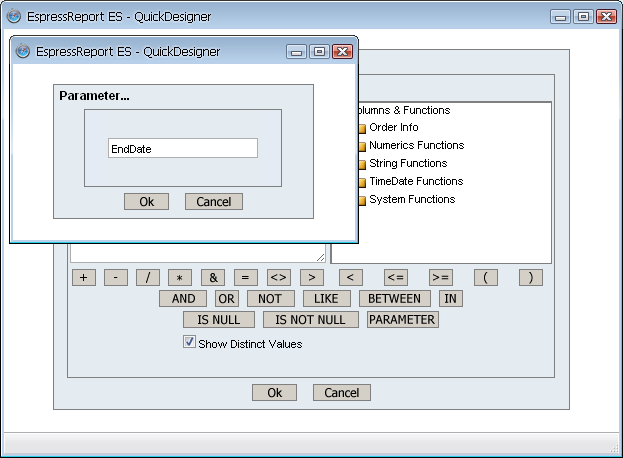
Specifying a Parameter in Formula Builder
For more information about query parameters, please see Section 2.4.3.2.2 - Parameterized Queries.
Once you have specified parameters in the query, they will need to be initialized. You can initialize parameters by clicking the button. The initialization dialog will also open if you try to preview the query or to continue on to the data mapping options.
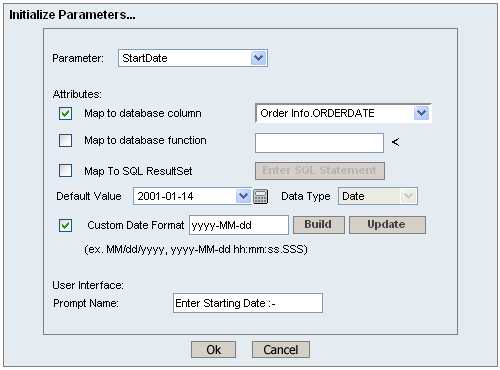
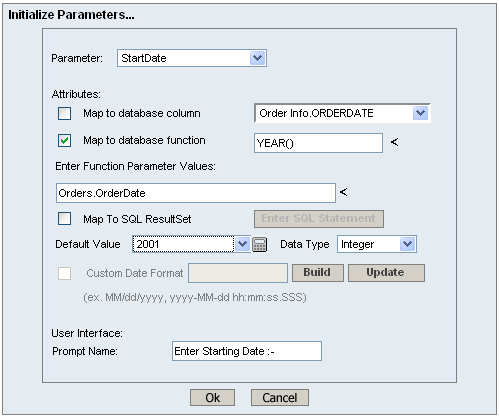
Initialize Parameter Dialog
The drop-down list at the top of the dialog indicates which parameter is currently being initialized. You can access and set the options for each parameter by selecting it from this list.
The following options are available for each parameter:
- Map to database column:
This allows you to specify a column from the database whose values will be used for the parameter input. Selecting this option modifies the parameter prompt that you will get when running the report or chart. If you map the parameter to a database column, you will be prompted with a drop-down list of distinct values from which to select a parameter value. If you do not map, you will have to type in the specific parameter value.
- Map to database function:
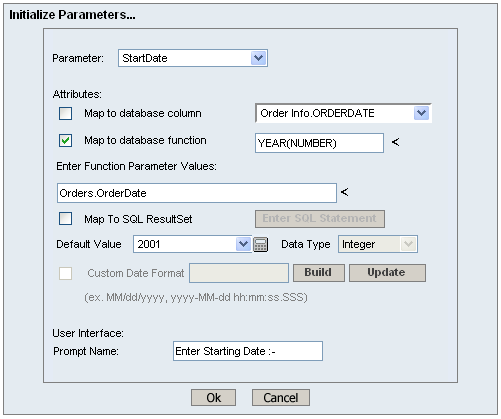
Mapping a parameter to a database function is very similar to mapping to a column. This feature allows you to map to the results of any function from your database. For example, suppose you have the following condition in your query:
Year({Orders.OrderDate}) IN (:OrderYear)In the initialize parameter dialog, check the Map to database function box, select the function from the list and enter the parameter value for your function. The default value and data type will be automatically updated
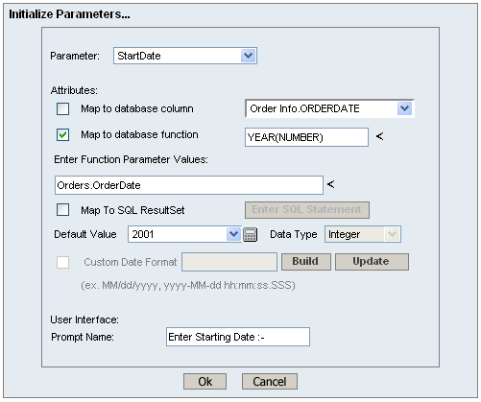
Initialize Parameter Dialog
For certain databases, you may notice that the functions available do not specify the parameter types for functions. In this case, there will only be one function parameter field and it will be longer than normal. Selecting a column from the drop down list will be appended at the end of the field rather than replacing the existing text. You must enter all parameter values for the selected function, separating values with commas. Once you click away from this field, the default value field will be filled with function results and the data type will be automatically determined.
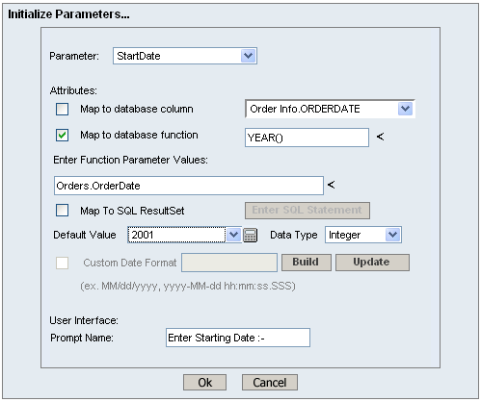
Entering Function Parameters
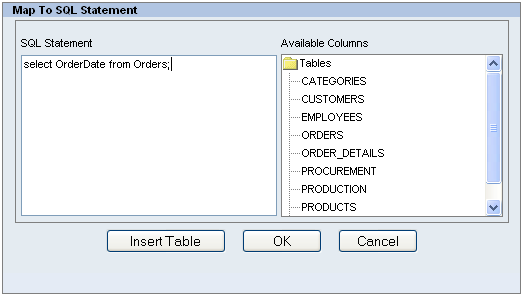
- Map To SQL ResultSet:
Mapping a parameter to a SQL Resultset allows you to map the parameter to the results of a query from your database. In the Initilize Parameter dialog, check the Map To SQL ResultSet to select this option.
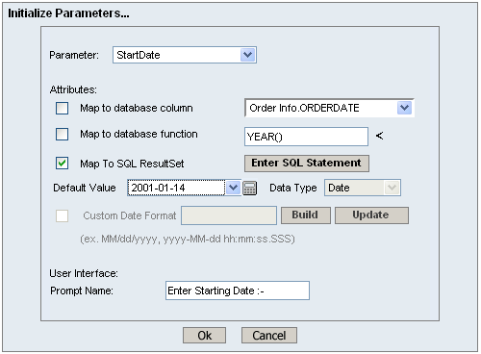
Initialize Parameter Dialog
You will now be able to enter a SQL statement whose resultset will be mapped to the parameter. Click on Enter SQL Statement to show the Map to SQL Statement dialog box. You can enter the SQL statement there and click after you are done.
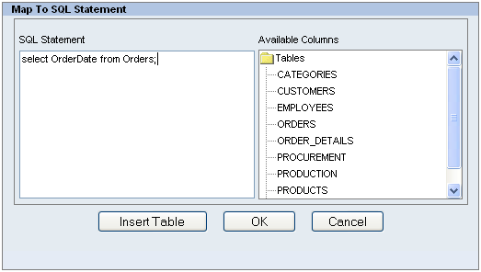
Initialize Parameter Dialog
- Default Value:
This allows you to specify a default value for the parameter. Although you do not have to specify a default value, it is recommended that you do so.
 Date Variable:
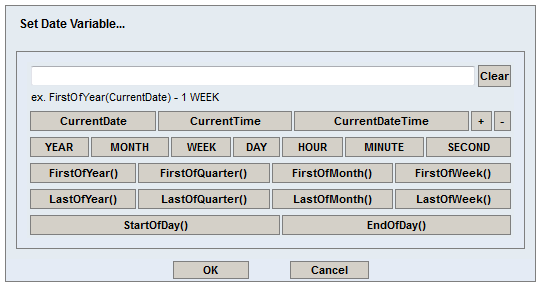
This option is only available when the parameter is not mapped to a database column or function, and is only intended for parameters with variable type date/time. When you click this button, the following panel will pop up, listing all the supported keywords.
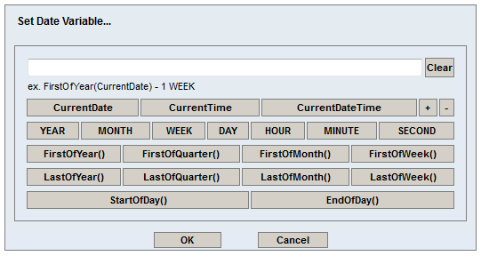
Enter Date Variable Dialog
This dialog allows you to select one of the three keywords: CurrentDate, CurrentTime, and CurrentDateTime. You may add or subtract units of time from the current date/time, allowing you to have a dynamic date range. For example, a report may have the following default values:
StartDate: CurrentDate - 1 WEEK
EndDate: CurrentDate
This would indicate that every time the report is run, the default prompt should be one week ago to the current date. Other supported measures are YEAR, MONTH, DAY, HOUR, MINUTE, and SECOND. This feature only supports a single addition or subtraction. This feature does not support multi-value parameters. Note: When the QuickDesigner prompt appears, it will show the date values that correspond to the variable values entered here, not the keywords themselves as in Report Designer.
You can also use functions to define the parameter value.
- Data Type:
This allows you to specify the data type for the parameter value(s). If you have mapped the parameter to a column,the data type is set automatically.
- Custom Date Format:
This allows you to set the format in which the date parameter should be entered. This option is only available when you have mapped the parameter to a date/time column or when you not mapped the parameter at all and the parameter data type is
date, time,ortimestamp. When you check this option you can specify a date format by either using the builder interface or by entering the date format in a combination of characters that represent time elements.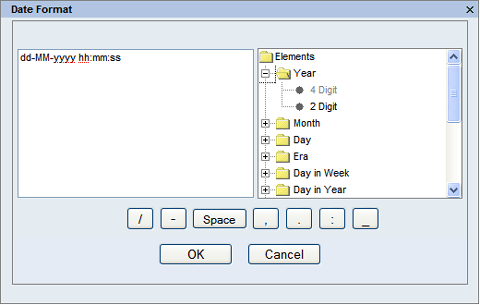
Date Format Dialog
If you click the button, the above dialog will appear. The date/time representations are listed on the right and optional spacers and symbols are shown as a collection of buttons on the bottom. Once you have finished creating the format, click to save.
The date and/or time format is a series of characters and delimiters. Letters are used to represent different elements of date/time data. For more on the characters and their formatting, please refer to the documentation for the printDate() report function in Section 3.6.2.8.3 - Date/Time Functions.
If the parameter is mapped to a column, once you have finished designing the format, click on the update button to refresh the parameter prompt with the new format.
- Prompt Name:
This allows you to specify the prompt that is given to the user in the parameter dialog.

Once you have finished setting values for all the parameters, click to close the dialog and save the settings.
You can save the created query, or save the changes to the query if you selected a data view query to begin with by clicking the Save Query option in the conditions window. This will bring up a dialog prompting you to specify a name for the query.
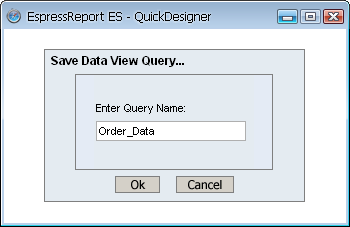
Save Query Dialog
Once you have specified the name, click . The query will be saved in the data registry as a new node under the data view.
You can view the constructed query by clicking the SQL View option in the conditions window. This will bring up a page with the formatted query.
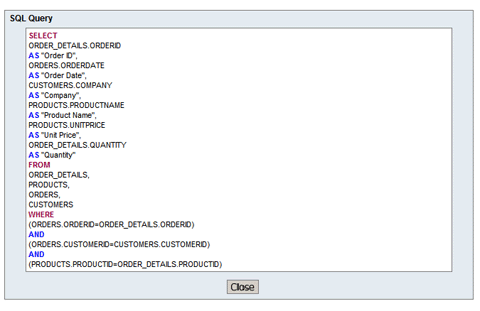
SQL View
If you add aggregation and group bys to the query, you are also able to specify an alias for the aggregated field.
Set Alias
Clicking on the Set Alias option will pop up a dialog allowing you to specify a name for the field. The name you specify here will replace the actual field name in both reports and charts.
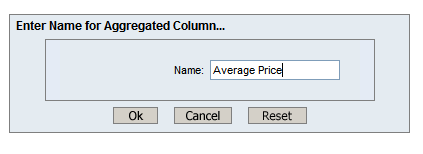
Alias Dialog
After you have gone to the main QuickDesigner window, you can modify the query by clicking the button on the toolbar. This will take you back to the conditions window allowing you to modify the query.
You can also hit the button in this dialog to change the column selection for the query. Once you have finished modifying the query, hit the button to return to the report or chart. Note that you may need to re-specify the mapping options for the report or chart if you have made significant changes to the query.