Major administrative functions in ERES are handled in the Admin Console. The admin console is a thin-client interface that can be launched from the ERES start page. To start the Admin Console, start the server (see Section 1.3.2.2 - Starting the Server), and login as the administrator. The administrator username is admin and the default password is admin. This can be changed in the console.
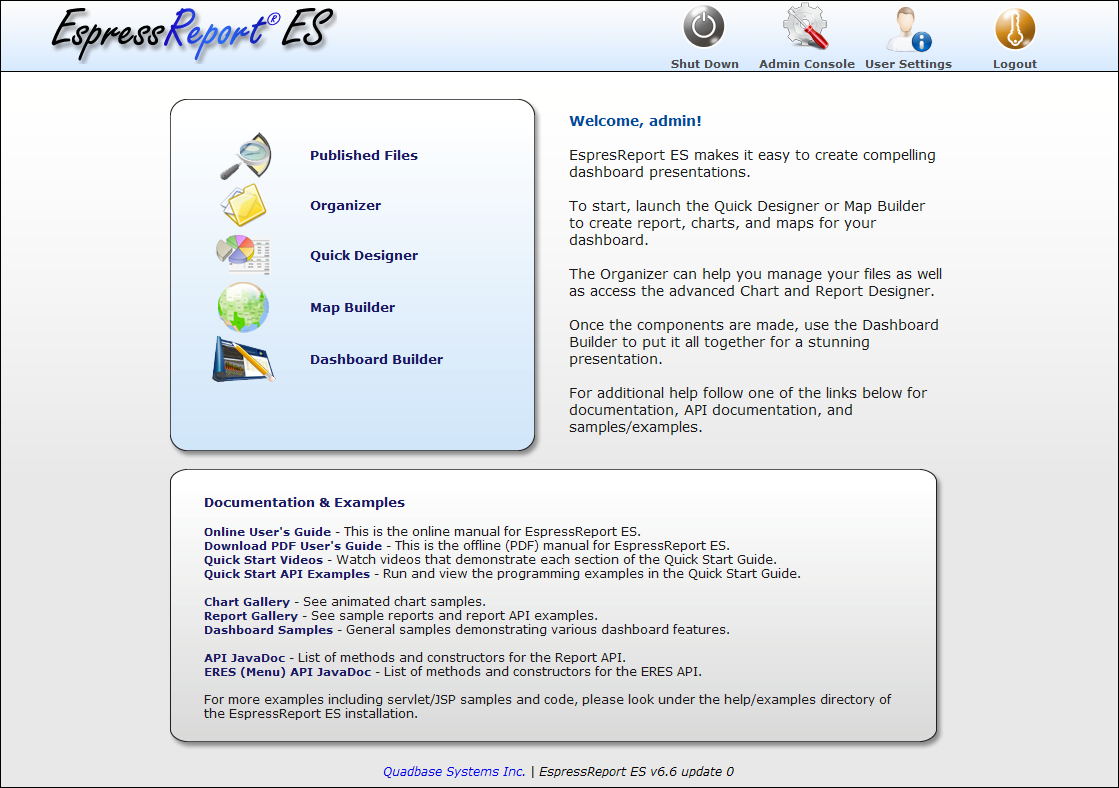
Admin Logged into Start Page
Once you login the administration button in the start page becomes active. Click this button to load the admin console. You can also access the admin console directly by going to the menu page login: Admin_Login.jsp. If you installed ERES with Tomcat the URL to the login is http://machinename:port/ERES/Admin_Login.jsp. This will bring up a page allowing you to login to the Admin Console directly.
The top of the Admin Console interface contains five tabs. One is labeled User List, one Setting Info, one Server Options, one LDAP Settings, and one Customization.
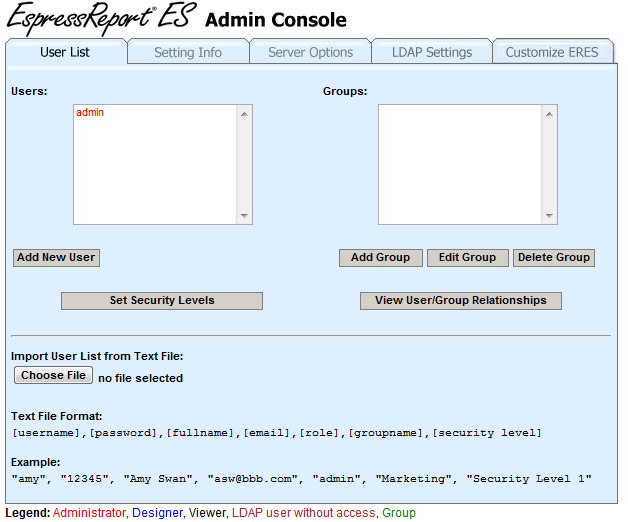
Admin Console
The User List tab of the Admin Console allows you to create and maintain users and groups that use ERES to design or view reports and charts. The left-hand side of the dialog contains a list of all the defined users, and the right-hand side a list of all the defined groups. Normally these users and groups are stored in the ERES database, however ERES can be configured to retrieve the users and groups from existing systems including LDAP servers. To add a new user, click the button. This will bring up a new dialog allowing you to specify information for the new user.
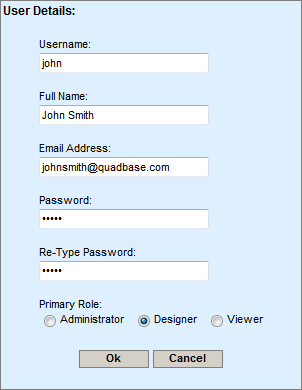
Add User Dialog
For each user, you need to supply a username, an email address (for schedule delivery), and a password. Each user also has a primary role of a viewer or a designer which is assigned in this dialog. Viewers can see and run reports as well as build ad hoc reports using the QuickDesigner, but they do not have access to the core design/development tools, like Report Designer, Chart Designer, and Organizer. Designers have access to all the interfaces, but are restricted by licensing and can't change server settings and user privileges. Each designer user must be licensed by a developer seat. Administrator can view all the interfaces, change server settings, view detailed logs and modify user privileges. Each administrator must be licensed by a developer seat.
In the user list, you can quickly distinguish user roles by their color. There is a legend for that below the admin console.
Once you have finished adding information for the new user, click and the new user will be added.
You can edit or remove a user by selecting it in the user list, selecting the function you would like to perform (edit or delete) from the drop-down menu, and clicking the button below the user list. If you select to edit the user, a dialog will open allowing you to change the information for that user. If you select to delete the user, it will be removed. The original administrator user (admin) can't be removed.
![[Note]](../../../images/note.png) | Note |
|---|---|
You can't edit users that have been read from LDAP (see the Section 1.4.1.4 - LDAP Settings chapter to learn more about LDAP users). If you select a LDAP user and click the button, the following dialog will open. |
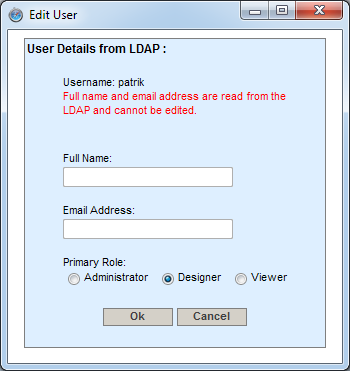
Edit LDAP user dialog
You are allowed to edit only the user attributes, that have not been read from LDAP. The rest of the user settings can be edited on the LDAP server.
Also, LDAP user accounts can't be fully deleted. If you select a user that has been read from an LDAP server and click the button, the user will be deactivated, but it will not be removed from the user list - it will be marked as LDAP user without access.
To add a new group, click the button under the group list. This will pop-up a new dialog prompting you to specify information for the group and select members.
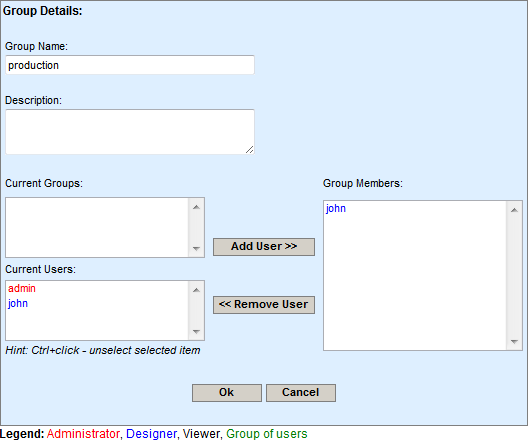
Add Group Dialog
For each group, you need to name the group, and select members. Members can be individual users or other groups. To add group members, select users and/or groups from the left-hand side, and click the button. You can make multiple selections (or de-selections) by holding down the CTRL key when clicking on the user/group.
Once you have finished adding members to the group, click the button and the group will be added.
You can edit or remove a group by selecting it in the group list, selecting the function you would like to perform (edit or delete) from the drop-down menu, and clicking the button below the group list. If you select to edit the group, a dialog will open allowing you to change the information for the group. If you select to delete the group, it will be removed.
There is also a button to set security levels for users and groups. Details for the security level dialog can ben found in Section 1.4.1.1.3 - Setting User/Group Security Levels.
You can view all of the user and group relationships by clicking the button. This will bring up a new dialog that shows all of the users and which groups they belong to in a tree format. If the user or group has a certain security level assigned to them, you will also see the name of the security level in brackets.
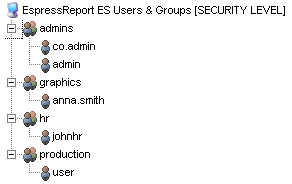
User/Group Relationships Dialog
In addition to adding users and groups via the Admin Console manually, you can directly import users from a delimited file. To import users, you must have a CSV file with the following structure:
[username],[password],[fullname],[email],[role],[groupname],[security level]
username is the user login name, password is the user password, fullname is the user's full name, email is the users email address, and role indicates the user's primary role either designer, viewer or admin. The groupname field indicates which group the user belongs to. If that group has already been defined then the user will be added to the group. If the group has not been defined a new group will be created. A sample import file might look something like this:
"amy", "12345", "Amy Swansen", "aswansen@quadbase.com", "admin", "Marketing","Security Level 1"
"tom", "12345", "Tom Weeks", "tweeks@quadbase.com", "designer", "Executive","Security Level 2"
"sarah","12345", "Sarah Jensen", "sjensen@quadbase.com", "viewer", "Marketing","Security Level 1"
If you have a convenient delimited file with users that you want to import into the ERES, log in as an administrator and then open the Admin Console. Make sure you are on the User List tab.
In the Import User List from Text File section, there will be a or button allowing you to import the delimited file. Click on the button.
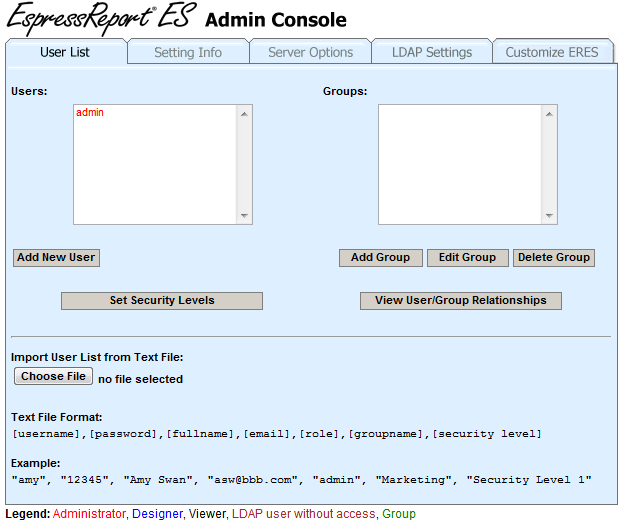
User List tab of the Admin Console
| Note |
|---|---|
The button may be different in other web browsers (the screen shot was taken in Safari), but it will always do the same thing - if you click on the (or ) button, a browse dialog will pop up allowing you to select a file. |
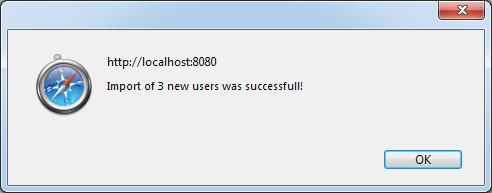
Select the delimited file and confirm the browse dialog. The following message should show up confirming that the users, groups and security levels were imported successfully.
Instead of creating new users and groups in ERES, you can re-use existing users and groups. ERES allows you to retrieve users and groups from an existing database, integrate with an LDAP server, or implement your own logic/methods to supply ERES with users and groups. The security provider interface provides an API that allows you to implement any custom logic to return user's, groups, and user/group relationships. For more information about configuring ERES to use existing users and groups, please see Section 8.2 - Integrating Existing Users/Groups. For more information about LDAP integration, please see Section 1.4.1.4 - LDAP Settings.
On the User List page, there is also a button to . When you click this button, a dialog will pop up allowing you to create, remove, and configure security levels within ERES. For more information regarding security levels please see Section 2.3.3 - Security Levels.

Set Security Levels Dialog
To add a new security level, click on the button and provide a level name. You can add any number of users and groups into each security level. To do so, click on the security level name in the list box and click the button. This will present a dialog allowing you to select existing members and groups and add it to the security level. You can also remove members and security levels by selecting the item and using the and buttons respectively. Click when you are finished.
Please note that all security level changes will take effect immediately.
The Setting Info tab contains configurations and settings critical to the way ERES functions.
Setting Info Dialog
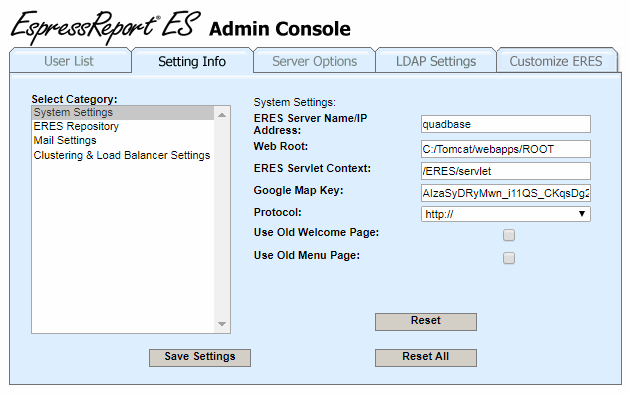
The first category, System Settings, presents the server information.
- ERES Server Name/IP Address:
This is the host name or IP address of the machine on which ERES is installed. This is generally configured during installation, but can be changed here if necessary.
- Web Root:
This is the web root for the server in which you've deployed ERES. If you installed ERES with Tomcat, this should be configured automatically. However, if you use a different database than the default HSQLDB, this field will need to be reconfigured. For tomcat, the default web root is
/webapps/ROOT/.- ERES Servlet Context:
This is the context in which the servlet collection for the ERES server, and deployment options are deployed. If you installed ERES with Tomcat, the default context is
ERES/servlet. If you change this option, you will need to re-start the server for it to take effect.- Google Map Key:
This is the key used for designing and viewing Google Maps. Please note that this must be changed to a key mapped for your machine, otherwise Google Maps will not appear. Please see Section 4.3 - Google Maps for Google Map details.
- Protocol:
This tells the system whether to use HTTPS with SSL or regular HTTP to connect to the sever.
- Use Old Welcome Page:
Brings back the old ERES start page design.
Please note that changing protocol here is not enough to setup the system to work with SSL. You also have to configure your application server and update URLs of the existing files in Organizer. The recommended way is to reinstall your product and use the HTTPS option in the installer that sets up everything automatically (see Section 1.3.1 - Installing ERES for more details). It is not enough to do upgrade install, you have to perform full installation. Be aware that full installation overwrites internal ERES database, so you loose all the files inserted in Organizer. Please back them up before making the full installation.
If you cannot or do not want to make the full installation, you can still configure SSL manually. To do that, please follow these steps:
Change the protocol in the Admin Console as described above.
Get (or generate) SSL certificate, install it on your application server (following instructions of your application server) and set up your application server to use HTTPS.
Start your application server and access ERES start page using the HTTPS (if you changed port number, do not forget to use the new one).
Start Organizer and update your URL Mapping to use the new protocol (and new port if it has changed). See Section 2.1.5 - URL Mapping for more details about URL Mapping.
Run Repair Broken Links to update URL Mapping for all files in Organizer. See Section 2.1.6 - Repairing Broken Links for more details about this feature.
If you use the
ERESHome.htmlshorcut to access ERES start page, please also update the protocol (and port) in your<ERES_INSTALLATION_DIRECTORY>/ERESHome.html.
If you are switching from HTTPS to HTTP, use similar instructions. Just replace HTTPS with HTTP and skip generating the SSL certificate.
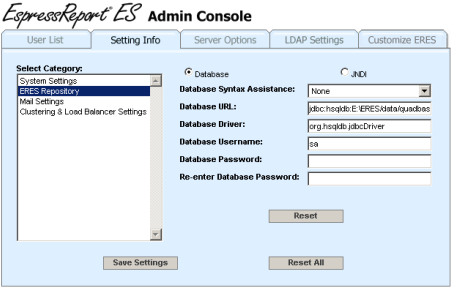
Database Repository
The second category ERES Repository describes the current database configuration options. You can use either a database connection or through JNDI. For database, you need to specify the following information.
- Database URL:
The JDBC URL to the database.
- Database Driver:
The JDBC Driver to the database.
- Database Username:
The username used to connect to the database.
- Database Password:
The password used to connect to the database. This field needs to be reentered in the next line to ensure validity.
You can use the drop down box to help in set up the connection by setting up a template of the URL and Driver.
Note that if you make a mistake while entering the database connection details, it may cause ERES not to run properly. In that event, the only way to correct it would be to be open <ERES Install Directory>/WEB-INF/classes/QB.properties file and edit the entries for DatabaseUrl, DatabaseDriver, DatabaseUserName and DatabasePassword. Depending on how the file was generated, the entries may not be grouped together.
The following is an image of the JNDI connection options. Not all components need to be completed in order to connect to the JNDI server.
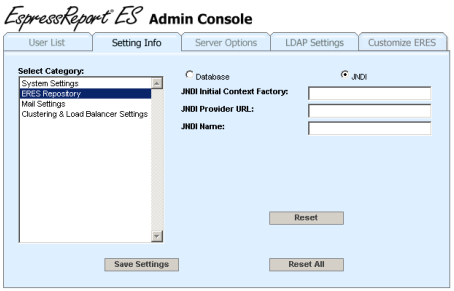
JNDI Repository
- JNDI Initial Context Factory:
The JNDI initial context factory specifies the class used to connect to the JNDI server. If you wish to use the application server's default context factory, you can leave this field blank.
- JNDI Provider URL:
The URL to the JNDI Provider. If the provider URL is already set up in the application server environment, you can leave this field blank.
- JNDI Name:
The name for the JNDI connection. Frequently, the name contains the prefix
java:comp/env/. This field is required.
Mail Settings allow you to specify the SMTP information that ERES will use when sending scheduled e-mails to users.
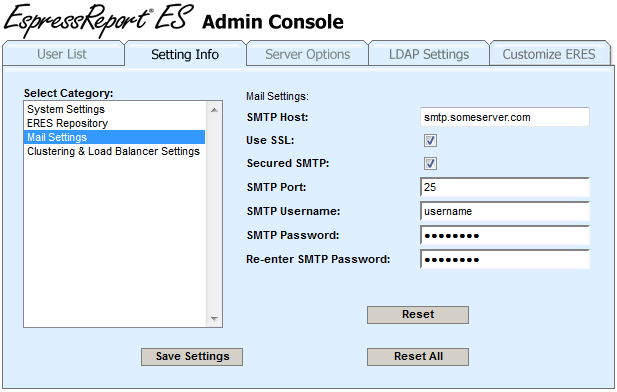
Mail settings
SMTP Host: | This is the host or ip address of the SMTP server. |
Use SSL: | Enable this if the SMTP server uses SSL/TLS. |
Secured SMTP: | Enable this if username and password are required to send mail from this server. |
SMTP Port: | This is the port for the secured SMTP server. |
SMTP Username: | Specify the username to use to log into the server. |
SMTP Password: | Specify the password for the email account. Enter again on the next line to verify. |
Clustering & Load Balancer Settings are used when you want to run ERES in a Clustered environment.
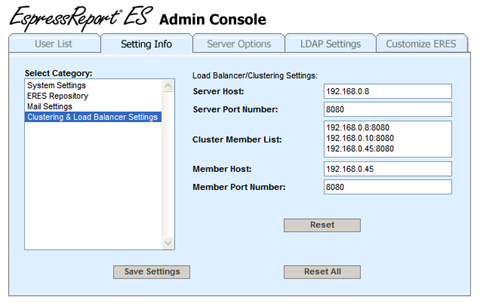
Clustering & Load Balancing
- Server Host:
This is the machinename or ip address of the load balancer.
- Server Port Number:
This is the port number for the load balancer.
- Cluster Member List:
This is the machinename or ip address of the cluster members. The first entry should always be the load balancer.
- Member Host:
This is the machinename or ip address of current node in the cluster.
- Member Port Number:
This is the port number for current node in the cluster.
The Server Options tab contains a number of server configuration options.
The following configuration categories are available from this tab:
- User List:
This category shows you which users are currently logged into ERES, either viewing or creating reports or charts.
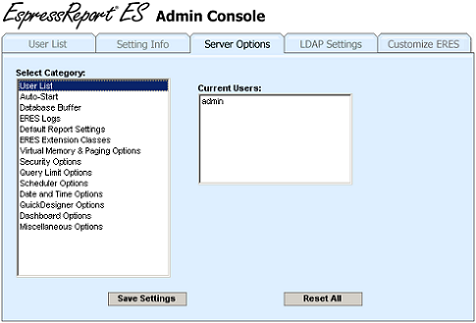
User list Dialog
- Auto-Start:
These options allow you to specify whether the server should be started automatically and what configuration should be used.
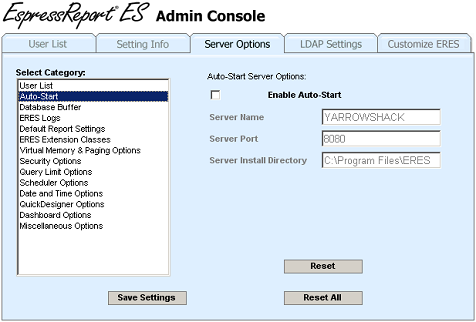
Auto-Start Options
- Database Buffer:
These options allow you to set the database connection buffering feature. If a database is being used as the data source for a report or chart, you can choose to buffer both the database connection and the data used for the report or chart using this feature. The number of connections and queries that will be stored, depends on the number of buffers from 1 to 999. The number of buffers is set in the Buffer Number dialog.
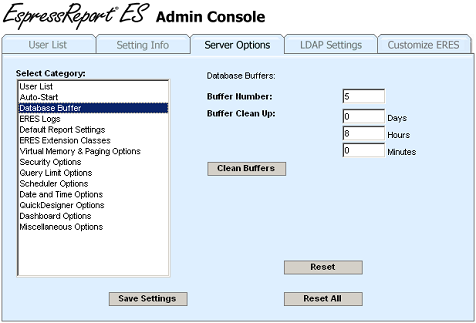
Database Buffer Options
- Buffer Number:
The number of buffers to use ranging from 1 to 999.
- Buffer Cleanup:
You can also specify the clean-up interval for database buffers in the Server Monitor. This interval indicates how often the buffers will be flushed, and the queries re-executed when reports/charts are run. You can specify the interval in days, hours, and minutes, by specifying the values in the appropriate dialogs.
- Clean Buffers:
You can immediately clean the database buffers by clicking the button.
- ERES Logs:
ERES provides two levels of logging activities.
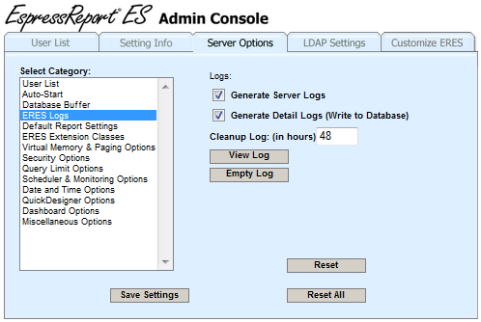
ERES Logs Options
- Generate Server Logs:
The Generate Server Logs option allows you to turn on/off the ERES Server logs. When this option is enabled, ERES writes a log file on the server-side that monitor the ERES installation. ERESServer.log monitors all of the client-server communitcation for the system, as well as the report generation. Any errors or exceptions are printed.
- Generate Detail Logs (Write to Database):
The Generate Detail Logs (Write to Database) option creates an in depth report of all activities related to ERES. A full list of logged activities are described in Appendix 1.A - ERES Details Log. To view this log, click on the View Log icon. This will pop up a report of the recent ERES activities. You can adjust the refresh rate of this report by entering a number in minutes for the refresh interval. By default, the report will maintain the last 48 hours of events, but you can adjust this duration by changing the Cleanup value.

- Default Report Settings:
These options allow you to specify global formatting, and font mapping XML files that will apply by default to new reports.
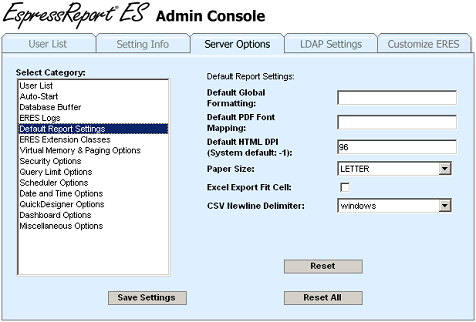
Report Setting Options
- Default Global Formatting:
The global formatting properties will be applied any time a user elects to create a blank report in Report Designer or QuickDesigner.
- Default PDF Font Mapping:
The font mappings will be applied by default anytime the report is exported to PDF. For more information about PDF font mapping, see Section 3.16.3.1 - PDF Font Mapping.
- Default HTML DPI (System default: -1):
This argument allows you to set the screen resolution that should be used when reports are exported to various format. By default, the system resolution is used, however this can cause some discrepencies when reports are generated on a Linux or Unix server and viewed on a Windows client. Generally in these scenarios, setting the DPI to 96 will produce a consistent export. Setting -1 will use the system default resolution.
- Paper Size:
This argument allow you to set the default paper size. Available options are LETTER or A4
- Excel Export Fit Cell:
Set this argument to true if you want to fit numeric values into single cells when exporting your report to Excel from the Menu Page, DHTML Viewer, or Dashboard. By default, this option is false.
- CSV Newline Delimiter:
This option allow you to set a default delimiter for all CSV exports.
- ERES Server Extension Classes:
These options allow you to specify classes that invoke the server extension options for ERES.
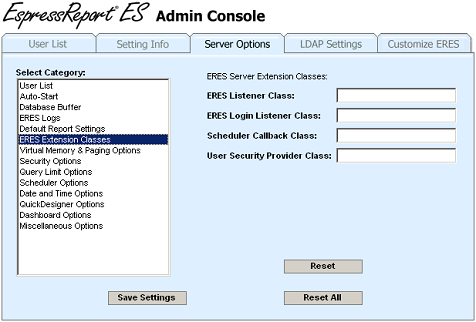
ERES Server Extension Options
- ERES Listener Class:
The ERES Listener Class allows you to implement listeners for server-driven report and chart execution. This includes reports and charts run from the Menu Page repository or via Dashboard URL calls. With these listeners in place, reports and charts will be passed to the custom code prior to final execution. For more information about the ERES Listener, see Section 6.4 - Menu Page Listener.
- ERES Login Listener Class:
The ERES Login Listener Class allows you to modify the database users connect to when they run reports and charts in the dashboard. For more information please see Section 7.3.4 - Login Listener.
- The Scheduler Callback:
The Scheduler Callback class allows you to provide a class that will be called when a schedule job completes. The class is called when the export/transmission of the report is successful, and if the schedule job fails. For more information about the scheduler callback, please see Section 7.7.5.1 - Getting Details of a Failed Schedule
- User Security Provider Class:
The User Security Provider class allows you to specify the class which implements the methods to return your users, groups, and security relationships for use with ERES. For more information about the security provider interface, see Section 8.2.2 - Implementing UserSecurityProvider. Note that you do not have to setup the security provider if you are connecting to an LDAP server.
- Virtual Memory/Paging Options:
For reports with large result sets, the paging feature reduces the amount of memory needed by using a virtual memory paging system. This system will write the data to temporary files on the hard drive once the specified memory usage is reached. You can specify the parameters for the paging feature using the options listed below. Please note that the older record set options (Max Records in Memory, Max Characters Per Field, and Record Paging Buffer Size) are no longer available.
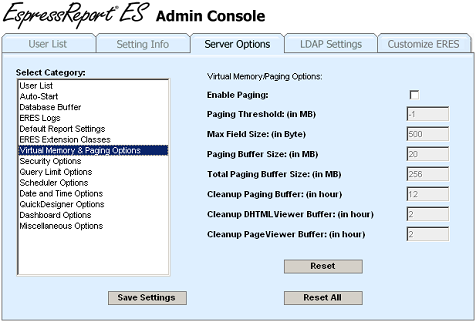
Virtual Memory/Paging Options
- Paging Threshold:
This argument specifies when the paging feature will be activated. If this argument is set to “-1” then data will never be paged. This value is independent of Page Buffer Size option. If this value is larger than the Paging Buffer Size, then the system will begin paging when the threshold is reached, not when the Paging Buffer Size is reached. Therefore each report or chart might use more memory than the amount specified in the Page Buffer Size. If this value is equal to or lower than the Paging Buffer Size, the paging feature will begin when the Paging Buffer Size is reached. This value is set in Megabytes.
- Max Field Size:
This argument specifies the expected maximum field size for large field types such as varchars. Fields that are larger than this value are not necessarily truncated. The behavior depends on the current memory usage in relation to the Total Paging Buffer Size allowed. As the amount of available memory decreases the amount of data stored for these large fields will decrease until it reaches this value. For example, a user is running a report with a field size that is larger than the specified Max Field Size value. When the server is not busy and there is ample memory available, the report will generate the full field without any truncation. However, when the server is heavily loaded and the available memory is near 0, the field in the report will be truncated to the Max Field Size. For numeric, boolean, date, time, and character datatypes, the data will never be truncated. For those database fields that are defined with a size limit smaller than the Max Field Size (e.g. Max Field Size = 500, but the field is defined as varchar(20)), the database limit will be used in place of the Max Field Size. This value is set in Bytes.
- Paging Buffer Size:
This argument allows you to set the amount of memory that each report or chart will use when the paging feature is invoked. The size of the buffer affects performance. The larger the buffer size, the faster the report or chart is generated, but more memory is used. When the amount of total memory used by the paging system approaches the Total Paging Buffer Size, the Paging Buffer Size provided to new reports will begin to diminish in order to avoid exceeding the specified total amount. This value is set in Megabytes.
- Total Paging Buffer Size:
This argument allows you to set the total amount of memory used by the paging feature across all reports and charts. The memory allocated to each report will diminish as the memory usage approaches this value. This value is set in Megabytes.
- Cleanup Paging Buffer:
This argument allows you to specify the cleanup interval for the temporary files used in the paging feature. Typically, these files are deleted when the reports are finished, however under rare circumstances (e.g. server crashed), these files are left on the server. The cleanup thread takes care of these rare scenarios. This value is set in hours;
- Cleanup DHTMLViewer Buffer:
In addition to the memory paging feature, the DHTMLViewer also provides a buffer to improve performance. Transparent to the user, the DHTMLViewer saves the exported pages to temporary files on the server when running reports. The report will be displayed as soon as the first page of the exported report is available. This means that loading a report and navigation between the pages will be very quick since there is no need to rerun the report at each page. The temporary files are deleted automatically upon user log out, however when the user doesn't log out properly, the files are left on the server. This argument, specified in hours, allows you to set the interval for the DHTMLViewer to delete these temporary files.
- Cleanup PageViewer Buffer:
This argument allows you to specify the cleanup interval for the files used in the PageViewer. Similar to the DHTMLViewer, these files help improve performance for users viewing reports in the Page Viewer. These files are typically cleaned up when the user logs out, but if the user does not log out properly, these files will be left behind and require clean up. This value is specified in hours.
- Best Practice:
Generally, if you have a number of large reports, make sure to enable this feature by setting an adaquate paging threshold. Specify the options based on the amount of memory avaiable to your application server. For example, if you are running Tomcat with 512 MB memory, start with 256 MB for the Total Paging Buffer Size and around 10-20 MB for the Paging Threshold. This way, between 10-20 users can be running the large reports without crippling the performance. The reason you should not use 100% of the Tomcat memory is because there are other components that will require memory as well. For instance, the POI libraries will require additional memory when exporting a report to Excel to generate the actual xls file. Each environment will be different, the number of large reports, the size of the result sets, and the number of concurrent users will all affect the optimized option settings. However, as a general starting point, shoot for around 50% of application server memory for the Total Paging Buffer Size. Then set the Paging Buffer Size to be around 2-10% of the Total Paging Buffer Size. The Paging Threshold should not be much greater than the Paging Buffer Size.
- Security Options:
ERES also provides a set of sophisticated security options.
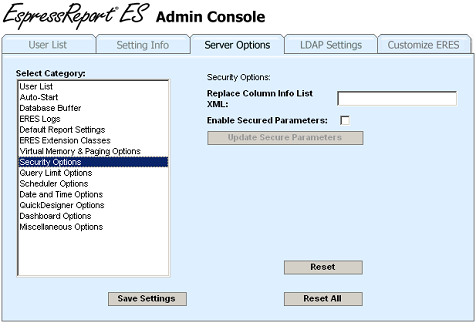
Security Options
- Replace Column Info List XML:
This argument allows you to turn on the automatic decryption feature in quick designer and menu page. The XML file must specify all the information for the column to be decrypted, including database information, table name, and column name. You can specify either an absolute path to the XML file or a relative path to the ERES install directory (i.e.
help/examples/DataDecryption/QBReplaceColumnInfoList.xml). You can find more details as well as an example for this feature in Section 3.18.1.2 - Querying Encrypted Data.- Enable Secured Parameters:
This argument allows you to turn on the secured parameters feature. This feature activates a global security structure allowing you to specify the segments of data that each security level is entitled to view. You can find more details as well as interface for configuring Secured Parameters in Section 1.4.1.3.1 - Secured Parameter.
- Query Limit Options:
These options allow you to set strict limits to the all query execution.
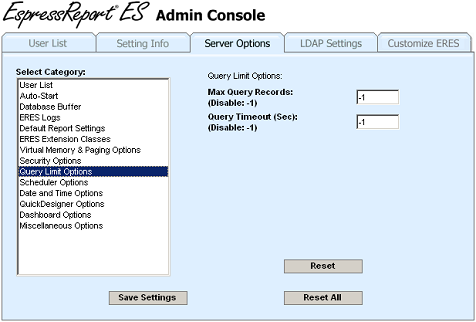
Query Limit Options
- Max Query Records:
This argument allows you to set a maximum limit for the number of records the server will retrieve from a database when executing a query. Once the maximum is reached, the server will stop running the query. If this argument is set to -1 then no query record limit will be applied.
- Query Timeout (Sec):
This argument allows you to specify a timeout interval in seconds for report/chart queries. Once the query execution time passes the timeout argument, ERES will abort the query. This feature prevents users from accidentally creating run-away queries.
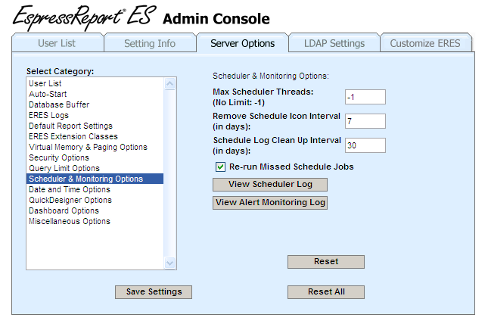
- Scheduler Options:
These options allow you to set some options regarding scheduled reports.

Scheduler Options
- Max Scheduler Threads:
The scheduler thread limit allows you to set the maximum number of schedule jobs that can run concurrently. Additional jobs will be queued until one completes. If this argument is set to -1 then no limit will be placed on the number of concurrent schedule jobs.
- Remove Schedule Icon Interval:
This value allows you to specify how long to retain the schedule icon in the menu page after a schedule has finished. After this duration is reached, the icon will be removed from the Menu Page. However, the exported file will remain in the export directory. The default interval is 7 days.
- Re-run Missed Schedule Jobs:
The re-run scheduled jobs option allows you to specify what should happen if a schedule job fails to execute due to server down-time. If this option is enabled, any missed schedule jobs will run when the server is re-started.
- View Scheduler Log:
Opens scheduler log. To learn more about scheduler log, visit Section 2.2.3.2 - Schedule and Archive Logs.
- View Alert Monitoring Log:
Opens alert monitoring log. To learn more about alert monitoring log, visit Section 10.4.4 - Monitoring log.
- Date and Time Options:
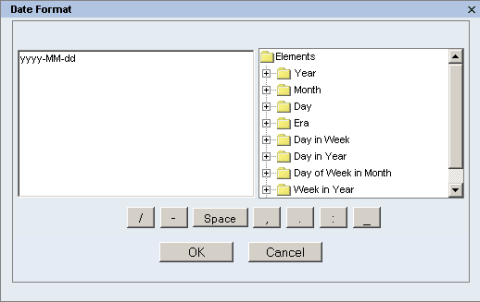
This section allows you to specify a default custom date, time, and timestamp format used when parameters are mapped to a column in a database. When the Custom Date Format option is checked, this is the default format presented to the user.
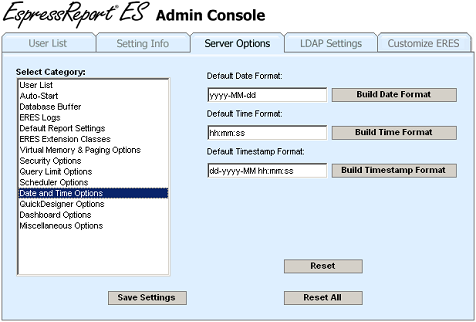
Date and Time Options
Click on the Build buttons to build the custom format. The date/time representations are listed on the right and optional spacers and symbols are shown as a collection of buttons on the bottom. Once you have finished creating the format, click to save.
Custom Timestamp Dialog
- QuickDesigner Options:
This section provides several defaults for the QuickDesigner.
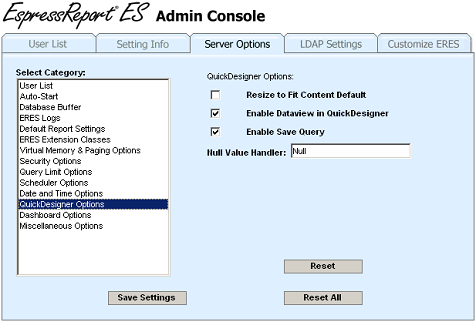
QuickDesigner Options
- Resize to Fit Content Default:
While resize to fit content can be changed in any report within the QuickDesigner, this option allows you to set a default behavior. If you enable this option, all cells in the QuickDesigner will have Resize to Fit Content enabled by default.
- Enable Dataview in QuickDesigner:
This option allows you to disable the data views in quick designers such that the user can only make ad hoc reports based on data view queries, but not from data views. This feature can prevent users from bypassing the data view secured parameters.
- Enable Save Query:
To prevent users from creating too many custom dataview queries, you can disable this option so that users are forced to work from the list of dataview queries that you have provided.
- Null Value Handler:
This option allows you to control the display for null data in the QuickDesigner. The value can be any string that does not contain spaces. To insert a space into the null data handler, use the word SPACE in uppercase. For example: -SPACE- will replace all null values in the QuickDesigner with - -.
- Dashboard Options:
This section provides several defaults for the Dashboard Builder.
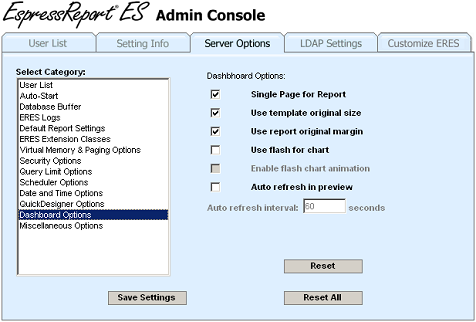
Dashboard Options
- Single page for report:
While the single-page or multi-page layour can be changed in any report within the Dashboard Builder, this option allows you to set a default behavior. If you enable this option, all reports in the Dashboard Builder will have the single-page layout enabled by default.
- Use template original size:
This option allows you to configure the original size of the template to be used by default.
- Use report original margin:
This option allows you to configure the original margin of the report to be used by default.
- Use Flash for charts:
This option allows you to specify whether Flash should be used in charts by default.
- Enable Flash chart animation:
This option allows you to specify whether Flash animation should be turned on in charts by default.
- Auto refresh in preview:
This option allows you to specify whether the previewed dashboard should be refreshed automatically, and if it should be refreshed automatically, you can configure the time interval for refreshing the dashboard preview.
- Miscellaneous Options:
This section contains a number of general options available for ERES.
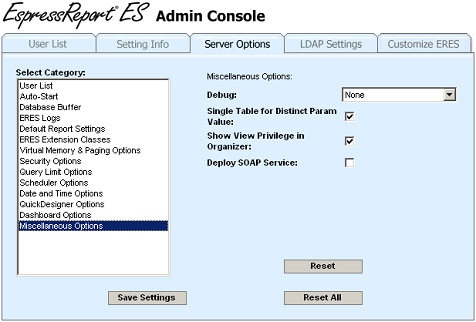
Miscellaneous Options
- Debug:
When setting up the ERES system, you might need to enable the debug option for some components to troubleshoot problems. This option makes it easy to enable the debug statements for Secure Parameter, Replace Column, or Virtual Memory features. Once you restart the server, whenever the feature is invoked, informative outputs will be printed to the system console.
- Single Table for Distinct Param Value:
When you enable this argument, the parameter dialog for parameterized charts and reports will be drawn differently. When you map the parameters to a database column, the distinct list will be drawn be running a select distinct on only the mapped field. The default behavior (without this argument) will use the joins and conditions in the original query to constrain the distinct parameter list.
- Show View Privilege in Organizer:
By default, regular users (with designers role) will not be able to configure file privileges, but they can view them. Disable this option if you do not want users to see the privilege list for organizer files and folders.
- Deploy SOAP Service:
This determines if ERES will deploy the SOAP Lookup Service on start up. The service allow developers to request reports and charts by sending relevant information using SOAP. Details can be found in Section 7.8 - SOAP Interface.
Once you've specified any changes to the options on this tab, click the button to save the changes.
| Note |
|---|---|
The changes will not take effect, nor will your changes display in the Server Options tab until the server is re-started. |
These options can also be directly entered into a Server Command text file. For more information for the Server Commands, please see Appendix 1.B - Server Commands.
ERES contains a feature which allows you to filter data based on a user's security level within the QuickDesigner, Dashboard Builder, Dashboard Viewer and Published Files.
To set up and configure this feature, go to Server Options in the Administration Console, select the Security Options category, Enable Secured Parameters (if it is not checked), and click the button. This will take you to the following dialog.
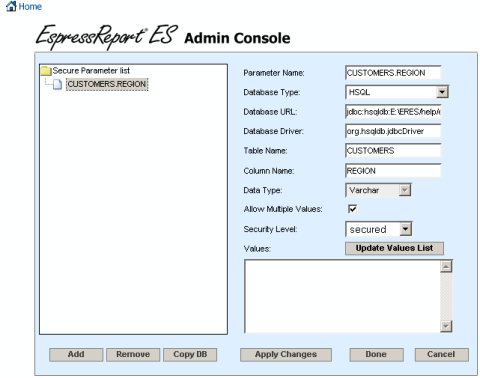
Secured Parameter Dialog
By default, there will be a secured parameter set up for Customers.Region in the HSQL database. You can add more secured parameters at any time by using the or option at any time. The option will copy the database connection information so you don't have to type it in again. Once you have created a new secured parameter or selected an existing one, the options on the right will enable. Fill in each of the options.
- Parameter Name:
This is just a name for the Secured Parameter, you can give it any name.
- Database Type:
This is a syntax assistence drop down box. Selecting the database will place default URL syntax and default JDBC Driver in the corresponding fields. You can then go into the URL and fill in the server specific information.
- Database URL:
Specify the URL for the database you would like to apply the Secured Parameter on. Use the Database Type drop down to assist in the syntax.
- Database Driver:
Specify the driver or use the Database Type drop down to use the default database driver.
- Table Name
Specify the table you would like to apply the Secured Parameter.
- Column Name:
Specify the column you would like to apply the Secured Parameter.
- Data Type:
This field will automatically be configured and is only displayed for verification.
- Allow Multiple Values:
This will determine if security levels will each be able to access only one value or multiple values. If you select multiple values, the Values drop down box will become a list box allowing you to select multiple values.
- Security Level:
Go through the security levels on the system and specify a value or values for each security level. The first time you select a security level, you will need to click the button to retrieve a list of available values for that column.
- Values:
The button will launch a prompt for username and password to this database the first time it is run. Once you have supplied the information, it will retrieve a list of available values for the specified column. You can map a security level to one or more (if multiple is checked) values by clicking and highlighting the row of data. You can also use the Grant All option which allows that security level to view all data in that column.
Once you have set up mappings for secured parameters, click the button. That should bring you back to the Admin Console. Click the button. You will be reminded to restart the ERES server. Confirm the message, go back to the ERES start page, shut down the server and then start it again.
After the server has been restarted, the secured parameters settings will carry through to the QuickDesigner, and Dashboards in ERES. To illustrate the concept, let us walk through a simple example.
Suppose you have a secured parameter set up for the REGION column from the CUSTOMERS table in the Woodview sample database. It specifies the behavior of the filter for six different security levels. For level East the query will be automatically filtered so that only rows where region is East will be returned. For level South the query will be automatically filtered so that only rows where region is South will be returned. For the level Midwest only rows where the region is Midwest will be returned. For the level West only rows for West region will be returned. The Allow Multiple Values attribute allows you to indicate whether multiple parameter values can be specified for the filter, like mapping the EastSouth security level to both East and South. For level Executive, Grant All is selected and all values from the region column will be available.
With the options set up, any time a user creates or runs a query, data view, or data view query in the QuickDesigner that includes the CUSTOMERS table, the filter defined for their security level will be applied. These settings reside on the server, and are not saved into the report, chart, or dashboard. Therefore if the user then creates and saves a report in QuickDesigner and transfers the report to another machine, the security will not be apply. Instead, it will follow the security settings sepecified on the new Server.
For information about applying security filters to data views and data view queries, please see Section 2.4.3.3.3 - Data View Security.
The LDAP Settings tab in the Admin Console provides options that allow you to configure ERES to retrieve users from an LDAP server. To set the LDAP connection, select Use LDAP Security Provider option. The following dialog should open.
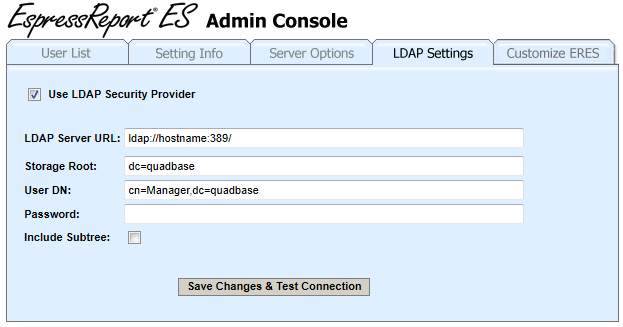
LDAP Settings Dialog
The dialog contains example setting.
To the Storage Root field, enter the distinguished name of the AD node that contains all the users you want to import.
By default, only the given AD node (i.e. the Storage Root node) will be searched for users, excluding it's sub-nodes. If you want to search for users in the storage root node and all of it's sub-nodes, select the Include Subtree option.
In order to connect with ERES you will need to have an user in your LDAP server that can read from the Active Directory. Enter the user's distinguished name in to the User DN field and then type the user's password to the Password field.
Click on the button. If you set the LDAP correctly, the following dialog will show up.
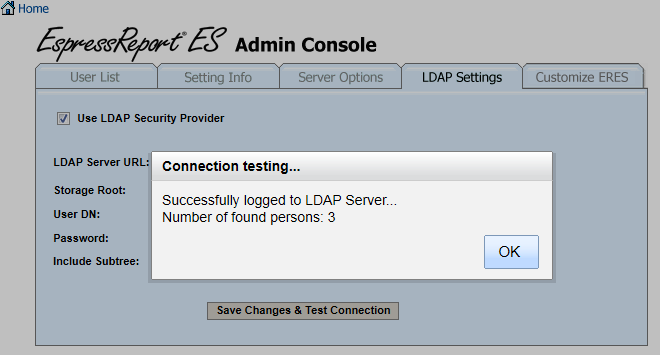
Click . The LDAP users were imported, but haven't been activated yet. To activate the users, click on the Users List tab.

There are some users marked as LDAP users without access in the Users list (user roles are distinguised by their colors - there is a legend for that below the AdminConsole).
Select one or more LDAP users without access. The button will show up'. Click on it.
| Note |
|---|---|
If you include a non-LDAP user in the selection, the 'Insert LDAP User(s)' button will disappear. |
A new window dialog will show up allowing you to select user role for the selected user(s). To learn more about user roles, visit the Part 2, Chapter 3.1.1) User List chapter. Select a user role and click .
The users will not be marked as LDAP Users without access any more. Their color changed from dark red to light red (if you gave them admin privileges), blue (if they are designers) or black (if you gave them viewer rights). They are valid ERES users and they can start using the ERES now.
ERES can be customized to maintain a consistent look and feel for your web application. The customization tab allows the administrator to change the appearance of many components in ERES. When customizing, it is recommended that you save your images and files under different names rather than overwriting existing files in the ERES. This way, you will not have to worry about future updates overwriting your changes.
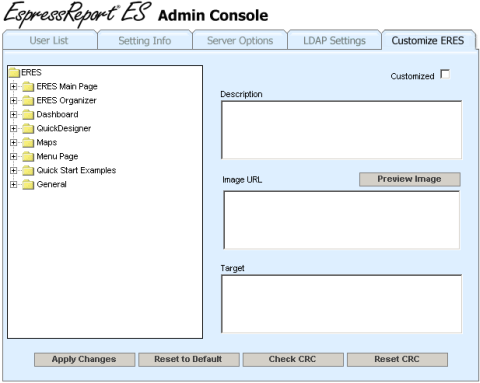
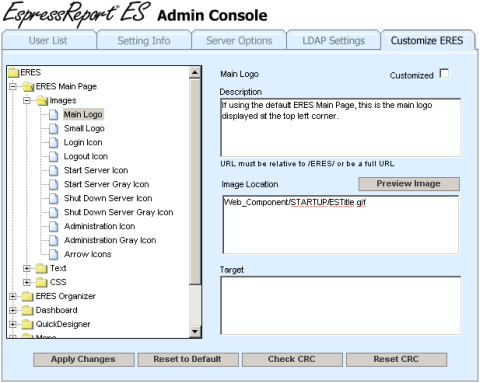
The Customization Interface
The left window provides a tree of the different elements that can be customized. The customizable elements are broken up into sections based on the components in the ERES application. Most sections contain three types of elements: images, text, and CSS files. By clicking on an image element, the page will display the description, an image URL, and a target URL if available. You can change the image file by providing a different URL. Clicking on the button will display the image at the bottom of the screen. The preview window is only available for images, clicking on a text or CSS element will disable the preview window. The target URL is only available for certain elements. If the selected element allows for a target to be set, this text box will appear beneath the image URL box. Enter a URL in this window if you would like to add a hyperlink for this image. If this link is provided, when users click on the image, the browser will be redirected to the target URL.
Preview Image
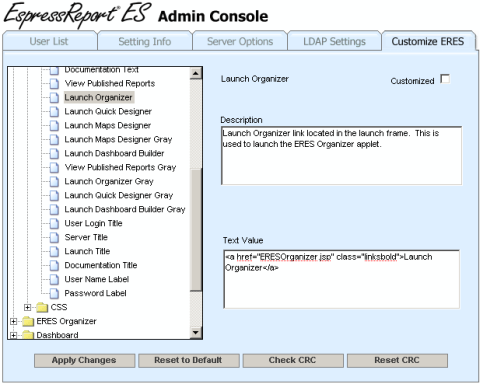
If you select a text node, the page will display the description and a text value. Change the text value to adjust the message or link for this element. The text will be used directly in the ERES application, so you can enter any html tags in the tool. Certain elements also contain a link (e.g. → → ). You can utilize this to redirect the user to another URL if you are not using the default components. For example, if you are using a customized Menu Page, you can modify the link for the Published Files element to point to your customized page. Editing the text value also gives you the ability to add even more CSS to the page.
Customizing Text
Changing the CSS file is quite straightforward, simply enter the url for the new CSS file. It is recommended that you make a copy of the original CSS file and edit the copied version so that future updates will not overwrite your changes. As mentioned earlier, you can specified new CSS elements in customized text elements and enter the style in your CSS file.
When you change the values for any element, the Customized box for that element will automatically check. If you wish to revert back to the default value for this element, simply uncheck the Customized box and choose Okay from the pop up dialog. If you wish to reset all elements to their default values, click on the Reset to Default icon at the bottom.
Once you are finished with your changes, make sure to click Apply Changes to save all changes. To see the changes appear in the ERES application, you will need to shut down the ERES Server and restart it.
There are two full customization examples in the help/examples/Customization folder. To try these examples, rename the ERESCustomization.xml in the ERES root directory and copy the ones from the example directory. Start (or restart) the ERES Server and you will immediately see the changes.
Customization Results
Using this feature, you will be able to alter the look of the application quickly and easily without fear of your changes being overwritten by future upgrades. For image and CSS files, we also add an option that will check the CRC values of the default files to see if these files were changed. After upgrading to a new version of ERES, make sure to click this icon to see if any default files have changed. Sometimes, these changes may need to be implemented in your customized files as well. If files do not match the stored CRC checksum, the tree on the left side will display the elements surrounded by stars.
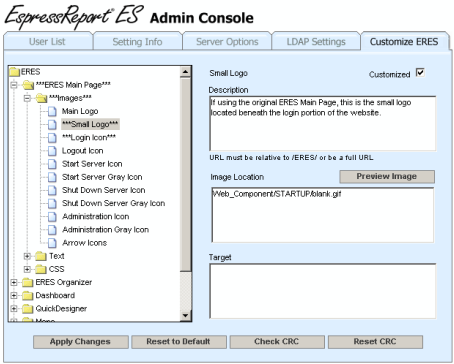
Default File has Changed
Once you have checked the changed files, reset the CRC checksum by clicking on the button on the bottom right corner. This will recalculate the CRC value for every default image and CSS file.
ERES Main Page
While on the subject of customization, there is another option available that allows you to change the look and feel of ERES. ERES Main Page, the gateway to the many components in the product, has been updated to provide easier integration into your web application. In addition to the original index.jsp page, there is also a second main page index2.jsp that relocates the main sections of the page (ERES Server, Login, Launch) into their own frames. Following this example, you can place these components into your own web application in any way you choose.
ERES in Web Application
For example, the ERES Server and Administration Console component is typically only used by the admin. Therefore, you can place this component on an administration page that is not available to the public. If you are using a different database for user authentication, you may chose to omit the login frame all together and only display the launch frame once users have logged in on your site. Using these modularized frames greatly increase the options you have to integrate the application. This feature in conjunction with the Customization tool makes application integration a simple yet effective process.
In addition to the administrator, users can modify some of their own information/settings in ERES. When a user other than the administrator logs in in the Start page, a link will appear in the left-hand dialog labled User Settings.
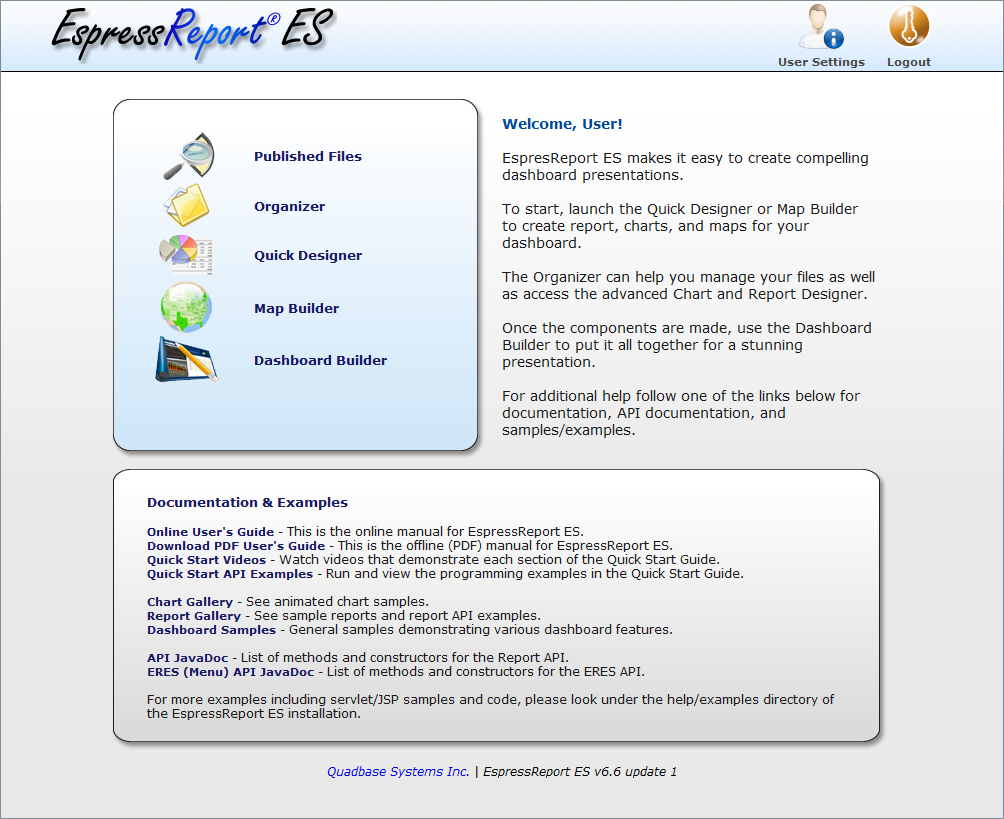
User Logged into ERES Start Page
When the link is clicked, a new window will open that allows the user to modified the email address and password associated with his/her account.
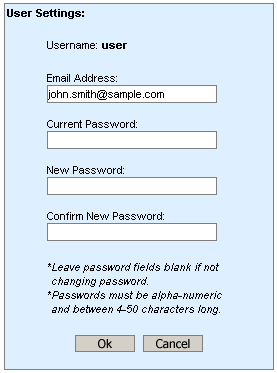
User Settings Dialog
After making the appropriate changes, clicking will save the user changes and close the window.