ERES is capable of scheduling/archiving any chart (.pac, .cht or .tpl) or report (.pak, .rpt or .xml) file that is placed in the Organizer. A schedule will generate an exported file for the report or chart at a regular interval specified by the user. An archive will generate a report or chart template with the current data stored in the template. The periodicity of schedule/archive can be set for specific time intervals, or for fixed days of the week or dates of the month.
To schedule a chart or report, first, select the file in the Organizer that you would like to schedule. You can also select multiple files at once. Then click the button on the toolbar or right click on the selected file and select Set Schedule from the pop-up menu. The first dialog of the scheduling process will open.
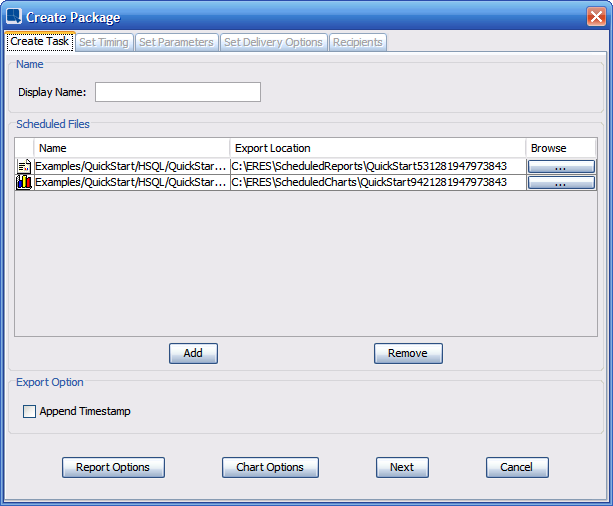
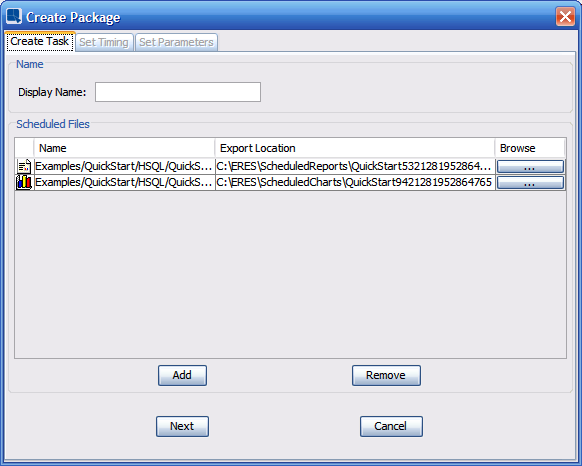
Create task dialog
On this Wizard step, enter a Display Name.
In the Scheduled files list, you can see what files are being scheduled. You can also remove a file from the scheduled task or add a file.
The dialog has following objects:
- Display name:
scheduled task name.
- Scheduled files:
Icon - indicates the type of scheduled file.
 - Chart
 - Report
Name - name of the file
Export location - directory path. The file will be exported to the location at the time when the task is run. You can double click this field to alter the path manually. You can access the exported file from MenuPage by clicking on the
 Schedule icon (as described in Section 6.1.2.1 - Viewing Reports and Charts ).
Browse - clicking the “...” field will bring up a browse dialog allowing you to change file export location. This has the same effect as double clicking the Export location field, only this option allows you to browse file structure.
- Add -
this button allows you to add more files into the scheduled task.
- Remove -
removes selected file from the scheduled task.
- Append timestamp -
appends current time (i.e. time when the task is run) to the exported file's name. Also, if timestamp is appended to filename, the filename is always unique thus every time when the task is run, a new file is added into the export folder. If you disable the Append timestamp option, only one exported file will be kept in the export folder and it will be overwritten every time the task is run.
- Report options -
shows dialog allowing you to set report export format. For reports you can select DHTML, PDF, CSV, Excel (XLS), Excel 2007 (XLSX), text, rich text, or XML. Additional options allow you to select single page or multi-page exporting for DHTML and XML. The button allows you to set format-specific options for the exported file. For DHTML you can set single or multi-page exporting. For DHTML you can also specify which CSS options to use. For PDF you can set encryption and for text you can specify the delimiter. For more information about report exporting options please see Section 3.5.2 - Exporting Reports.
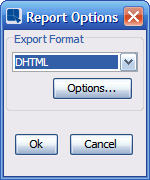
Report Options Dialog
- Chart options -
shows dialog allowing you to set chart export format. For charts you can select JPG, GIF, PNG, PDF, SVG, or FLASH. Other options allow you to specify PNG compression, set JPEG quality, and specify background transparency for GIFs. You can also enable and configure Flash animation if the image depiction should be animated. You can also specify the size of the exported image. For more information about chart exporting options please see Section 3.16.3 - Exporting Charts.
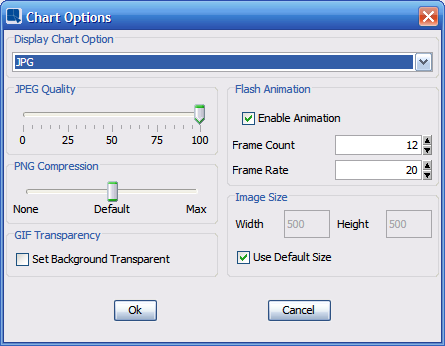
Chart Options Dialog
After you are done setting the first tab options, you can click button and proceed to the Set timing tab.
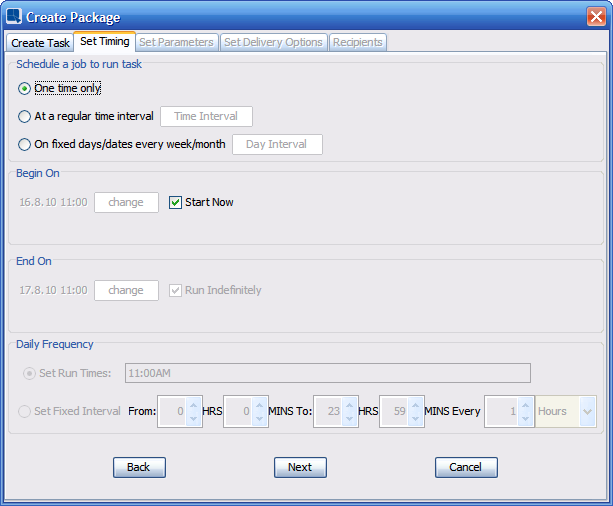
Set Timing Dialog
Set timing tab allows you to set a time pattern of the scheduled task.
You have following timing options:
- One time only:
task is run one time only at pre-defined time. You can choose when the task will be run using the Begin on option (will be described later).
- At regular time interval:
scheduled task will be run at fixed intervals for a pre-defined period of time. For example, you can set the task to be run every X hours (or minutes, days, months...) from Begin on to End on time and date. When you select this option, the Set time interval dialog pops up. This dialog will be described later.
- On fixed days/dates every week/month:
If you need to run your task irregularly, this option should do the trick. It allows you to run the task on certain week day(s) (for example, every Monday and Friday), or certain days of the month (for example, every the first of each month). This is set in the Set fixed days/dates Interval dialog which pops up when you select the option. Also, when you select this option, the Daily frequency section is enabled. These two dialogs will be described later.
You also need to set when the task should start running and when it should stop. You can do this using the following options:
- Begin on:
allows you to set when the task will start running. By default, the Start now option is enabled. It means that the task start time and date will be set two minutes ahead of the time when the creation of the schedule job is finished. If you do not want the task to start immediately, uncheck this option to pick the start time and date from a calendar. You can access the calendar by clicking the button (which is available only when the Start now option is disabled).
- End on:
controls when the task will end. This option is very similar to the Begin on option. The only difference is that the Start now option is replaced by Run indefinitely option. If you choose this option, the task will never stop unless you stop it manually. You can also unselect this option and pick the End on time and date manually from a calendar.

Set Time Interval Dialog
This dialog is enabled only if the At regular time interval option is selected. First of all, choose a time unit (namely, hours and minutes, days or months) that suits your needs. Next, enter a number of the time units that should be waited for between each task runs.
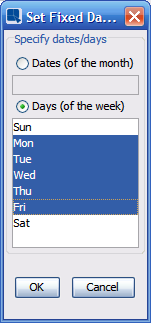
Set Fixed Days/Dates Dialog
This dialog is enabled only if the On fixed days/dates every week/month option is selected. First, choose whether you want to run the task on a weekly basis or on a monthly basis. Next, select days of the week or month task should be run on. After you are done setting this dialog, click and proceed to the Daily frequency settings.
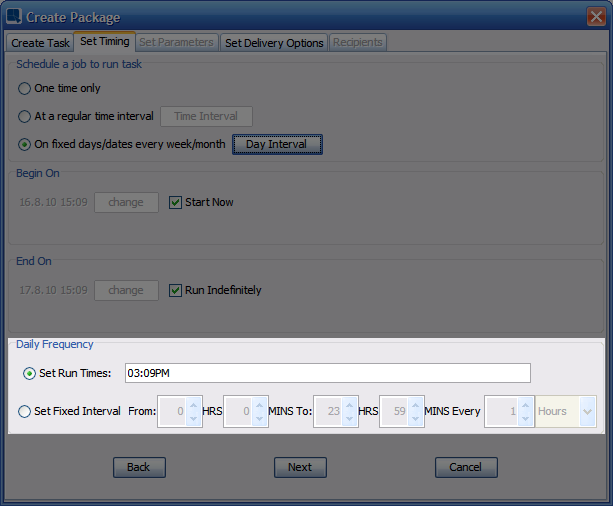
Daily Frequency Settings
After you have set the days of the month/week you want the task to be run on, you have to set when exactly should it be run on those days. That can be done in the Daily frequency section. You have two basic options:
- Set run times -
allows you to manually enter the run times. You can add as many values as you want. You can use 12-hour or 24-hour format. Individual values are comma separated. For example: 08:05AM, 11:15PM, 22:35
- Set fixed interval:
use this option to run the task periodically from the From: time to the To: time every X hours/minutes. To set the times, you can use up and down arrows or you can enter the value manually (click in the field and type a number). If you enter an incorrect time (for example, 11:65), the value will be marked with red color. Correct values are marked with green color.
Once you have finished specifying the periodicity, click to continue with the Schedule Wizard.
If you have selected to schedule a report or chart that contains parameters, the next tab will appear allowing you to set the parameter values that you would like to use.
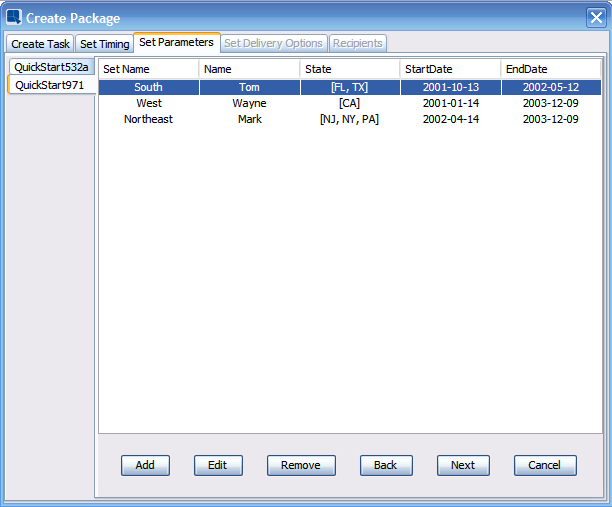
Set parameters dialog
To add a set of parameters, click the button. This will bring up the parameter prompt dialog allowing you to select the set parameter values that you would like to use. Once you have selected a parameter set, your choices will appear in the dialog. You can add as many different combinations of parameter sets as you want. A separate file will be generated for each parameter set.
You can also specify a name for each parameter set by double clicking on the first column. The name specified here will be used in later dialogs to help you organize your recipients.
Once you have added all parameter sets, click the button to continue.
After you have finished setting up the schedule, you will be prompted to select delivery methods. These options allow you to email the generated files, print the exports, and upload the exported files to a FTP server. You do not have to select any additional delivery options.
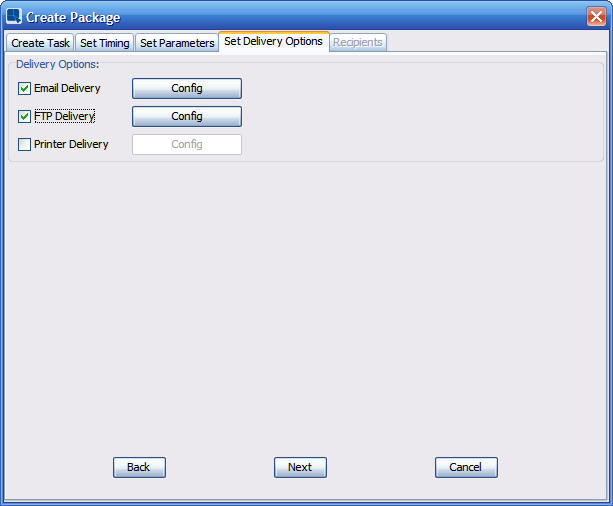
Delivery Options Dialog
If you select a delivery option, click the button to configure the delivery method.
When you click the 'Config' button for email delivery the following dialog will open allowing you to set an email message:
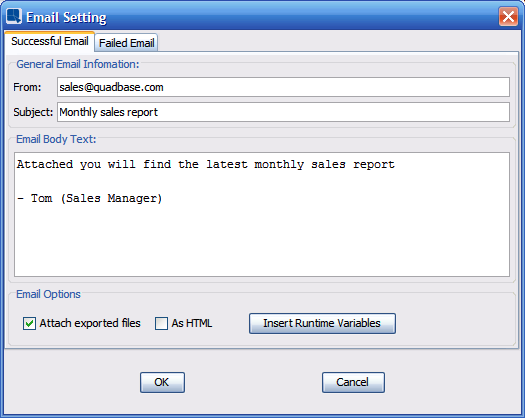
Email Settings Dialog
The first tab contains information for the email sent when the report or chart has successfully exported. The General Email Information portion of this tab allows you to specify the from addresses for the email as well as the subject.
The first tab is called Successful email and it allows you to set an email message which will be sent in case the scheduled task finished with no problems.
There are the following elements:
- From:
enter an email address into this field. This address will be used as an email sender's address. Please make sure that your SMTP server will not reject the address (depends on your SMTP server security settings).
- Subject:
email subject. Enter any convenient text in here.
- Email Body Text:
enter a message that will be sent on every task run. You can enter any text and also, you can use Runtime variables (will be described later).
- Attach exported files:
allows you to attach all exported reports and charts to the email.
- As HTML:
if this option is enabled, the email body text will be replaced by the scheduled report or chart in HTML format. This option is available only if the Attach exported files is enabled and there is only one scheduled report/chart in the scheduled task. Also, PDF, SVG and Flash charts ca mot be added into HTML emails and only DHTML reports can be added into HTML emails. You can set the export format on the Create task tab, as described in Section 2.2.1 - Setting a Schedule.
- Insert Runtime Variables -
allows you to insert certain variables into the email body text. Variables are replaced by real values at the task run time. All variables also have a “default value”. If no convenient data can be inserted into the variable, the default value is used (for example, when user has not provided his/her name). You can choose between following variables:
- <USERNAME> -
recipient's user name. For example: you can use this variable in a salutation like “Hello <USERNAME>”. This variable works only for email recipients that were chosen from the ERES database (will be described later). If you add an email address to recipients list manually, no username is displayed because no username was provided.
- <FULLNAME> -
recipient's full name. Just like the <USERNAME> variable, this variable also does not work for manually entered recipients email addresses.
- <EMAIL> -
recipient's email address.
- <TIMESTAMP> -
current time and date. Shows when the email was sent.
- <PARAMETERS> -
list of all parameter sets and parameter values.
- <SAVED_LINKS> -
links of all scheduled files. Users can access the exported files through these links.
- <LIVE_LINKS> -
links of all scheduled files. Unlike the <SAVED_LINKS>, these links lead to the DHTML Viewer which allows users to access current version of the scheduled files.
![[Note]](../../../images/note.png) | Note |
|---|---|
In order to send email correctly, the SMTP host needs to be set up. How to configure a SMTP server is described in Section 1.4.1.2 - Setting Info. |
The Failed Email tab allows you to send a different email (subject and body) to your recipients if an error has occurred during the task running (for example: one of the scheduled reports has been removed).
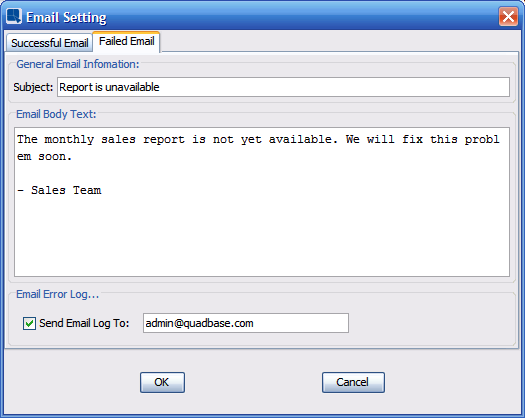
Failed email settings dialog
This tab also allows you to send the error logs to a specific user. Typically, this would be the admin or technical user who is able to diagnose and troubleshoot the problem.
When you click the button for FTP delivery, the following dialog will open, allowing you to set options for FTP schedule delivery.
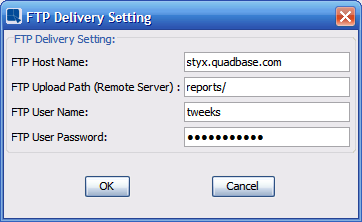
FTP Delivery Options Dialog
The following information is required for FTP schedule delivery:
- FTP Host Name:
This is the host name of the FTP server to which you would like to upload the reports. If you have a Secure FTP Server (SSH FTP), enter
sftp://in front of the hostname.- FTP Upload Path:
This is the path or directory (relative to the FTP root) where you would like to write the exported report files.
- FTP User Name:
This is the user name for the FTP server.
- FTP Password:
This is the password for the FTP server.
When you click the button for printer delivery, the following dialog will open allowing you to set options for the print schedule delivery.

Printer Delivery Options Dialog
The first drop-down dialog contains a list of all the available system and network printers. You can select which one you would like to use. The second option allows you to select a page range for printing. You can print all of the pages or set a specific range. -1 represents the last page. Example, if you want to print all of the pages except for the first one, set the range to From 2 , To -1.
If you selected the email delivery, the next tab allows you to specify the recipient list. The recipient list is set up differently depending on the type of report or chart you are scheduling. If the report or chart contains parameters, you will see the following dialog. This allows you to send different parameter sets to different users or groups.
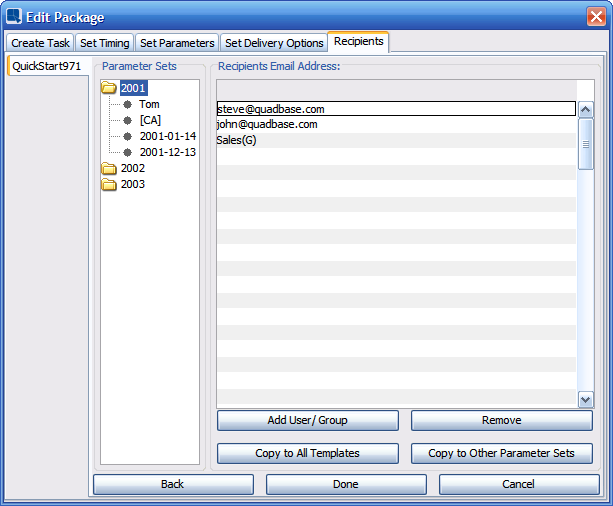
Set Recipients Dialog for Parameterized Reports
Entering recipients into the list is simple, click on the icon to select users and groups from the ERES database. You can also add regular email addresses by double clicking any row in the recipients list and typing it in manually. You may also click on and view the Prev. List tab for the previously listed recipients.
If you want to send all parameter sets or all templates to the same recipients, you do not have to add the recipients manually into all parameter sets and templates. Just add the recipients into one recipients list and then use one of the following buttons:
- Copy to all templates:
click this button to copy current recipient list into all scheduled templates (reports, charts) recipient lists.
- Copy to other parameter sets:
allows you to copy current recipient list to the rest of the parameter sets.
If you are scheduling a grouped report (such as a summary break report) and the report is using a database as a datasource, you will see the option for report bursting as well. Screenshots and detailed information for report bursting can be found in the Section 2.2.1.3.1 - Report Bursting.
For all other cases, you will see the following dialog containing only the recipients list.
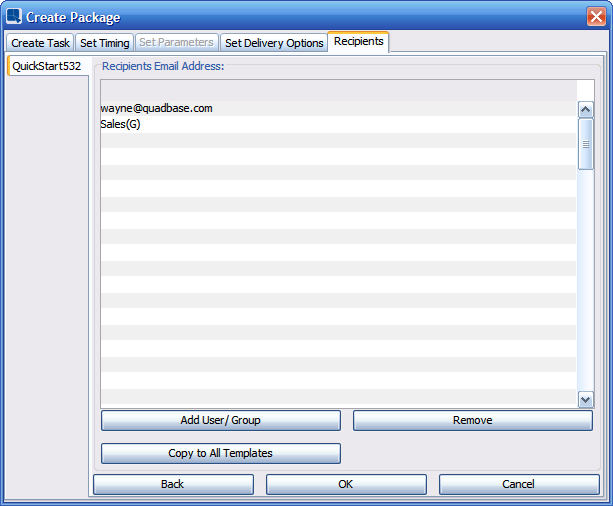
Set Recipients Dialog
If the scheduled report contains grouped data (like a summary break report), you can enable “report bursting”. When a report is burst, the main report is divided into smaller reports and each group report is then sent to a different recipient. The recipients are taken from a database column so you do not have to enter them manually for each group of data. This feature offers significant performance and security improvements over running many small reports. The report burst option is available only for database data sources (MySQL, MS SQL, Oracle etc...).
If the report contains grouped data, the recipients dialog will contain a bursting option at the top.
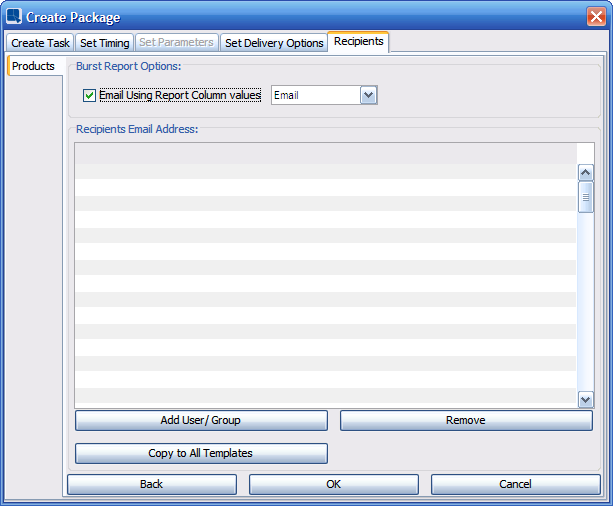
Report Bursting
To set up the burst report feature, the report has to have a column that contains email addresses that correctly correspond to the group by (row break) column. For example, if the report is an account statement grouped by a customer id column, the report must also contain a column that contains the email address for each customer. Note that the email column does not need to be visible in the report in order to use the bursting feature.
If the report meets the aforementioned requirements, you can enable report bursting by selecting the option Email Using Report Column Values at the top of the dialog. This will run a single query for the report, break the report up by groups, export each group, and deliver the exports to the email address listed for each group.
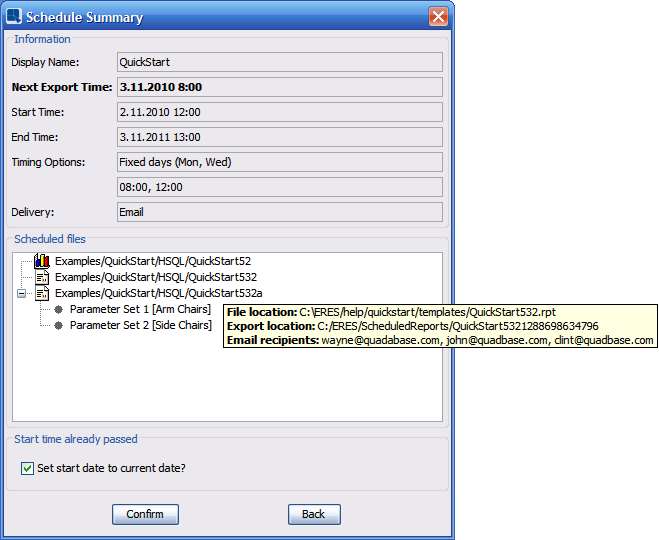
After you confirm the last step of the Create Package Wizard, the Schedule summary dialog pops up. It offers you a quick overview of the scheduled task you have just finished configuring. If you are satisfied with the task's settings, click . If not, click to go back to the Create Package wizard.
It is recommended to always check the Next Export Time. If you are not satisfied with the next export time, it indicates that the timing has been set wrong. You can click and revise the timing settings.
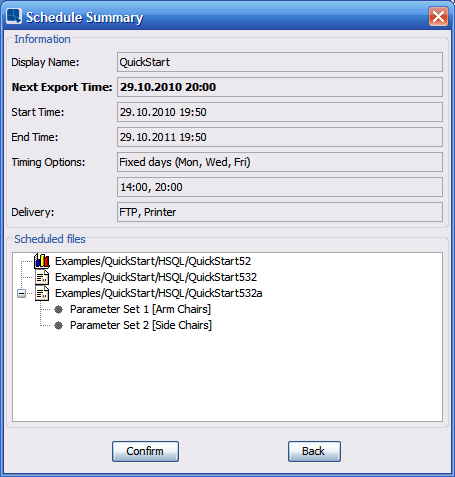
Schedule Summary
The Schedule Summary dialog has only one setting - Set start date to current date. This setting appears only when the start time has already passed. If you select this option, start time will be automatically set to current date/time.
Move the mouse over a scheduled object (report, chart, etc) in the Scheduled files list to display file and export locations.
If the email delivery is enabled, the tooltip also displays email recipients for the scheduled object. If the object has some parameters, there is a tooltip for each parameter set displaying email recipients.
Schedule Summary
In addition to scheduling, which periodically exports the chart or report to a static file, ERES also supports archiving. An archive is similar to a schedule job except that instead of exporting a static copy of the report or chart, a version of the chart or report template is saved. The archived template contains all the data for that report or chart, thus saving a historical snapshot of the data that can be run/viewed at a later date.
To setup an archive, select the report or chart that you would like to use in the Organizer, and select Set Archive from the Schedule/Archive menu, or right click and select Set Archive from the pop-up menu. The following dialog will appear allowing you to set the name and location of the archive:
Set Archive Dialog
From this screen you are prompted to specify a Display Name for this archive. You can also elect to specify the location and file name (without extensions) for the saved archive or allow the server to assign a location and file name. Note that each time the archive runs a new file will be created (the file name is appended with a timestamp) creating a distinct file for each version. Archived files can also double as backup that can be used to restore old report/chart template version.
Set archive wizard is just a simpler version of the Create scheduled task wizard that was described in the previous chapters.
Once you have set the initial options for the archive, the next two tabs allow you to set the periodicity for the archive, and supply parameter sets (if any). These operations are exactly the same as for setting a schedule discussed in Section 2.2.1 - Setting a Schedule.
Archives cannot be delivered since they are in templates rather than exported formats. They can be accessed from the menu page, which will show a special icon ![]() for files that are archived (as described in Section 6.1.2.1 - Viewing Reports and Charts).
for files that are archived (as described in Section 6.1.2.1 - Viewing Reports and Charts).
You can see a list schedules or archives, by selecting View schedule tasks from the Schedule/Archive menu. A window will open with a list of all of the currently active schedule and archive jobs. The list displays the schedule name, task type (SCH for scheduled tasks, and ARCH for archive tasks) and the next export time. This window also allows you to edit, remove, and immediately run the schedule or archive at the moment.
The Schedule/Archive menu also contains a very similar option called View alert monitoring tasks. This is useful when you are working with alerts monitoring. To learn more about alerts monitoring, please visit Section 10.4 - Monitoring.

View Scheduled Tasks
The Edit option in the View Tasks window allows you to modify the existing schedule or archive. The edit dialog looks very similar to the Create scheduled task dialog. However, rather than having to go through the steps in sequence, you can skip to any section by clicking on the tab names. There is also a button, which allows you to exit the dialog whenever you are satisfied with your changes.
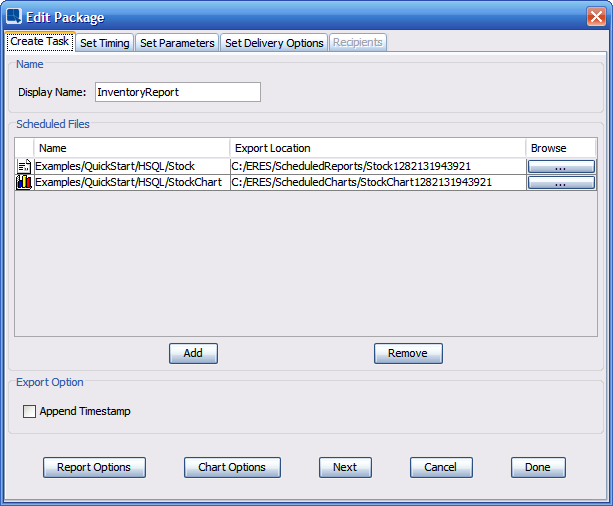
Edit Scheduled Task Dialog
The admin also has the ability to view a log report containing detailed information about previously run schedules and archives. To view the detailed Scheduler Log, log in as the admin, and go into the administration console. In the Server Options tab, under the Scheduler & Monitoring Options section, click on the icon.
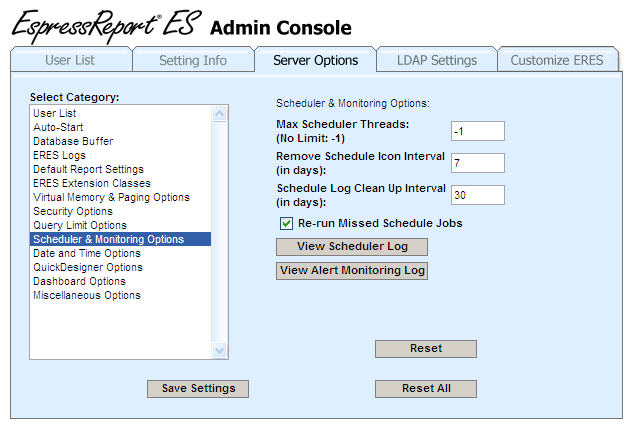
Admin Console
This will pop up a window containing the Scheduler Log. The root report displays information regarding the schedule list. This not only includes the currently active schedules and archives, it also includes any completed schedules and archives.
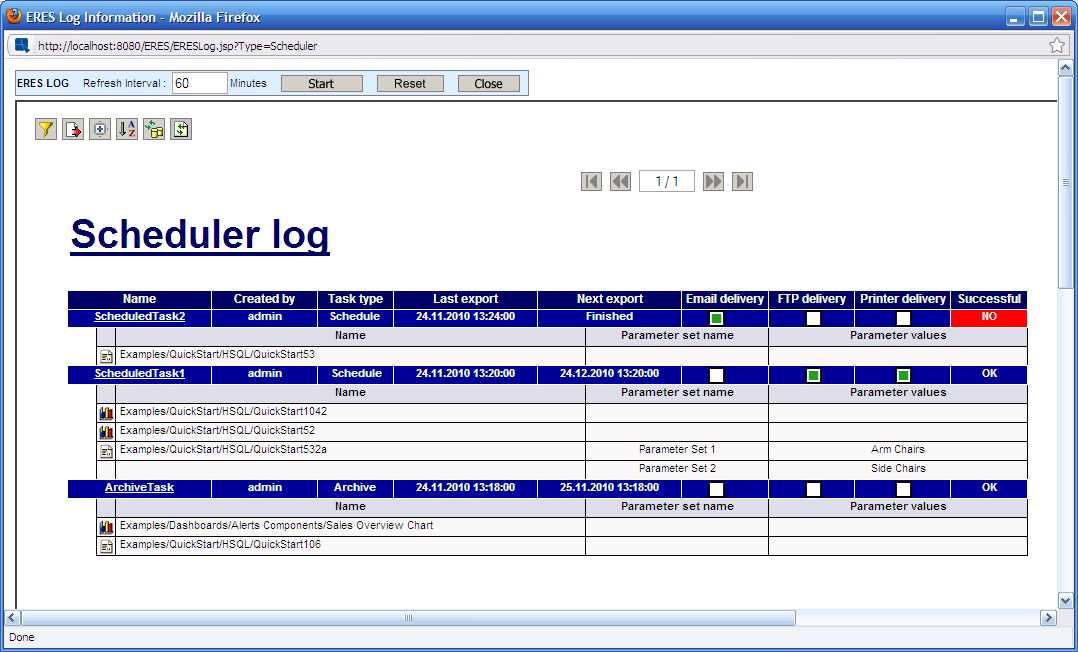
Scheduler Log
| Note |
|---|---|
The list contains only tasks that have been run at least once in the past. If there are no such tasks, Scheduler log will not be visible. A“No tasks found!” warning message will be displayed instead. |
All tasks in the Scheduler Log have Task type indicator which tells whether the task is a schedule or an archive.
If you do not want the completed schedules and archives to be on the list, you can filter them out. Click on the ![]() icon, set the Show finished tasks? parameter to false and click .
icon, set the Show finished tasks? parameter to false and click .
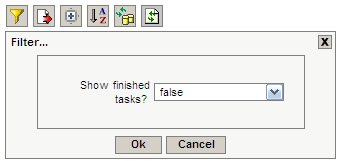
Scheduler Log Filter
The successful field indicates whether the task was run successfully during the last export time. If one of scheduled templates could not be exported or one of delivery methods could not be performed, the successful field will look like this:  . If that happens, you can get more detailed information in the task's drill-down. This will be discussed later.
Under each task's header, there is a list of its files. If there are several parameter sets added to a single template, the file will take several rows in the list, but its name will be displayed only once (as displayed in the following picture).

Parameterized Report
The list contains one drill-down. If you click on a scheduled task name, another report will open, providing detailed information about the particular task.
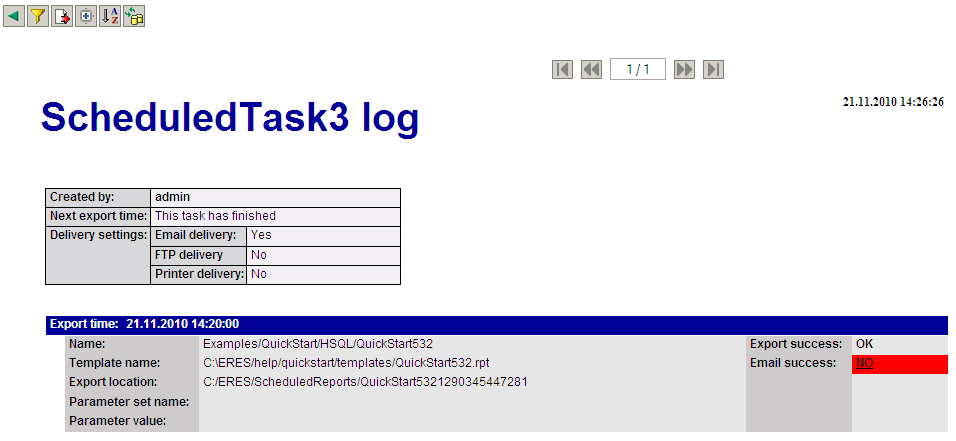
Scheduler Log - Second Level
All tables between two consecutive blue headers show details for files that were run at the same run time.
Each scheduled file and parameter set has its own table. In the left part of the table, you will find file details, namely: name (also doubles as organizer path), template name (also doubles as disk path), export location, and parameter settings.
In the right part of the table, there are export and delivery methods results. All files have the Export success indicator. It indicates whether the file was successfully exported. This is the most important indicator, because if the file wasn not exported successfully, there is no file to be delivered by the delivery methods. If the export fails, be sure to check whether the template can be accessed by the ERES server (it could have been removed or renamed), if the export location can be accessed (there is enough free disk space and the ERES server has write permission to the directory) and if the file's data source can be accessed.
Each delivery method has its own indicator. If some delivery method was not enabled for the scheduled task, its indicator will not be visible in this table. If a delivery indicator is visible, you can click on it to drill-down.

Export and Delivery Success
This log level can be also filtered. The log can either contain all exports or just failed exports. To enable the filter, click on the ![]() Filter icon and set the Failed exports only parameter to true.
Filter icon and set the Failed exports only parameter to true.
To return back to the root level, click on the ![]() Back icon.
Back icon.
Email Delivery Log
If you click on an Email delivery indicator in the second Scheduler Log level, email delivery log will open. It contains details for one file and one run time only. Each email recipient has one table which shows whether the email was sent successfully to the recipient's email address. If the delivery fails, an error message will be displayed.
For example:
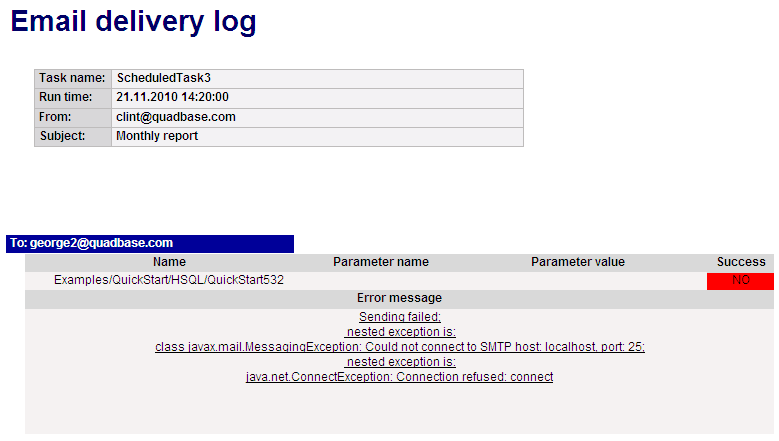
Failed Email Delivery Details
In the previous picture, there is a failed email delivery. The log shows that an email from clint@quadbase.com to george2@quadbase.com (not actual email addresses) couldn't be sent because the ERES server wasn't able to connect to SMTP host at localhost:25. It could be caused by a network problem or by incorrect SMTP settings (as described in Section 1.4.1.2 - Setting Info). This is probably the most common problem with email delivery.
FTP delivery
FTP delivery log is much simpler – there is only one “recipient” so there is only one table. The table contains information about the scheduled file, ftp settings, run time, and success indicator and in case the delivery has failed – an error message. You can see such situation in following picture. The problem is that the ERES server was not able to connect to gamma.quadbase.com FTP host (not an actual FTP host).
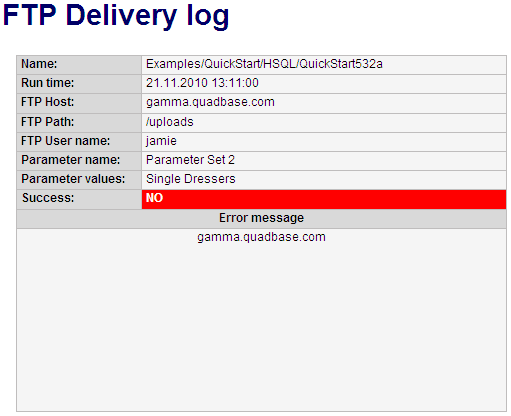
Failed FTP Delivery
Printer Delivery Log
Printer delivery log is very similar to the FTP delivery log. It shows file and printer details and an error message (only in case the delivery has failed).

Successful Printer Delivery
To go back to the second log level, click on the ![]() Back button.
Back button.